SpringBoot- Spring Initializr Example
we are using Spring Initializer(https://start.spring.io) to create a template for spring boot application
1. Go to https://start.spring.io , Choose Dependencies & Generate Project. Here we are not selecting any dependencies because it is just a Hello world program

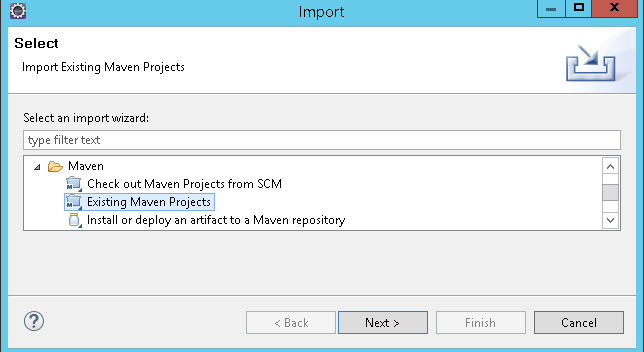
2. Open Eclipse, import→ Maven →Existing Maven Projects → Select Project →Finish
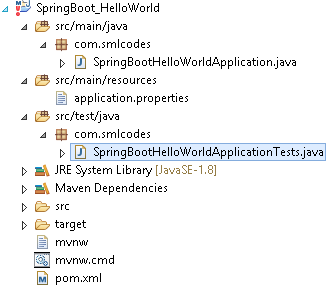
3. The Project structure will be as follows if we open eclipse Package explorer
4. If we open the pom.xml it contains only basic dependencies like spring-boot-starter which allows start spring boot application
<project>
	<modelVersion>4.0.0</modelVersion>
	<groupId>com.smlcodes</groupId>
	<artifactId>SpringBootDemo</artifactId>
	<version>0.0.1-SNAPSHOT</version>
	<parent>
 <groupId>org.springframework.boot</groupId>
 <artifactId>spring-boot-starter-parent</artifactId>
 <version>1.5.6.RELEASE</version>
	</parent>

	<dependencies>
 <dependency>
 	<groupId>org.springframework.boot</groupId>
 	<artifactId>spring-boot-starter-web</artifactId>
 </dependency>
	</dependencies>

	<properties>
 <java.version>1.8</java.version>
	</properties>
</project>
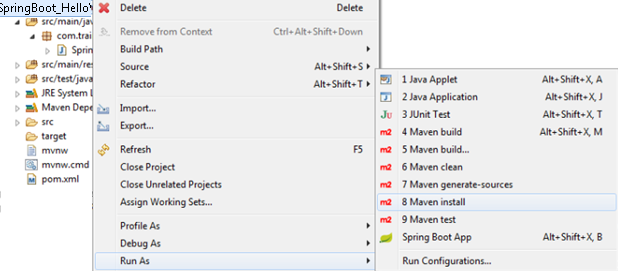
5. Select Project, Right click Run as→ maven install to download and install the dependencies.
6.Spring boot generates the default java class which contains main() method. The main method calls the run method of SpringApplication. SpringApplication.run(SpringBootHelloWorldApplication.class, args); This run method bootstraps the application starting spring which will run the embedded Tomcat Server. Let’s add some helloworld message to print
package com.smlcodes;
import org.springframework.boot.SpringApplication;
import org.springframework.boot.autoconfigure.SpringBootApplication;

@SpringBootApplication
public class SpringBootHelloWorldApplication {
	public static void main(String[] args) {
 SpringApplication.run(SpringBootHelloWorldApplication.class, args);
 System.out.println("============================================");
 System.out.println("Hello World, Spring Boot!!!!");
 System.out.println("=============www.smlcodes.com===============");
	}
}
7. Select the Java file and right click RunAs → Java Application
\\ / ___'_ __ _ _(_)_ __  __ _ \ \ \ \
( ( )\___ | '_ | '_| | '_ \/ _` | \ \ \ \
 \\/  ___)| |_)| | | | | || (_| |  ) ) ) )
  '  |____| .__|_| |_|_| |_\__, | / / / /
 =========|_|==============|___/=/_/_/_/
 :: Spring Boot ::        (v1.5.1.RELEASE)
2017-01-31 11:05:32.745  INFO 29596 --- [           main] s.c.a.AnnotationConfigApplicationContext : Refreshing org.springframework.context.annotation.AnnotationConfigApplicationContext@646007f4: startup date [Tue Jan 31 11:05:32 IST 2017]; root of context hierarchy
2017-01-31 11:05:43.108  INFO 29596 --- [           main] o.s.j.e.a.AnnotationMBeanExporter        : Registering beans for JMX exposure on startup
2017-01-31 11:05:43.200  INFO 29596 --- [           main] c.s.SpringBootHelloWorldApplication      : Started SpringBootHelloWorldApplication in 12.855 seconds (JVM running for 16.094)
============================================
Hello World, Spring Boot!!!!
=============www.smlcodes.com===============
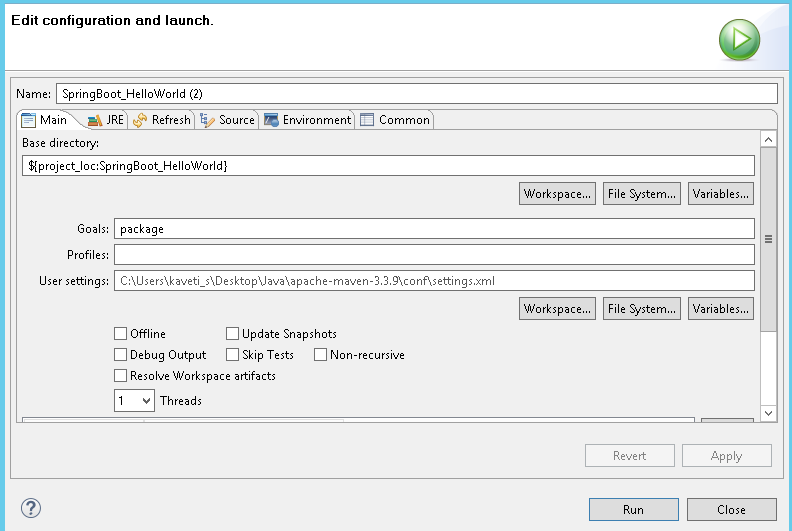
8.We can also run this application from the command line using the jar file that is generated. To get the jar file, select pom.xml right click** RunAs → Maven Build (2nd one), goals=package, Apply & Run**
[INFO] Building SpringBoot_HelloWorld 0.0.1-SNAPSHOT
[INFO] ----------------------------------------------------------------------
C:\Users\kaveti_s\Desktop\Downloads\SpringBoot_HelloWorld\SpringBoot_HelloWorld\target\SpringBoot_HelloWorld-0.0.1-SNAPSHOT.jar
[INFO] --- spring-boot-maven-plugin:1.5.1.RELEASE:repackage (default) @ SpringBoot_HelloWorld
[INFO] -------------------------------------------------------------------
[INFO] BUILD SUCCESS
[INFO] -------------------------------------------------------------------
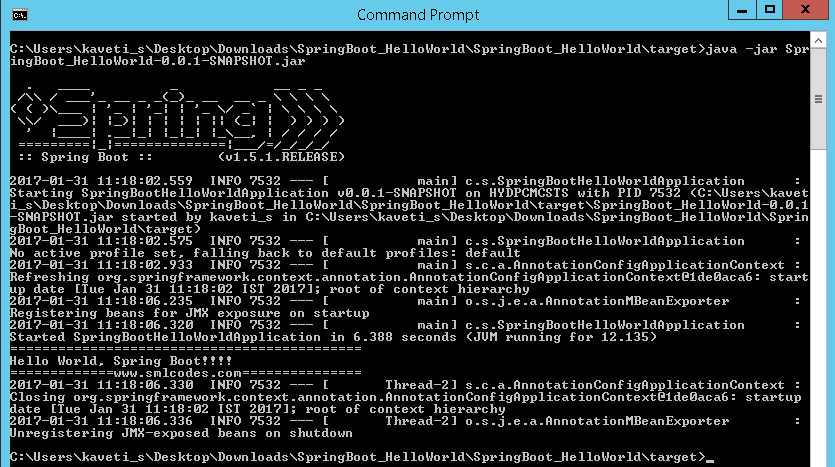
9.Open command line and go to the folder where your project is located. Next, move to the target folder and then type java -jar «filename».jar.
java -jar SpringBoot_HelloWorld-0.0.1-SNAPSHOT.jar
How it works internally
-
we place the all the required Spring boot starters in pom.xml which are requires for implementing Spring Boot application. on loading project, the all required starter dependencies are added automatically to the project
-
By running Spring Boot main class, at @SpringBootApplication line it will do the Auto configuration things, it will automatically add all required annotations to Java Class ByteCode.
-
On Executing main() method SpringApplication.run() used to bootstrap and launches Spring Boot application.
1.Spring Boot Starters
Spring boot Starters are the one-stop-shop for all the Spring and related technology that we need . For example, if you want to get started using Spring and JPA for database access, just include the spring-boot-starter-data-jpa dependency in your project, and you are good to go.
All official starters follow a similar naming
pattern; spring-boot-starter-*, where * is a particular type of
application. The following are the some of the application starters are provided
by Spring Boot under the org.springframework.boot group
| Name | Description |
|---|---|
| spring-boot-starter-web-services | Starter for using Spring Web Services |
| spring-boot-starter-web | Starter for building web, including RESTful, applications using Spring MVC. Uses Tomcat as the default embedded container |
| spring-boot-starter-test | Starter for testing Spring Boot applications with libraries including JUnit, Hamcrest and Mockito |
| spring-boot-starter-jdbc | Starter for using JDBC with the Tomcat JDBC connection pool |
| spring-boot-starter-jersey | Starter for building RESTful web applications using JAX-RS and Jersey. An alternative to spring-boot-starter-web |
| spring-boot-starter-aop | Aspect-oriented programming with Spring AOP and AspectJ |
| spring-boot-starter-security | Starter for using Spring Security |
| spring-boot-starter-data-jpa | Starter for using Spring Data JPA with Hibernate |
| spring-boot-starter | Core starter, including auto-configuration support, logging,YML |
In above Example we used spring-boot-starter & spring-boot-starter-test Starters which are configure in pom.xml
<dependencies>
 <dependency>
 	<groupId>org.springframework.boot</groupId>
 	<artifactId>spring-boot-starter</artifactId>
 </dependency>
 <dependency>
 	<groupId>org.springframework.boot</groupId>
 	<artifactId>spring-boot-starter-test</artifactId>
 	<scope>test</scope>
 </dependency>
</dependencies>
2.@SpringBootApplication Annotation
This annotation marks the class as a spring bean, configures the application by adding all the jars based on the dependencies and also scans the other packages for spring beans.
Spring Boot developers always have their main class annotated with @Configuration, @EnableAutoConfiguration and @ComponentScan.
-
@Configuration – Specifies this class as a spring bean
-
@EnableAutoConfiguration –
-
This tells how you want to configure Spring, based on the jar dependencies that you have added. & also Enable / Disable auto configuration.
-
Spring Boot auto-configuration attempts to automatically configure your Spring application based on the jar dependencies that you have added.
-
For example, if HSQLDB is on your classpath, and you have not manually configured any database connection beans, then Spring Boot auto-configures an in-memory database
-
We can disble AutoConfiguration specific files by @EnableAutoConfiguration(exclude={DataSourceAutoConfiguration.class})
-
-
@ComponentScan – is to scan other packages for spring beans.
-
@Import - used to import additional configuration classes
-
@ImportResource -annotation to load XML configuration files
import org.springframework.boot.SpringApplication;
import org.springframework.boot.autoconfigure.EnableAutoConfiguration;
import org.springframework.context.annotation.ComponentScan;
import org.springframework.context.annotation.Configuration;

@Configuration
@EnableAutoConfiguration
@ComponentScan
public class Application {
    public static void main(String[] args) {
        SpringApplication.run(Application.class, args);
    }
}
Since these annotations are so frequently used together Spring Boot provides a convenient @SpringBootApplication as an alternative. The @SpringBootApplication annotation is equivalent to using @Configuration, @EnableAutoConfiguration and @ComponentScan with their default attributes.
@SpringBootApplication = @Configuration + @ComponentScan +@EnableAutoConfiration.
The original @SpringBootApplication annotation class is defined as below
package org.springframework.boot.autoconfigure; @Target(ElementType.TYPE)
@Retention(RetentionPolicy.RUNTIME)
@Documented
@Inherited
@Configuration
@EnableAutoConfiguration
@ComponentScan
public @interface SpringBootApplication {
	Class<?>[] exclude() default {};

	String[] excludeName()default{};

	@AliasFor(annotation = ComponentScan.class, attribute = "basePackages")
	String[] scanBasePackages() default {};

	@AliasFor(annotation = ComponentScan.class, attribute = "basePackageClasses")
	Class<?>[] scanBasePackageClasses()default{};
}
3.SpringApplication Class
SpringApplication class is used to bootstrap and launch a Spring application from a Java main method. By default, class will perform the following steps to bootstrap your application:
-
Create an appropriate ApplicationContext instance (depending on your classpath)
-
Register a CommandLinePropertySource to expose command line arguments as Spring properties
-
Refresh the application context, loading all singleton beans
-
Trigger any CommandLineRunner beans
In most circumstances the static run(Object, String[]) method can be called directly from your main method to bootstrap your application:
public static void main(String[] args) {
    SpringApplication.run(MySpringConfiguration.class, args);
}
4. Embaded Servlet containers
The following embedded servlet containers are supported out of the box.By default we will get Tomcat
| Name | Servlet Version | Java Version |
|---|---|---|
| Tomcat 8 | 3.1 | Java 7+ |
| Tomcat 7 | 3.0 | Java 6+ |
| Jetty 9.3 | 3.1 | Java 8+ |
| Jetty 9.2 | 3.1 | Java 7+ |
| Jetty 8 | 3.0 | Java 6+ |
| Undertow 1.3 | 3.1 | Java 7+ |
5.Spring Boot Profiles (@Profile Annotation)
Spring Profiles provide a way to segregate parts of your application configuration and make it only available in certain environments. Any @Component or @Configuration can be marked with @Profile to limit when it is loaded
@Configuration
@Profile("production")
public class ProductionConfiguration {

    // ...

}
In the normal Spring way, you can use a spring.profiles.active Environment property to specify which profiles are active. You can specify the property in any of the usual ways, for example you could include it in your application.properties:spring.profiles.active=dev,hsqldb or specify on the command line using the switch –spring.profiles.active=dev,hsqldb.
6. Spring Boot Actuator
Spring Boot provides actuator to monitor and manage our application. Actuator is a tool which has HTTP endpoints. when application is pushed to production, you can choose to manage and monitor your application using HTTP endpoints.
To get production-ready features, we should use spring-boot-actuator module. We can enable this feature by adding it to the pom.xml file.
<dependencies>
    <dependency>
        <groupId>org.springframework.boot</groupId>
        <artifactId>spring-boot-starter-actuator</artifactId>
    </dependency>
</dependencies>