Spring Boot – Logging
Spring boot’s provide default logging mecahnisum, which is written with Apache Commons Logging
SpringBoot supports ERROR, WARN, INFO, DEBUG, or TRACE as logging level. By
default, logging level is set to INFO. It means that code>DEBUG and TRACE
messages are not visible.
To enable debug or trace logging, we can set the logging level in
application.properties file. Also, we can pass the –debug or –trace arguments
on the command line while starting the application.
# In Console
-Dlogging.level.org.springframework=ERROR
-Dlogging.level.com.howtodoinjava=TRACE

# In properties file
logging.level.org.springframework=ERROR
logging.level.com.howtodoinjava=TRACE
Example
 org.slf4j.Logger;
 org.slf4j.LoggerFactory;

@SpringBootApplication
  Application
{
       Logger =LoggerFactory.(Application.);

       main(String[] args) {
        SpringApplication.(Application., args);
        .info("Simple log statement with inputs {}, {} and {}", 1,2,3);
    }
}
Using @slf4j annotation
To use SLF4J for logging in a Spring Boot application, you typically use the @Slf4j annotation provided by Lombok, a library that helps reduce boilerplate code in Java.
Use @Slf4j Annotation: In your Spring component (e.g., service, controller, etc.), use the @Slf4j annotation to automatically generate a logger field for you:
import lombok.extern.slf4j.Slf4j;
import org.springframework.stereotype.Service;

@Service
@Slf4j
public class MyService {

    public void doSomething() {
        log.info("Doing something...");
        // Your code here
    }
}
The @Slf4j annotation generates a logger named log for the class, which you can use to log messages.
Spring Boot - Devtools
If you have worked on latest UI development frameworks e.g. Node, angular, gulp etc. then you must have appreciated the auto-reload of UI in browser whenever there is change in some code. Its pretty useful and saves a lot of time.
To enable dev tools in spring boot application is very easy. Just add the
spring-boot-devtools dependency in your build file.
<dependencies>
    <dependency>
        <groupId>org.springframework.boot</groupId>
        <artifactId></artifactId>
        <optional>true</optional>
    </dependency>
</dependencies>
Static Resource Caching
To improve the performance, dev tools cache the static content/template files to serve them faster to browser/client.
There are many such UI template libraries that support this feature. e.g. thymeleaf, freemarker, groovy, mustache etc.
#spring.freemarker.cache = true //set true in production environment
spring.freemarker.cache = false //set false in development environment; It is false by default.

//Other such properties
spring.thymeleaf.cache = false
spring.mustache.cache = false
spring.groovy.template.cache = false
Automatic UI refresh
The spring-boot-devtools module includes an embedded LiveReload server that can be used to trigger a browser refresh when a resource is changed
spring.devtools.livereload.enabled = false #Set false to disable live reload
SpringBoot Acuator - Health check, Auditing, Metrics,Monitoring
Actuator brings production-ready features to our application.
Monitoring our app, gathering metrics, understanding traffic or the state of our database becomes trivial with this dependency.
<dependency>
    <groupId>org.springframework.boot</groupId>
    <artifactId>spring-boot-starter-actuator</artifactId>
</dependency>
Some of important and widely used actuator endpoints are given below:
| ENDPOINT | USAGE |
|---|---|
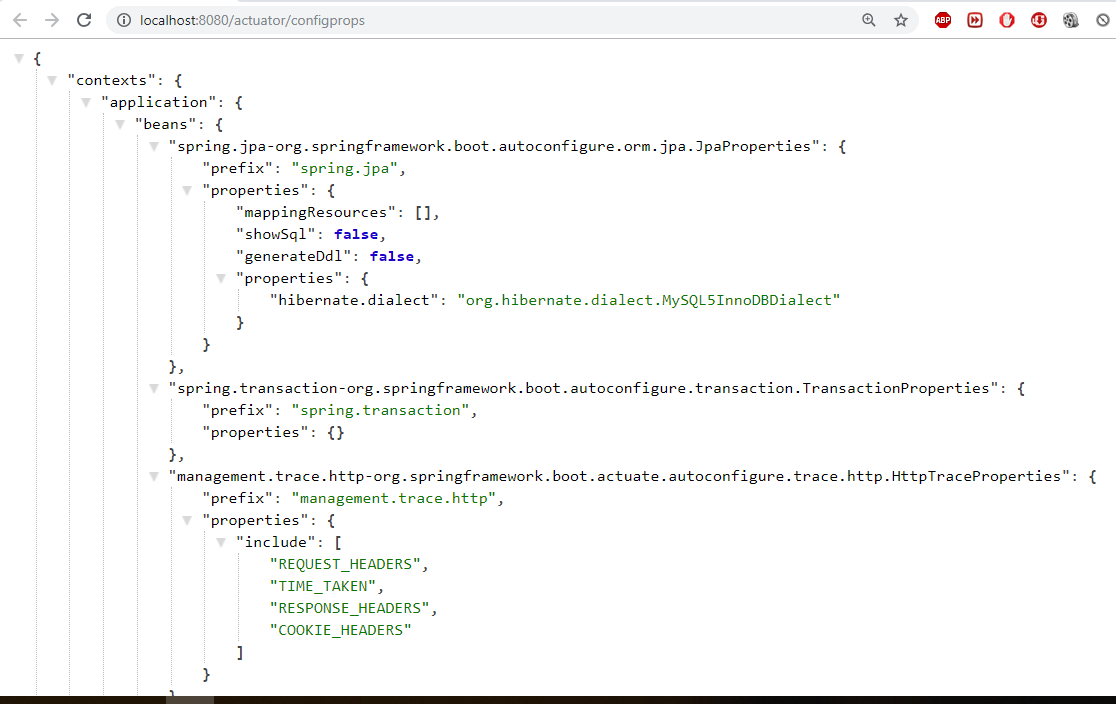
| /env | Returns list of properties in current environment |
| /health | Returns application health information. |
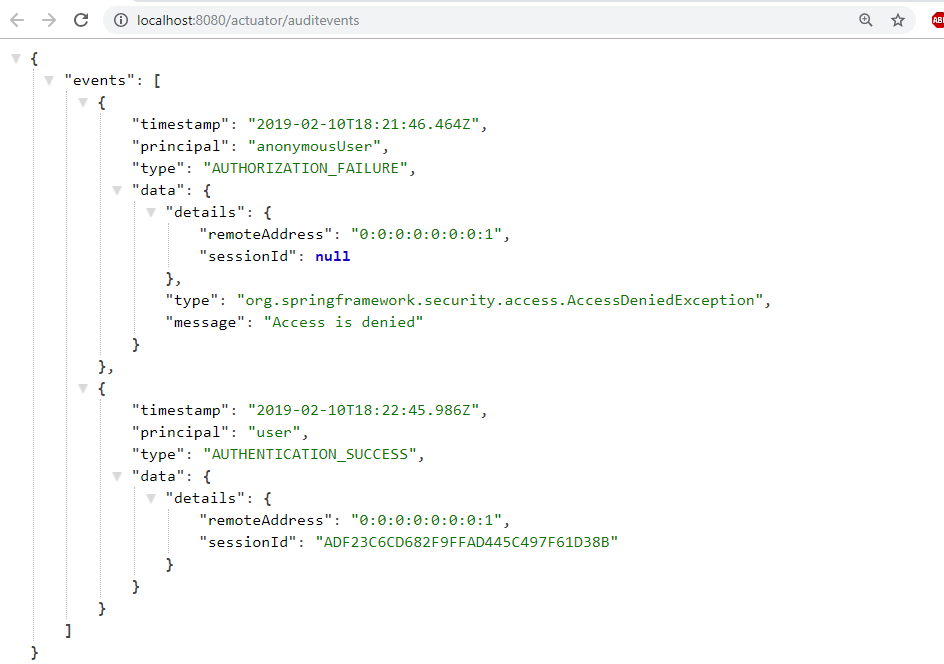
| /auditevents | Returns all auto-configuration candidates and the reason why they ‘were’ or ‘were not’ applied. |
| /beans | Returns a complete list of all the Spring beans in your application. |
| /trace | Returns trace logs (by default the last 100 HTTP requests). |
| /dump | It performs a thread dump. |
| /metrics | It shows metrics information like JVM memory used, system CPU usage, open files, and much more. |
You can access all available endpoint by this URL: http://localhost:8080/actuator
{
	"_links": {
		"self": {
			"href": ,
			"templated": false
		},
		"health": {
			"href": ,
			"templated": false
		},
		"health-component-instance": {
			"href": ,
			"templated": true
		},
		"health-component": {
			"href": ,
			"templated": true
		},
		"info": {
			"href": ,
			"templated": false
		}
	}
}
If you see we have only 2 endpoints showing (health, info) out of 16 endpoints
By default, all the actuator endpoints are exposed over JMX but only the health and info endpoints are exposed over HTTP.
Here is how you can expose actuator endpoints over HTTP and JMX using application properties -
Exposing Actuator endpoints over HTTP
# Use "*" to expose all endpoints, or a comma-separated list to expose selected ones
management.endpoints.web.exposure.include=*
management.endpoints.web.exposure.exclude=
Exposing Actuator endpoints over JMX
# Use "*" to expose all endpoints, or a comma-separated list to expose selected ones
management.endpoints.jmx.exposure.include=*
management.endpoints.jmx.exposure.exclude=
Securing Actuator Endpoints with Spring Security
Actuator endpoints are sensitive and must be secured from unauthorized access. you can add spring security to your application using the following dependency -
<dependency>
   <groupId>org.springframework.boot</groupId>
   <artifactId>spring-boot-starter-security</artifactId>
</dependency>
we can override the default spring security configuration and define our own access rules.
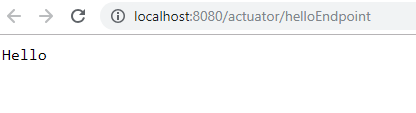
Creating a Custom Actuator Endpoint
To customize the endpoint and define your own endpoint, simply Create a classs annotate with @Endpoint URL :
 org.springframework.boot.actuate.endpoint.annotation.Endpoint;
 org.springframework.boot.actuate.endpoint.annotation.ReadOperation;
 org.springframework.stereotype.Component;

@Endpoint(id="helloEndpoint")
@Component
  ListEndPoints {
    @ReadOperation
     String mypoint(){
         "Hello" ;
    }
}
Few more Endpoints


SpringBoot – Project Lombok
Project Lombok is a Java library tool that generates code for minimizing boilerplate code. The library replaces boilerplate code with easy-to-use annotations.
For example, by adding a couple of annotations, you can get rid of code clutters, such as getters and setters methods, constructors, hashcode, equals, and toString methods, and so on.
-
val :Finally! Hassle-free final local variables.
-
var :Mutably! Hassle-free local variables.
-
@Data:All together now: A shortcut for @ToString, @EqualsAndHashCode, @Getter on all fields, and @Setter on all non-final fields, and @RequiredArgsConstructor!
-
@NonNull : How I learned to stop worrying and love the NullPointerException.
-
@Cleanup :Automatic resource management: Call your close() methods safely
-
@Getter/@Setter :Never write public int getFoo() {return foo;} again.
-
@ToString : generate a toString for you!
-
- @EqualsAndHashCode
- Generates hashCode and equals implementations from the fields of your object.
-
@NoArgsConstructor, @RequiredArgsConstructor and @AllArgsConstructor
Constructors made to order: Generates constructors that take no arguments, one argument per final / non-nullfield, or one argument for every field.
-
@Value :Immutable classes made very easy.
-
@Builder No-hassle fancy-pants APIs for object creation!
-
@SneakyThrows :To boldly throw checked exceptions where no one has thrown them before!
-
@Synchronized:synchronized done right: Don’t expose your locks.
-
@With:Immutable ‘setters’ - methods that create a clone but with one changed field.
-
@Getter(lazy=true):Laziness is a virtue!
-
@Log :Captain’s Log, stardate 24435.7: “What was that line again?”
- experimental :Head to the lab: The new stuff we’re working on.
Maven dependency
<dependency>
    <groupId>org.projectlombok</groupId>
    <artifactId>lombok</artifactId>
    <optional>true</optional>
</dependency>
Ref.
https://dzone.com/articles/spring-boot-actuator-a-complete-guide
https://www.callicoder.com/spring-boot-actuator/
Spring Boot – Asynchronous Implementation
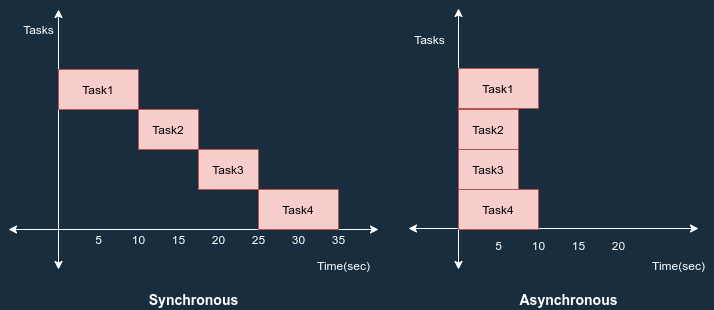
This article is about how asynchronous behavior can be achieved in spring boot. But first of all, let’s see the difference between synchronous and asynchronous.
-
Synchronous Programming: In synchronous programming, tasks are performed one at a time and only when one is completed the next is unblocked.
-
Asynchronous Programming: In asynchronous programming, multiple tasks can be executed simultaneously. You can move to another task before the previous one finishes.
In spring boot, we can achieve asynchronous behavior using @EnableAsync &
@Async annotations.
-
@EnableAsync- to enable async support by annotating the main application class. -
@Async- annotate the method
When you annotate a method with @Async annotation, it creates a proxy for
that object based on “proxyTargetClass” property.
When spring executes this method, by default it will be searching for associated thread pool definition. Either a unique spring framework TaskExecutor bean in the context or Executor bean named “taskExecutor”. If neither of these two is resolvable, default it will use spring framework SimpleAsyncTaskExecutor to process async method execution.
Example – Without Async
@RestController
public class DecomController {
	@Autowired
	DecomService service;

	@GetMapping("/decomTrial")
	public String decomClinicalTrial() {
		System.out.println(" *** decomClinicalTrial :: Started*** ");
		service.ArchiveUsers();
		service.ArchiveReports();
		System.out.println(" *** decomClinicalTrial :: Completed.*** ");
		return "decomClinicalTrial Complted.";
	}
}
@Service
public class DecomService {

	public void ArchiveUsers() {
     S.o.p(Thread.currentThread().getName() + " :ArchiveUsers :Start "+new Date());
		try {
			Thread.sleep(5000);
		} catch (InterruptedException e) {
			e.printStackTrace();
		}
     S.o.p (Thread.currentThread().getName() + " :ArchiveUsers :End " + new Date());
	}

	public void ArchiveReports() {
	S.o.p(Thread.currentThread().getName() + ":ArchiveReports : Start" + new Date());
		try {
			Thread.sleep(5000);
		} catch (InterruptedException e) {
			e.printStackTrace();
		}
	S.o.p(Thread.currentThread().getName() + " :ArchiveReports : End" + new Date());
	}
}
@SpringBootApplication
public class TrialServicesApplication {
	public static void main(String[] args) {
		SpringApplication.run(TrialServicesApplication.class, args);
		System.out.println("*************************************");
		System.out.println("Trial Services Startred ... ");
		System.out.println("*************************************");
	}
}
*** decomClinicalTrial: Started***
http-nio-8080-exec-1:ArchiveUsers :Start 24 Sep 2021 07:52:32 GMT
http-nio-8080-exec-1:ArchiveUsers :End 24 Sep 2021 07:52:37 GMT
http-nio-8080-exec-1:ArchiveReports :Start24 Sep 2021 07:52:37 GMT
http-nio-8080-exec-1:ArchiveReports :End24 Sep 2021 07:52:42 GMT
 *** decomClinicalTrial: Completed.***
Here all methods execute by single Thread http-nio-8080-exec-1
With @Aync
Place @EnableAsync on the Top of SpringBoot Main class -
TrialServicesApplication
@EnableAsync
@SpringBootApplication
public class TrialServicesApplication {
	public static void main(String[] args) {
		SpringApplication.run(TrialServicesApplication.class, args);
		System.out.println("*************************************");
		System.out.println("Trial Services Startred ... ");
		System.out.println("*************************************");
	}
}
Place @Async on the top of each method, which we want to execute in parallel.
@Service
public class DecomService {
	@Async
	public void ArchiveUsers() {
S.o.p(Thread.currentThread().getName() + " :ArchiveUsers :Start " + new Date());
		try {
			Thread.sleep(5000);
		} catch (InterruptedException e) {
			e.printStackTrace();
		}
		S.o.p(Thread.currentThread().getName() + " :ArchiveUsers :End " + new Date());
	}

	@Async
	public void ArchiveReports() {
	 S.o.p(Thread.currentThread().getName() + ":ArchiveReports : Start" + new Date());
		try {
			Thread.sleep(5000);
		} catch (InterruptedException e) {
			e.printStackTrace();
		}
	S.o.p(Thread.currentThread().getName() + " :ArchiveReports : End" + new Date());
	}
}
*** decomClinicalTrial :: Started***
*** decomClinicalTrial :: Completed.***
task-1 :ArchiveUsers : Start 24 Sep 2021 08:01:20 GMT
task-2 :ArchiveReports : Start24 Sep 2021 08:01:20 GMT
task-2 :ArchiveReports : End24 Sep 2021 08:01:25 GMT
task-1 :ArchiveUsers :End 24 Sep 2021 08:01:25 GMT
In above ArchiveUsers, ArchiveReports are executed paralley by two different threads task-1, task-2
Async methods with Return Types
Previously, The async method only used a void return type. And in my opinion, that is the best way to write self sufficient asynchronous functions. However, If you want to handle the results from an @Async function, you are in luck. Because Spring framework provides out of the box support for these situations using Future type. This is possible by wrapping the result inside of an AsyncResult class.
@Async
public Future<String> longRunningProcessThatReturns() {
    try {
        Thread.sleep(10000);
    } catch (InterruptedException e) {
        e.printStackTrace();
    }
    return new AsyncResult<>("I take 10 seconds to return on a Thread named : " + Thread.currentThread().getName());
}
https://medium.com/globant/asynchronous-calls-in-spring-boot-using-async-annotation-d34d8a82a60c
https://springhow.com/spring-async/
https://howtodoinjava.com/spring-boot2/rest/enableasync-async-controller/
SpringBoot – Switch Between Environments
https://stackabuse.com/how-to-access-property-file-values-in-spring-boot/
Spring Boot already has support for profile based properties.
Simply add an application-[profile].properties file and specify the profiles
to use using the spring.profiles.active property.
-Dspring.profiles.active=local
This will load the application.properties and the application-local.properties with the latter overriding properties from the first.
SpringBoot – Reactive Web
Spring WebFlux provides reactive, async, non-blocking programming support for web applications in an annotated Controller format similar to SpringMVC.
This approach is similar to how Node.js uses an async, non-blocking model which helps make it more scalable. Spring WebFlux uses a similar model but with multiple event loops.
Spring WebFlux moves away from the thread-per-request blocking model in traditional SpringMVC(with Tomcat by default) and moves towards a multi-EventLoop, async, non-blocking(with Netty by default) paradigm with back-pressure that is more scalable and efficient than traditional blocking code.