SpringBoot - Security(latest 2023 > 2.7.0)
Spring Boot supports several authentication types to secure your application. Here are the most commonly used authentication types:
-
Basic Authentication: Basic authentication is a simple authentication scheme built into the HTTP protocol. With this type of authentication, the user’s credentials are sent in the header of each request.
-
OAuth2: OAuth2 is an open standard for authorization that allows users to grant third-party applications access to their resources without giving them their credentials. Spring Boot provides OAuth2 support using the Spring Security OAuth2 module.
-
JWT Authentication (JSON Web Tokens ): JSON Web Tokens are a secure way to transmit information between parties as a JSON object. JWTs are commonly used for authentication and authorization purposes in modern web applications.
-
LDAP Authentication: LDAP authentication allows Spring Boot to authenticate users against an LDAP directory service. This is useful for enterprise applications that already have an LDAP infrastructure in place.
-
SAML Authentication: SAML (Security Assertion Markup Language) is an XML-based standard for exchanging authentication and authorization data between parties. Spring Boot provides support for SAML-based authentication using the Spring Security SAML module.
These are just some of the authentication types supported by Spring Boot. Depending on the requirements of your application, you can choose the appropriate authentication type or even combine multiple types to provide a more secure and flexible authentication mechanism.
How Spring Security Works

-
When ever user request Rest API with username & password, request goes to Authentication Filter
-
The AuthenticationFilter is a servlet filter class that will see if the user has already authenticated or not. If not, it will send that request to the AuthenticationManager to check if the details sent by the user is valid or not.
-
If the username and password are valid, the AuthenticationManager in turn uses AuthenticationProvider where the login logic or the authentication logic is defined.
-
The Authentication Provider will not fetch the user details from the database or from LDAP or in memory. It will use UserDetailsService & PasswordEncoder for that purpose.
-
Once the AuthenticationProvider checks, if the authentication details, the username, password, etc, are correct, then it will send the appropriate response back to the AuthenticationManager. AuthenticationManager hands it back to the AuthenticationFilter.
-
If the user details are correct & authentication succeeded. The AuthenticationFilter will use a AuthenticationSuccessHandler and stores that authentication information in SecurityContext.
-
If the authentication failed, it will use the AuthenticationFailureHandler to send the appropriate response back to the client.
SecurityContext VS JSESSIONID
For the first time the authentication happens, the JSESSIONID is created & stores inside of the SecurityContext as JSessionID as key & all the authentication information as value.
from next time as the client sends in the JSESSIONID, AuthenticationFilter uses that JSESSIONID checks if he’s already authenticated. And it will not prompt for authentication as long as that cookie is available. And when you deleted it, it will ask for the authentication again.
Once Authenication is success AuthenticationFilter will return JSESSIONID cookie back to Browser/Postman. If now change the password, it will work because it has valid JSESSIONID in the cookie. If we remove JSESSIONID from postman/browser it shows 401-UnAuthorized. We need to provide valid creds again
Going Deep…
Create a Sample SpringBoot Project & add Maven Dependency.
<dependency>
    <groupId>org.springframework.boot</groupId>
    <artifactId>spring-boot-starter-security</artifactId>
</dependency>
So you go along, add Spring Security to your Spring Boot (or plain Spring) project and suddenly…
-
you have auto-generated login-pages.
-
you cannot execute POST requests anymore.
-
your whole application is on lockdown and prompts you to enter a username and password.
The short answer:
At its core, Spring Security is really just a bunch of servlet filters that help you add [authentication] and [authorization] to your web application.
It also integrates well with frameworks like Spring Web MVC (or Spring Boot), as well as with standards like OAuth2 or SAML. And it auto-generates login/logout pages and protects against common exploits like CSRF.
1. Authentication
First off, if you are running a typical (web) application, you need your users to authenticate. That means your application needs to verify if the user is who he claims to be, typically done with a username and password check.
2. Authorization
Most applications have the concept of permissions (or roles). Imagine: customers who have access to the public-facing frontend of your webshop, and administrators who have access to a separate admin area.
3. Servlet Filters
Last but not least, let’s have a look at Servlet Filters
Basically any Spring web application is just one servlet: Spring’s good old DispatcherServlet, that redirects incoming HTTP requests (e.g. from a browser) to your @Controllers or @RestControllers.
The thing is: There is no security hardcoded into that DispatcherServlet and you also very likely don’t want to fumble around with a raw HTTP Basic Auth header in your @Controllers. Optimally, the authentication and authorization should be done before a request hits your @Controllers.
Luckily, there’s a way to do exactly this in the Java web world: you can put filters in front of servlets, which means you could think about writing a SecurityFilter and configure it in your Tomcat (servlet container/application server) to filter every incoming HTTP request before it hits your servlet.

In the real-world, however, you would split this one filter up into multiple filters, that you then chain together.
For example, an incoming HTTP request would…
-
First, go through a LoginMethodFilter…
-
Then, go through an AuthenticationFilter…
-
Then, go through an AuthorizationFilter…
-
Finally, hit your servlet.
This concept is called FilterChain and the last method call in your filter above is actually delegating to that very chain:
chain.doFilter(request, response);
Let’s assume you [set up Spring Security] correctly and then boot up your web application. You’ll see the following log message:
2020-02-25 10:24:27.875 INFO 11116 --- [ main] o.s.s.web.DefaultSecurityFilterChain : Creating filter chain: any request, [org.springframework.security.web.context.request.async.WebAsyncManagerIntegrationFilter@46320c9a, org.springframework.security.web.context.SecurityContextPersistenceFilter@4d98e41b, org.springframework.security.web.header.HeaderWriterFilter@52bd9a27, org.springframework.security.web.csrf.CsrfFilter@51c65a43, org.springframework.security.web.authentication.logout.LogoutFilter@124d26ba, org.springframework.security.web.authentication.UsernamePasswordAuthenticationFilter@61e86192, org.springframework.security.web.authentication.ui.DefaultLoginPageGeneratingFilter@10980560, org.springframework.security.web.authentication.ui.DefaultLogoutPageGeneratingFilter@32256e68, org.springframework.security.web.authentication.www.BasicAuthenticationFilter@52d0f583, org.springframework.security.web.savedrequest.RequestCacheAwareFilter@5696c927, org.springframework.security.web.servletapi.SecurityContextHolderAwareRequestFilter@5f025000, org.springframework.security.web.authentication.AnonymousAuthenticationFilter@5e7abaf7, org.springframework.security.web.session.SessionManagementFilter@681c0ae6, org.springframework.security.web.access.ExceptionTranslationFilter@15639d09, org.springframework.security.web.access.intercept.FilterSecurityInterceptor@4f7be6c8]|
If you expand that one line into a list, it looks like Spring Security does not just install one filter, instead it installs a whole filter chain consisting of 15 (!) different filters.
So, when an HTTPRequest comes in, it will go through all these 15 filters, before your request finally hits your @RestControllers. The order is important, too, starting at the top of that list and going down to the bottom.

So with these couple of filters, Spring Security provides you a login/logout page, as well as the ability to login with Basic Auth or Form Logins, as well as a couple of additional goodies like the CsrfFilter.Those filters, for a large part, are Spring Security. Hence, we need to have a look at how to configure Spring Security, next.
How to configure Spring Security: WebSecurityConfigurerAdapter (v2.7.0 VS latest)
In versions prior to Spring Boot 2.7.0, we needed to write a configuration class to inherit WebSecurityConfigurerAdapter, and then rewrite the three methods in the Adapter for configuration.
@Configuration
@EnableWebSecurity
public class SecurityConfig extends WebSecurityConfigurerAdapter
{
    @Override
    protected void configure(HttpSecurity http) throws Exception
    {
        http
         .csrf().disable()
         .authorizeRequests().anyRequest().authenticated()
         .and()
         .httpBasic();
    }

    @Autowired
    public void configureGlobal(AuthenticationManagerBuilder auth)
            throws Exception
    {
        auth.inMemoryAuthentication()
        	.withUser("admin")
        	.password("{noop}password")
        	.roles("ROLE_USER");
    }
}
The new usage is very simple, no need to inherit WebSecurityConfigurerAdapter, just declare the configuration class directly. Do below changes
- First, we’ll define our configuration class:
@EnableWebSecurity
@EnableGlobalMethodSecurity(prePostEnabled = true, securedEnabled = true, jsr250Enabled = true)
public class SecurityConfig {

    // config

}
2.we can create a SecurityFilterChain bean, in place of configure(Http ) method
@Bean
public SecurityFilterChain filterChain(HttpSecurity http) throws Exception {
    http.csrf()
      .disable()
      .authorizeRequests()
      .antMatchers(HttpMethod.DELETE)
      .hasRole("ADMIN")
      .antMatchers("/admin/**")
      .hasAnyRole("ADMIN")
      .antMatchers("/user/**")
      .hasAnyRole("USER", "ADMIN")
      .antMatchers("/login/**")
      .anonymous()
      .anyRequest()
      .authenticated()
      .and()
      .httpBasic()
      .and()
      .sessionManagement()
      .sessionCreationPolicy(SessionCreationPolicy.STATELESS);

    return http.build();
}
- Configure Authentication: in older we’ll use an AuthenticationManagerBuilder to set our authentication context. Now, if we want to avoid deprecation, we can define a UserDetailsManager or UserDetailsService component:
@Bean
public UserDetailsService userDetailsService(BCryptPasswordEncoder bCryptPasswordEncoder) {
    InMemoryUserDetailsManager manager = new InMemoryUserDetailsManager();
    manager.createUser(User.withUsername("user")
      .password(bCryptPasswordEncoder.encode("userPass"))
      .roles("USER")
      .build());
    manager.createUser(User.withUsername("admin")
      .password(bCryptPasswordEncoder.encode("adminPass"))
      .roles("USER", "ADMIN")
      .build());
    return manager;
}
Or, given our UserDetailService, we can even set an AuthenticationManager:
@Bean
public AuthenticationManager authenticationManager(HttpSecurity http, BCryptPasswordEncoder bCryptPasswordEncoder, UserDetailService userDetailService)
  throws Exception {
    return http.getSharedObject(AuthenticationManagerBuilder.class)
      .userDetailsService(userDetailsService)
      .passwordEncoder(bCryptPasswordEncoder)
      .and()
      .build();
}
Similarly, this will work if we use JDBC or LDAP authentication.
Authentication Types
When it comes to authentication and Spring Security you have roughly three scenarios:
-
The default: You can access the (hashed) password of the user, because you have his details (username, password) saved in e.g. a InMenory, Basic, database table.
-
Less common: You cannot access the (hashed) password of the user. This is the case if your users and passwords are stored somewhere else, like in a 3rd party identity management product offering REST services for authentication. Think: Atlassian Crowd.
-
Also popular: You want to use OAuth2 or “Login with Google/Twitter/etc.” (OpenID), likely in combination with JWT. Then none of the following applies and you should go straight to the [OAuth2 chapter].
Note: Depending on your scenario, you need to specify different @Beans to get Spring Security working, otherwise you’ll end up getting pretty confusing exceptions (like a NullPointerException if you forgot to specify the PasswordEncoder). Keep that in mind
1.Basic Authentication
Basic Authentication is a simple authentication scheme that sends the user’s credentials in the header of each request.
Basic authentification is a standard HTTP header with the user and password encoded in base64 : Authorization: Basic QWxhZGRpbjpvcGVuIHNlc2FtZQ==.The userName and password is encoded in the format username:password. This is one of the simplest technique to protect the REST resources because it does not require cookies. session identifiers or any login pages.
1. Maven Dependency.
The simplest way to add all required jars is to add the latest version of spring-boot-starter-security dependency.
<dependency>
    <groupId>org.springframework.boot</groupId>
    <artifactId>spring-boot-starter-security</artifactId>
</dependency>
2. Configure Spring Security.
To enable authentication and authorization support, we can configure the utility class WebSecurityConfigurerAdapter (deprecated). It helps in requiring the user to be authenticated prior to accessing any configured URL (or all URLs) within our application.
In the following configuration, we are using httpBasic() which enables basic authentication. We are also configuring the in-memory authentication manager to supply a username and password.
SecurityConfig.java // DEPRECATED 2.7.0
@Configuration
@EnableWebSecurity
public class SecurityConfig extends WebSecurityConfigurerAdapter
{
    @Override
    protected void configure(HttpSecurity http) throws Exception
    {
        http
         .csrf().disable()
         .authorizeRequests().anyRequest().authenticated()
         .and()
         .httpBasic();
    }

    @Autowired
    public void configureGlobal(AuthenticationManagerBuilder auth)
            throws Exception
    {
        auth.inMemoryAuthentication()
        	.withUser("admin")
        	.password("{noop}password")
        	.roles("ROLE_USER");
    }
}
Starting Spring Boot 2.7.0, WebSecurityConfigurerAdapter is deprecated. We can rewrite the above basic auth configuration in the latest versions as follows:
@Configuration
public class BasicAuthWebSecurityConfiguration
{
  @Autowired
  private AppBasicAuthenticationEntryPoint authenticationEntryPoint;

  @Bean
  public SecurityFilterChain filterChain(HttpSecurity http) throws Exception {
    http.authorizeRequests()
        .antMatchers("/public").permitAll()
        .anyRequest().authenticated()
        .and()
        .httpBasic()
        .authenticationEntryPoint(authenticationEntryPoint);
    return http.build();
  }

  @Bean
  public InMemoryUserDetailsManager userDetailsService() {
    UserDetails user = User
        .withUsername("user")
        .password(passwordEncoder().encode("password"))
        .roles("USER_ROLE")
        .build();
    return new InMemoryUserDetailsManager(user);
  }

  @Bean
  public PasswordEncoder passwordEncoder() {
    return new BCryptPasswordEncoder(8);
  }
}
BasicAuthenticationEntryPoint
The authentication entry points are used by the ExceptionTranslationFilter to commence authentication. By default, the BasicAuthenticationEntryPoint returns a full page for a 401 Unauthorized response back to the client.
To customize the default authentication error page used by basic auth, we can extend the BasicAuthenticationEntryPoint class. Here we can set the realm name and well as the error message sent back to the client.
@Component
public class AppBasicAuthenticationEntryPoint
  extends BasicAuthenticationEntryPoint {

  @Override
  public void commence(HttpServletRequest request,
                       HttpServletResponse response,
                       AuthenticationException authEx) throws IOException {

    response.addHeader("WWW-Authenticate", "Basic realm=" + getRealmName() + "");
    response.setStatus(HttpServletResponse.SC_UNAUTHORIZED);
    PrintWriter writer = response.getWriter();
    writer.println("HTTP Status 401 - " + authEx.getMessage());
  }

  @Override
  public void afterPropertiesSet() {
    setRealmName("howtodoinjava");
    super.afterPropertiesSet();
  }
}
3.Basic Authentication Demo.
For demo purposes, we can write a simple REST API given below.
EmployeeController.java
@RestController
@RequestMapping(path = "/employees")
public class EmployeeController
{
    @Autowired
    private EmployeeDAO employeeDao;

    @GetMapping(path="/", produces = "application/json")
    public Employees getEmployees()
    {
        return employeeDao.getAllEmployees();
    }
}
Accessing the API without ‘authorization’ Header
Access rest api at URL: HTTP GET http://localhost:8080/employees/
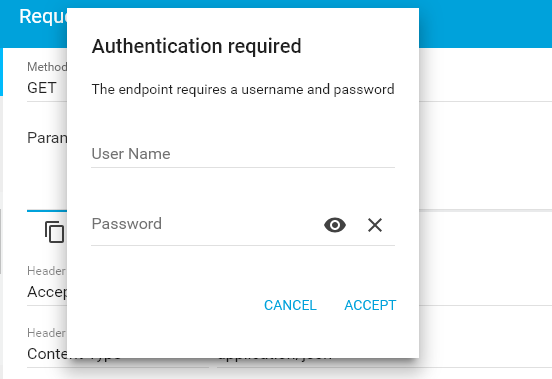
Require username and password
With authorization Header
Upon passing authorization request header with encoded basic-auth user name and password combination, we will be able to access the rest api response. Access rest api at URL: HTTP GET http://localhost:8080/employees/
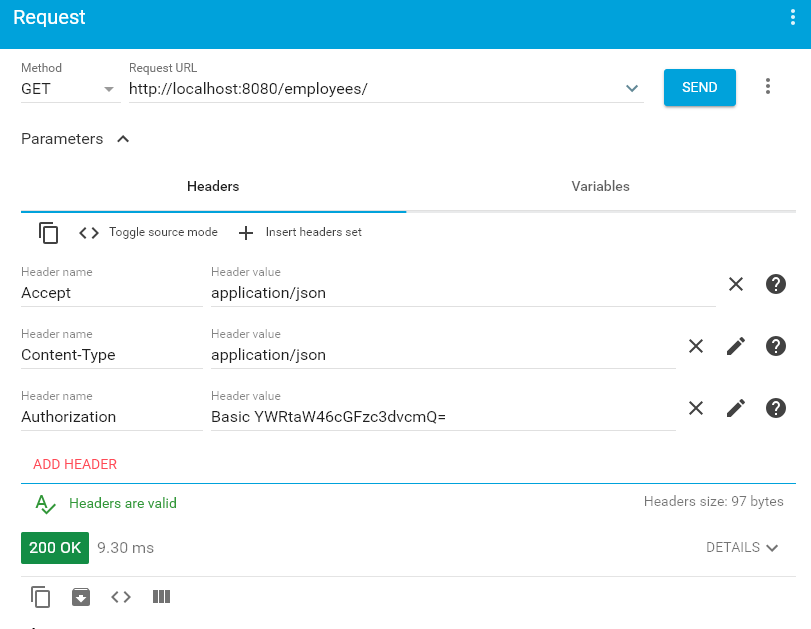
Successful api call
Generate Basic Auth Encoding
Browser apI testing tools are able to generate the base-64 encoded token by themselves using the plain username and password. But if we need to generate the encoded token ourselves to pass the token programmatically, then we can use the following code that uses the [java.util.Base64]
1. Encoding a String to Base64
This is as simple as getting an instance of the Base64.Encoder and input the string as bytes to encode it.
Base64.Encoder encoder = Base64.getEncoder();
String normalString = "username:password";

String encodedString = encoder.encodeToString(
        normalString.getBytes(StandardCharsets.UTF_8) );
Output
dXNlcm5hbWU6cGFzc3dvcmQ=
2. Decoding a Base64 Encoded String
This is also very simple. Just get the instance of Base64.Decoder and use it to decode the base 64 encoded string.
String encodedString = "dXNlcm5hbWU6cGFzc3dvcmQ=";
Base64.Decoder decoder = Base64.getDecoder();

byte[] decodedByteArray = decoder.decode(encodedString);

//Verify the decoded string
System.out.println(new String(decodedByteArray));
Output
username:password
2.Basic Authentication - with Database & UserDetailsService
A default implementation of the AuthenticationProvider uses the default implementations provided for the UserDetailsService and the PasswordEncoder.
The default implementation of UserDetailsService only registers the default credentials in the memory of the application. These default credentials are "user" with a default password that’s a randomly generated universally unique identifier (UUID) written to the application console when the spring context loads.
Using generated security password: 78nh23h-sd56-4b98-86ef-dfas8f8asf8
Note that UserDetailsService is always associated with a PasswordEncoder that encodes a supplied password and verifies if the password matches an existing encoding. When we replace the default implementation of the UserDetailsService, we must also specify a PasswordEncoder.
. UserDetailsService: Having access to the user’s password
Imagine you have a database table where you store your users. It has a couple of columns, but most importantly it has a username and password column, where you store the user’s hashed(!) password.
create table users (id int auto_increment primary key, username varchar(255), password varchar(255));
In this case Spring Security needs you to define two beans to get authentication up and running.
-
A UserDetailsService.
-
A PasswordEncoder.
Specifying a UserDetailsService is as simple as this:
@Bean
public UserDetailsService userDetailsService() {
    return new MyDatabaseUserDetailsService(); // (1)
}
MyDatabaseUserDetailsService implements UserDetailsService, a very simple interface, which consists of one method returning a UserDetails object:
public class MyDatabaseUserDetailsService implements UserDetailsService {

	UserDetails loadUserByUsername(String username) throws UsernameNotFoundException { // (1)
         // 1. Load the user from the users table by username. If not found, throw UsernameNotFoundException.
         // 2. Convert/wrap the user to a UserDetails object and return it.
        return someUserDetails;
    }
}

public interface UserDetails extends Serializable { // (2)

    String getUsername();

    String getPassword();

    // <3> more methods:
    // isAccountNonExpired,isAccountNonLocked,
    // isCredentialsNonExpired,isEnabled
}
-
A UserDetailsService loads UserDetails via the user’s username. Note that the method takes only one parameter: username (not the password).
-
The UserDetails interface has methods to get the (hashed!) password and one to get the username.
-
UserDetails has even more methods, like is the account active or blocked, have the credentials expired or what permissions the user has - but we won’t cover them here.
So you can either implement these interfaces yourself, like we did above, or use existing ones that Spring Security provides.
You can always implement the UserDetailsService and UserDetails interfaces yourself. But, you’ll also find defualt implementations by Spring Security that you can use/configure/extend/override instead.
-
JdbcUserDetailsManager, which is a JDBC(database)-based UserDetailsService. You can configure it to match your user table/column structure.
-
InMemoryUserDetailsManager, which keeps all userdetails in-memory and is great for testing.
-
org.springframework.security.core.userdetail.User, which is a sensible, default UserDetails implementation that you could use. That would mean potentially mapping/copying between your entities/database tables and this user class. Alternatively, you could simply make your entities implement the UserDetails interface.
Full UserDetails Workflow: HTTP Basic Authentication
Now think back to your HTTP Basic Authentication, that means you are securing your application with Spring Security and Basic Auth. This is what happens when you specify a UserDetailsService and try to login:
-
Extract the username/password combination from the HTTP Basic Auth header in a filter. You don’t have to do anything for that, it will happen under the hood.
-
Call your MyDatabaseUserDetailsService to load the corresponding user from the database, wrapped as a UserDetails object, which exposes the user’s hashed password.
-
Take the extracted password from the HTTP Basic Auth header, hash it automatically and compare it with the hashed password from your UserDetails object. If both match, the user is successfully authenticated.
That’s all there is to it. But hold on, how does Spring Security hash the password from the client (step 3)? With what algorithm?
PasswordEncoders
Spring Security cannot magically guess your preferred password hashing algorithm. That’s why you need to specify another @Bean, a PasswordEncoder. If you want to, say, use the BCrypt password hashing function (Spring Security’s default) for all your passwords, you would specify this @Bean in your SecurityConfig.
@Bean
public BCryptPasswordEncoder bCryptPasswordEncoder() {
    return new BCryptPasswordEncoder();
}
What if you have multiple password hashing algorithms, like Bcrypt or SHA-256? Then you would use the following encoder:
@Bean
public PasswordEncoder passwordEncoder() {
    return PasswordEncoderFactories.createDelegatingPasswordEncoder();
}
DelegatingPasswordEncoder will look at the UserDetail’s hashed password, which now has to start with a {prefix}. That prefix, is your hashing method! Your database table would then look like this:

Spring Security will:
-
Read in those passwords and strip off the prefix ( {bcrypt} or {sha256} ).
-
Depending on the prefix value, use the correct PasswordEncoder (i.e. a BCryptEncoder, or a SHA256Encoder)
-
Hash the incoming, raw password with that PasswordEncoder and compare it with the stored one.
That’s all there is to PasswordEncoders.
3. Third Party Authenticatio Provider
Now, imagine that you are using Atlassian Crowd for centralized identity management. That means all your users and passwords for all your applications are stored in Atlassian Crowd and not in your database table anymore.
Here, You do not have the user passwords anymore in your application, you have a REST API that you can login against, with your username and password. (A POST request to the */rest/usermanagement/1/authentication* REST endpoint).
If that is the case, you cannot use a UserDetailsService anymore, instead you need to implement and provide an AuthenticationProvider @Bean.
    @Bean
    public AuthenticationProvider authenticationProvider() {
        return new AtlassianCrowdAuthenticationProvider();
    }
An AuthenticationProvider consists primarily of one method and a naive implementation could look like this:
public class AtlassianCrowdAuthenticationProvider implements AuthenticationProvider {

        Authentication authenticate(Authentication authentication)  // (1)
                throws AuthenticationException {
            String username = authentication.getPrincipal().toString(); // (1)
            String password = authentication.getCredentials().toString(); // (1)

            User user = callAtlassianCrowdRestService(username, password); // (2)
            if (user == null) {                                     // (3)
                throw new AuthenticationException("could not login");
            }
            return new UserNamePasswordAuthenticationToken(user.getUsername(), user.getPassword(), user.getAuthorities()); // (4)
        }
	    // other method ignored
}
-
Compared to the UserDetails load() method, where you only had access to the username, you now have access to the complete authentication attempt, usually containing a username and password.
-
You can do whatever you want to authenticate the user, e.g. call a REST-service.
-
If authentication failed, you need to throw an exception.
-
If authentication succeeded, you need to return a fully initialized UsernamePasswordAuthenticationToken. It is an implementation of the Authentication interface and needs to have the field authenticated be set to true (which the constructor used above will automatically set). We’ll cover authorities in the next chapter.
4. Authorization with Spring Security
So far, we have only talked about authentication, e.g. username and password checks.
Let’s now have a look at permissions, or rather roles and authorities in Spring Security
What are Authorities? What are Roles?
Simple:
-
An authority (in its simplest form) is just a string, it can be anything like: user, ADMIN, ROLE_ADMIN or 53cr37_r0l3.
-
A role is an authority with a
*ROLE_*prefix. So a role called*ADMIN*is the same as an authority called*ROLE_ADMIN*.
The distinction between roles and authorities is purely conceptual and something that often bewilders people new to Spring Security.
What are GrantedAuthorities? What are SimpleGrantedAuthorities?
Of course, Spring Security doesn’t let you get away with just using Strings. There’s a Java class representing your authority String, a popular one being SimpleGrantedAuthority.
public final class SimpleGrantedAuthority implements GrantedAuthority {

	private final String role;

    @Override
	public String getAuthority() {
		return role;
	}
}
We are storing the users in Users table.Now, you would simply add a column called “authorities” to it.adding could contain multiple, comma-separated values authorities.
Adjust your UserDetailsService to read in that authorities column.
public class MyDatabaseUserDetailsService implements UserDetailsService {

  UserDetails loadUserByUsername(String username) throws UsernameNotFoundException {
     User user = userDao.findByUsername(username);
     List<SimpleGrantedAuthority> grantedAuthorities = user.getAuthorities().map(authority -> new SimpleGrantedAuthority(authority)).collect(Collectors.toList()); // (1)
     return new org.springframework.security.core.userdetails.User(user.getUsername(), user.getPassword(), grantedAuthorities); // (2)
  }

}
Revisiting WebSecurityConfigurerAdapter for Authorities
@Configuration
@EnableWebSecurity
public class WebSecurityConfig {

	@Bean
	public SecurityFilterChain filterChain(HttpSecurity http) throws Exception {
        http
          .authorizeRequests()
            .antMatchers("/admin").hasAuthority("ROLE_ADMIN") // (1)
            .antMatchers("/callcenter").hasAnyAuthority("ROLE_ADMIN", "ROLE_CALLCENTER") // (2)
            .anyRequest().authenticated() // (3)
            .and()
         .formLogin()
           .and()
         .httpBasic();
	}
}
-
To access the
*/admin*area you (i.e. the user) need to be authenticated AND have the authority (a simple string) ROLE_ADMIN. -
To access the
*/callcenter*area you need to be authenticated AND have either the authority ROLE_ADMIN OR ROLE_CALLCENTER. -
For any other request, you do not need a specific role but still need to be authenticated.
5. Spring Security & OAuth 2.0
Welcome to world of OAuth
Imagine you have a bank account, and you want to give a 3rd party access to CRED app, which tries to categorize and report on your monthly spendings.I.e. allow it to read your banking transactions, but not allow it to create new transactions
Rephrasing the problem above in OAuth speak looks like this:
How can the resource owner (you) give a client (3rd party software) scoped access (read or write or both) to a protected resource (bank account)?
Let’s break this down.
-
The
*resource owner*is you, the user, who holds the rights to something. -
That something is called
*protected resource*, i.e. your bank account. -
The 3rd party application, who wants to access the
*protected resource*in your place, is called the*client*. Never confuse the*client*with the*resource owner*. -
(Additionally, the client only gets
*scoped*access, i.e. it can only read transactions in this example)
These are three main players of every OAuth interaction. The main goal of the OAuth 2.0 flow is for the client to get a valid access token.

In our banking example, the protected resource (bank account) and authorization server would both be provided by the bank. It could be two different systems, or the same system with two different endpoints.
OAuth2 provides 4 different roles.
- Resource Owner - The user of the application.
- Client - the application (user is using) which require access to user data on the resource server.
- Authorization Server - responsible for authenticating user’s identity and gives an authorization token. This token is accepted by resource server and validate your identity.
- Resource Server - store user’s data and http services which can return user data to authenticated clients.

Access Token vs Refresh Token
An access token is a string representing an authorization issued to the client. Tokens represent specific scopes and durations of access, granted by the resource owner, and enforced by the resource server and authorization server.
The refresh token is issued (along with the access token) to the client by the authorization server, and it is used to obtain a new access token when the current access token becomes invalid or expires.
- The responsibility of access token is to access data before it gets expired.
- The responsibility of refresh token is to request for a new access token when the existing access token is expired.
6. OAuth2 with Github

Dependencies
		<dependency>
			<groupId>org.springframework.boot</groupId>
			<artifactId>spring-boot-starter-security</artifactId>
		</dependency>

		<dependency>
			<groupId>org.springframework.boot</groupId>
			<artifactId>spring-boot-starter-oauth2-client</artifactId>
		</dependency>
1.Genetrate github API Keys by going https://github.com/settings/developers

 After the application has been created, note down the generated client id and client secret.
Update Yaml file
spring:
  security:
   oauth2:
     client:
       registration:
         github:
           client-id: 01cbd1fd06e10fe0da41
           client-secret: f116116a4cee00c46993d14859912XXXXXXXXX
Update SecurityConfig with oauth2Login() method. The oauth2Login() method adds the OAuth2LoginAuthenticationFilter to the filter chain that intercepts the request and applies OAuth 2 authentication logic.
    @Bean
    public SecurityFilterChain filterChain(HttpSecurity http) throws Exception {

        http.cors().and().csrf().disable().authorizeRequests()
                .antMatchers("/swagger/*").permitAll()
                .anyRequest().authenticated()
                .and()
                .oauth2Login();
        return http.build();
    }
Now open URL http://localhost:8181/springdemo/user/list, it will ask for login with Github like below

7. custom authentication provider for OAuth
In Spring Boot, you can create a custom authentication provider for OAuth authentication by implementing the OAuth2UserService interface. The OAuth2UserService interface provides a method called loadUser(), which is responsible for loading the user details from the OAuth provider.
Here are the steps to create a custom authentication provider for OAuth in Spring Boot:
- Create a class that implements the
OAuth2UserServiceinterface.
@Service
public class CustomOAuth2UserService implements OAuth2UserService<OAuth2UserRequest, OAuth2User> {

    @Override
    public OAuth2User loadUser(OAuth2UserRequest userRequest) throws OAuth2AuthenticationException {
        // TODO: Implement your custom OAuth2 authentication logic here
        return null;
    }
}
-
Implement the
loadUser()method to load the user details from the OAuth provider. This method should return an instance ofOAuth2Userthat contains the user’s details. -
Annotate your class with
@Serviceto make it a Spring-managed bean. -
Register your custom authentication provider with Spring Security by creating a
WebSecurityConfigurerAdapterconfiguration class and overriding theconfigure()method.
@Configuration
@EnableWebSecurity
public class SecurityConfig extends WebSecurityConfigurerAdapter {

    @Autowired
    private CustomOAuth2UserService customOAuth2UserService;

    @Override
    protected void configure(HttpSecurity http) throws Exception {
        http
            .authorizeRequests()
                .anyRequest().authenticated()
                .and()
            .oauth2Login()
                .userInfoEndpoint()
                    .userService(customOAuth2UserService);
    }
}
In the configure() method, configure your application’s security settings. In this example, we’re requiring authentication for all requests and configuring the OAuth2LoginConfigurer to use our custom authentication provider.
With these steps, you can create a custom authentication provider for OAuth in Spring Boot and use it to authenticate users in your application.
8. Spring Security pre-authentication
Spring Security pre-authentication is a feature that allows applications to authenticate a user before the user is authenticated by the application’s security mechanism. This means that the user’s identity is already established by a third-party system, such as a Single Sign-On (SSO) solution or an authentication proxy, before the user’s request reaches the application.
In pre-authentication, the user’s identity is typically passed to the application through a request header, such as “X-Remote-User” / “X-USERID”. The application can then use this identity to authenticate the user and authorize their access to the application’s resources.
Spring Security provides support for pre-authentication through its AbstractPreAuthenticatedProcessingFilter class, which is a filter that intercepts the request and extracts the user’s identity from the request header. The filter then passes the identity to Spring Security’s authentication mechanism, which can authenticate the user based on the identity.
Pre-authentication can simplify the authentication process for applications by removing the need for the user to enter their credentials. It can also improve security by allowing the user’s identity to be authenticated by a trusted third-party system.
In Spring Boot, you can implement pre-authentication using Spring Security by creating a custom filter that extracts the user’s authentication information from the request header and passes it to Spring Security’s authentication mechanism.
Here are the steps to create a Spring Boot application with pre-authentication using Spring Security:
- Create a class that extends
AbstractPreAuthenticatedProcessingFilterand implements thegetPreAuthenticatedPrincipal()andgetPreAuthenticatedCredentials()methods. These methods extract the user’s authentication information from the request header.
public class CustomPreAuthenticatedProcessingFilter extends AbstractPreAuthenticatedProcessingFilter {

    @Override
    protected Object getPreAuthenticatedPrincipal(HttpServletRequest request) {
        return request.getHeader("X-USERID");
    }

    @Override
    protected Object getPreAuthenticatedCredentials(HttpServletRequest request) {
        return "N/A";
    }
}
-
Annotate the class with
@Componentto make it a Spring-managed bean. -
Register the custom filter with Spring Security by creating a
WebSecurityConfigurerAdapterconfiguration class and overriding theconfigure()method.
@Configuration
@EnableWebSecurity
public class SecurityConfig extends WebSecurityConfigurerAdapter {

    @Autowired
    private CustomPreAuthenticatedProcessingFilter customPreAuthenticatedProcessingFilter;

    @Override
    protected void configure(HttpSecurity http) throws Exception {
        http
            .addFilter(customPreAuthenticatedProcessingFilter)
            .authorizeRequests()
                .anyRequest().authenticated()
                .and()
            .httpBasic().disable()
            .csrf().disable();
    }

    @Override
    public void configure(WebSecurity web) throws Exception {
        web
            .ignoring()
                .antMatchers("/actuator/**");
    }
}
-
In the
configure()method, configure your application’s security settings. In this example, we’re adding the custom filter to the security filter chain and requiring authentication for all requests. -
Start your application and make a request with the user’s authentication information in the request header. In this example, we’re using the
X-USERIDheader to pass the user’s identity.
bashCopy code
curl -H "X-USERID: alice" http://localhost:8080/
With these steps, you can implement pre-authentication using Spring Security in your Spring Boot application. When a user makes a request with their authentication information in the request header, the custom filter extracts the information and passes it to Spring Security’s authentication mechanism, which can authenticate the user based on the identity.
Sample of Realtime Implemetation
/**
 * Security configuration based on the Spring Security setup.
 * <p>
 * Since Micro-Services do not participate in authentication of users, and the authentication is delegated
 * to an external Authentication Server, then this configuration wires the Pre-Authentication settings required
 * to extract the authenticated user token from the header.
 * <p>
 * By default, all APIs at path /api will be secured against the pre-authenticated header.
 *
 * @author Ameer Qudsiyeh
 */
@Configuration
@EnableWebSecurity
public class SecurityConfig {

	@Bean
    public SecurityFilterChain filterChain(HttpSecurity http) throws Exception {
		// Configure Security Policy
		http
			.csrf().disable()	// CSRF does not apply in REST app //NOSONAR
			.addFilterAfter(this.preAuthenticationFilter(), RequestHeaderAuthenticationFilter.class)
			.authorizeRequests()
				// Authenticate /api/** requests - Will use the RequestHeaderPreAuthenticationFilter
				.antMatchers(RestConstants.API_BASE + "v*/**").hasAuthority(RestConstants.PREAUTH_USER_ROLE) //authenticated()
			.and()
				// REST API is stateless, hence no session. Caching will be used instead
				.sessionManagement().sessionCreationPolicy(SessionCreationPolicy.STATELESS)
			.and()
				// For Pre-Authenticated setup use a 403 Forbidden entry point
				.exceptionHandling()
					.authenticationEntryPoint(new Http403ForbiddenEntryPoint())
			.and()
				.headers().frameOptions().disable();	// FrameOptions do not apply in REST app
		return http.build();
	}

    @Bean
    protected AuthenticationManager authenticationManager() {
        return new ProviderManager(Collections.singletonList(this.authenticationProvider()));
    }

	@Bean
	public RequestHeaderAuthenticationFilter preAuthenticationFilter() {
		RequestHeaderAuthenticationFilter preAuthenticationFilter = new RequestHeaderAuthenticationFilter();
		preAuthenticationFilter.setPrincipalRequestHeader(RestConstants.PREAUTH_HEADER_LABEL);
		preAuthenticationFilter.setCredentialsRequestHeader(RestConstants.PREAUTH_HEADER_LABEL);
		preAuthenticationFilter.setAuthenticationManager(this.authenticationManager());
		// Turn off exceptions since we have configured a 403 for the security policy
		preAuthenticationFilter.setExceptionIfHeaderMissing(false);

		return preAuthenticationFilter;
	}


    @Bean
    public AuthenticationProvider authenticationProvider() {
        PreAuthenticatedAuthenticationProvider authenticationProvider = new PreAuthenticatedAuthenticationProvider();
        authenticationProvider.setPreAuthenticatedUserDetailsService(this.userDetailsServiceWrapper());
        // Turn off exceptions since we have configured a 403 for the security policy
        authenticationProvider.setThrowExceptionWhenTokenRejected(false);

        return authenticationProvider;
    }

    @Bean
    public AuthenticationUserDetailsService<PreAuthenticatedAuthenticationToken> userDetailsServiceWrapper() {
        return new AuthorizationUserDetailsService();
    }
}
/**
 * Spring Security UserDetails Service class for pre-authenticated requests.
 * <p>
 * Pre-authenticated requests inject a header token of the user id that has already been authenticated
 * by an external Authentication Server.
 * <p>
 * This class is responsible for applying verification of the token and loading the associated user and
 * roles. No authentication is actually performed here
 *
 */
@Slf4j
public class AuthorizationUserDetailsService implements AuthenticationUserDetailsService<PreAuthenticatedAuthenticationToken> {

	/**
	 * Load and return a UserDetails instance of the Pre-Autenticated user token.
	 * <p>
	 * Caching is enabled here since the Security Config is Stateless (SessionCreationPolicy.STATELESS),
	 * then there is no session management, which can cause performance issues due to the creation of a
	 * new Security Context for every request.
	 * <p>
	 * NOTE: Ensure the caching configuration declares the Cache name of <b>PreAuthUsers</b>
	 *
	 */
	@Override
	@Cacheable(value = "PreAuthUsers", key = "#token")
	public UserDetails loadUserDetails(PreAuthenticatedAuthenticationToken token) throws UsernameNotFoundException {
		String userId = token.getCredentials().toString();
        log.debug("Detected Pre-Authenticated token for user: {}", userId);

        // Return a wrapped User object representing the pre-authenticated token.
        // If no token, the Spring Security framework will throw an exception before arriving at this method
		return new User(userId, userId, Collections.singletonList(new SimpleGrantedAuthority(RestConstants.PREAUTH_USER_ROLE)));
	}

}
Ref.
I have gone through below articles while writing this post. So this post not completly wrote by me. https://www.marcobehler.com/guides/spring-security#_authentication_with_spring_security
https://www.marcobehler.com/guides/spring-security-oauth2
https://howtodoinjava.com/spring-boot2/oauth2-auth-server/
https://howtodoinjava.com/spring-security/oauth2-login-with-spring-boot-security/