Spring MVC - Introduction
The Spring Web MVC framework provides Model-View-Controller (MVC) architecture and ready components that can be used to develop flexible and loosely coupled web applications. The MVC pattern results in separating the different aspects of the application (input logic, business logic, and UI logic), while providing a loose coupling between these elements.
-
The Model encapsulates the application data and in general they will consist of POJO.
-
The View is responsible for rendering the model data and in general it generates HTML output that the client’s browser can interpret.
-
The Controller is responsible for processing user requests and building an appropriate model and passes it to the view for rendering.
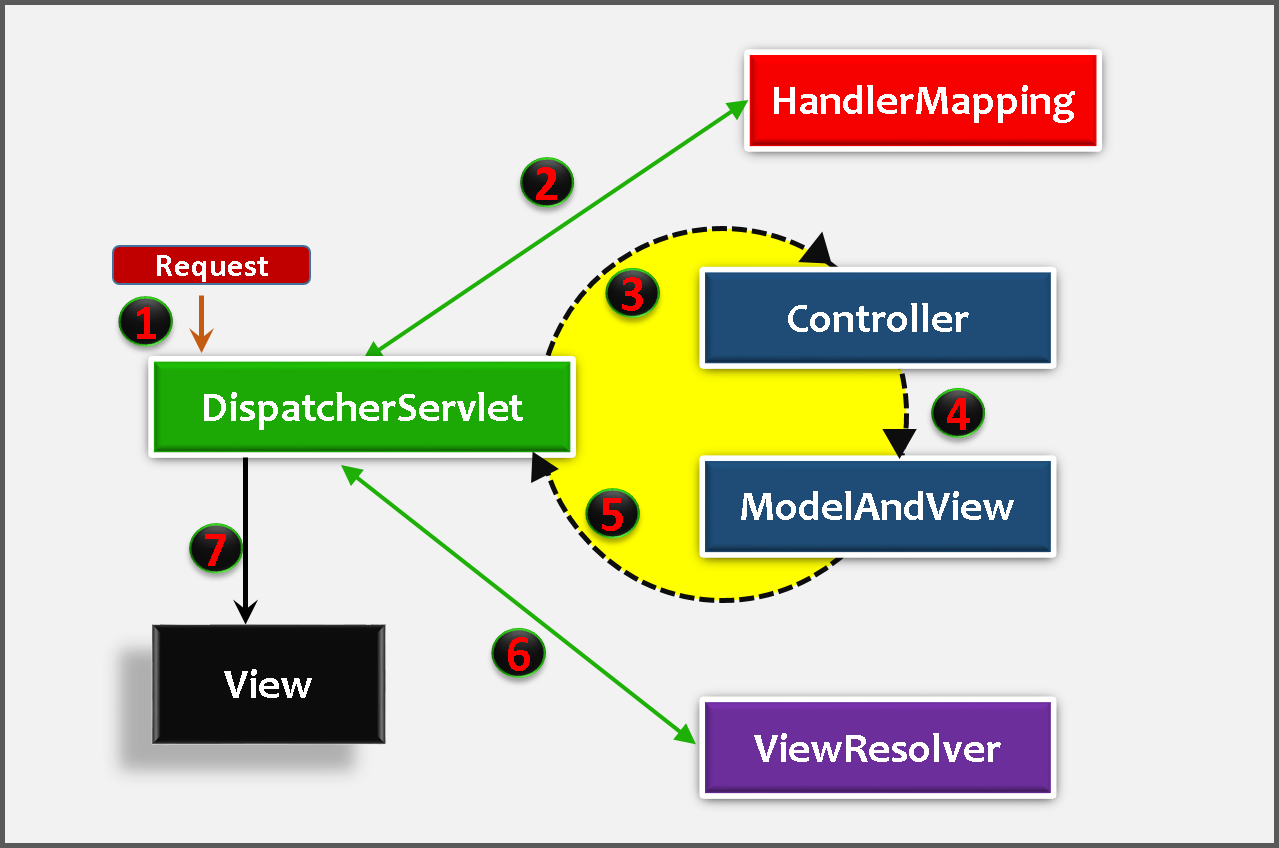
Spring MVC Flow Diagram

1. First request will be received by DispatcherServlet
2. DispatcherServlet asks HandlerMapping for Controller class name for the current request. HandlerMapping will returns controller class name to DispatcherServlet.
3,4,5. DispatcherServlet will transfer request to Controller, Controller will process the request by executing appropriate methods and returns ModeAndView object. ModeAndView object (contains *Model *data and *View *name) back to the DispatcherServlet
6. Now DispatcherServlet send the model object to the ViewResolver to get the actual view page.
7. Finally, DispatcherServlet will pass the Model object to the View page to display the result.
Note: All these below Examples are comes under Spring 3.0
Spring MVC –HelloWorld Example
We are going to create following files in this example
-
Create the request, view pages (index.jsp, hello.jsp)
-
Create the controller class (HelloWorldController.java)
-
Configure entry of controller, Front controller in web.xml file
-
Configure ViewResolver, View components in serveltname-servlet.xml.
-
Test the Applciation by running on server
SpringMVCBasic
|
+---src
|   \---controller
|           HelloWorldController.java
|---WebContent
    |   index.jsp
    \---WEB-INF
        |   hello-servlet.xml
        |   web.xml
        |
        +---jsp
        |       helloView.jsp
        |
        \---lib
update pom.xml with maven dependencies
        <!-- https://mvnrepository.com/artifact/org.springframework/spring-web -->
        <dependency>
            <groupId>org.springframework</groupId>
            <artifactId>spring-web</artifactId>
            <version>${spring.version}</version>
        </dependency>

        <!-- https://mvnrepository.com/artifact/org.springframework/spring-webmvc -->
        <dependency>
            <groupId>org.springframework</groupId>
            <artifactId>spring-webmvc</artifactId>
            <version>${spring.version}</version>
        </dependency>

        <!-- JSTL Dependency -->
        <dependency>
            <groupId>javax.servlet.jsp.jstl</groupId>
            <artifactId>javax.servlet.jsp.jstl-api</artifactId>
            <version>1.2.1</version>
        </dependency>
        <dependency>
            <groupId>taglibs</groupId>
            <artifactId>standard</artifactId>
            <version>1.1.2</version>
        </dependency>

        <!-- Servlet Dependency -->
        <dependency>
            <groupId>javax.servlet</groupId>
            <artifactId>javax.servlet-api</artifactId>
            <version>3.1.0</version>
            <scope>provided</scope>
        </dependency>

        <!-- JSP Dependency -->
        <dependency>
            <groupId>javax.servlet.jsp</groupId>
            <artifactId>javax.servlet.jsp-api</artifactId>
            <version>2.3.1</version>
            <scope>provided</scope>
        </dependency>
1.Create the request, view pages (index.jsp, hello.jsp)
//index.jsp
<h1>
<a href="helloController">Click Here</a>
</h1>

./jsp/hello.jsp
<h1> SmlCodes :  ${message} </h1>
2.Create the controller class –HelloWorldController.java
package controller;

@Controller
public class HelloWorldController {
	@RequestMapping("/helloController")
	public ModelAndView helloWorld() {
 String message = "Hello,Spring MVC!!!";
 return new ModelAndView("helloView", "message", message);
        //it will search for helloView.jsp in JSP Folder
	}
}
-
To create the controller class, we have to use @Controller and @RequestMapping annotations.
-
@Controller annotation marks this class as Controller.
-
@Requestmapping annotation is used to map the class with the specified name.
-
-
@Controller facilitates auto-detection of Controllers which eliminates the need for configuring the Controllers in DispatcherServlte’s Configuration file.
- For enabling auto-detection of annotated controller’s component-scan
has to be added in configuration file (hello-servlet.xml) with the package
name where all the controllers are placed.
<context:component-scan base-package="controller"></context:component-scan> - Controller class returns the instance of ModelAndView controller with the mapped name, message name and message value. The message value will be displayed in the jsp page.
3.Configure DispatcherServlet, Controller Entry in web.xml
-
In Spring Web MVC, DispatcherServlet class works as the front controller. It is responsible to manage the flow of the spring mvc application.
-
DispatcherServlet is a normal servlet class which implements HttpServlet base class.
-
we have to configure DispatcherServlet in web.xml.
-
Configure
, any url with given pattern will call Spring MVC Front controller.
<!-- file : web.xml -->
<?xml version="1.0" encoding="UTF-8"?>
<web-app>
  <servlet>
    <servlet-name>hello</servlet-name>
    <servlet-class>org.springframework.web.servlet.DispatcherServlet</servlet-class>
  </servlet>
  <servlet-mapping>
    <servlet-name>hello</servlet-name>
    <url-pattern>/</url-pattern> //<url-pattern>*.html</url-pattern>
  </servlet-mapping>
</web-app>
if you want to provide spring view resolever configuration manually, instead of serching with serveltname - we need to provide file name in <init-param> like below
<?xml version="1.0" encoding="UTF-8"?>
<web-app id="WebApp_ID" version="4.0"
	xmlns="http://xmlns.jcp.org/xml/ns/javaee"
	xmlns:xsi="http://www.w3.org/2001/XMLSchema-instance"
	xsi:schemaLocation="http://xmlns.jcp.org/xml/ns/javaee http://xmlns.jcp.org/xml/ns/javaee/web-app_4_0.xsd">
	<display-name>SpringMVC-Starter</display-name>
	<servlet>
		<servlet-name>dispatcher</servlet-name>
		<servlet-class>org.springframework.web.servlet.DispatcherServlet</servlet-class>
		<init-param>
			<param-name>contextConfigLocation</param-name>
			<param-value>/WEB-INF/spring-servlet.xml</param-value>
		</init-param>
		<load-on-startup>1</load-on-startup>
	</servlet>

	<servlet-mapping>
		<servlet-name>dispatcher</servlet-name>
		<url-pattern>/</url-pattern>
	</servlet-mapping>
</web-app>
4.Configure ViewResolver, View components in hello-servlet.xml
Once the DispatcherServlet is initialized, it will looks for a file
names [servlet-name]-servlet.xml in WEB-INF folder. In above example,
the framework will look for hello-servlet.xml.
// hello-servlet.xml
<?xml version="1.0" encoding="UTF-8"?>
<beans>
   <context:component-scan base-package="controller"></context:component-scan>

   <bean class="org.springframework.web.servlet.view.InternalResourceViewResolver">
	<property name="prefix" value="/WEB-INF/jsp/"></property>
	<property name="suffix" value=".jsp"></property>
   </bean>

</beans>
5.Test the Applciation by running on server

Flow of execution
-
Run the application, index.jsp file will executed, it has a link
<a href="helloController"> -
Once you click on that link, container will check the URL pattern at web.xml and passes the request to the DispatcherServlet
-
DispatcherServlet takes this ‘helloController’ & asks HandlerMapping **for Controller class**
-
HaandlerMapping scans the all the controllers classes in the packges & searches for the Class which is conating helloController as @RequestMapping(“/helloController”). Then it will return HelloWorldController class to DispacherServelt.
-
DispatcherServlet Excecutes methods which is having @RequestMapping(“/helloController”) in our controller class, that methods gives ModelAndView object as return type.
return new ModelAndView("helloView", "message", message); -
first argument is ‘View’ page name(helloView), second, third are <Key, Value> pair of Model Object for passing data to View Page.
-
DispatcherServlet forwards request to
ViewResolver(hello-servlet.xml)& search for View pages (helloView.jsp) location, ViewResolver returns ViewPage to DispatcherServlet -
DispatcherServlet will displays View page with data to the client.
Note : If you are using Intellij Community Edition, it bit difficut to run Spring MVC. because we need to do some manual Configuration. So try to use Eclipse / Intellij Ultimate Edition.