Spring – Spring Bean Internal Working
Spring IoC container receives metadata from either an XML file, Java annotations, or Java code.
By reading the configuration metadata container gets its instructions, which POJO class objects to instantiate, configure, and assemble.
The Objects which are created through this process called Spring Beans.
The responsibilities of IoC container are:
-
Instantiating the bean
-
Wiring the beans together
-
Configuring the beans
-
Managing the bean’s entire life-cycle
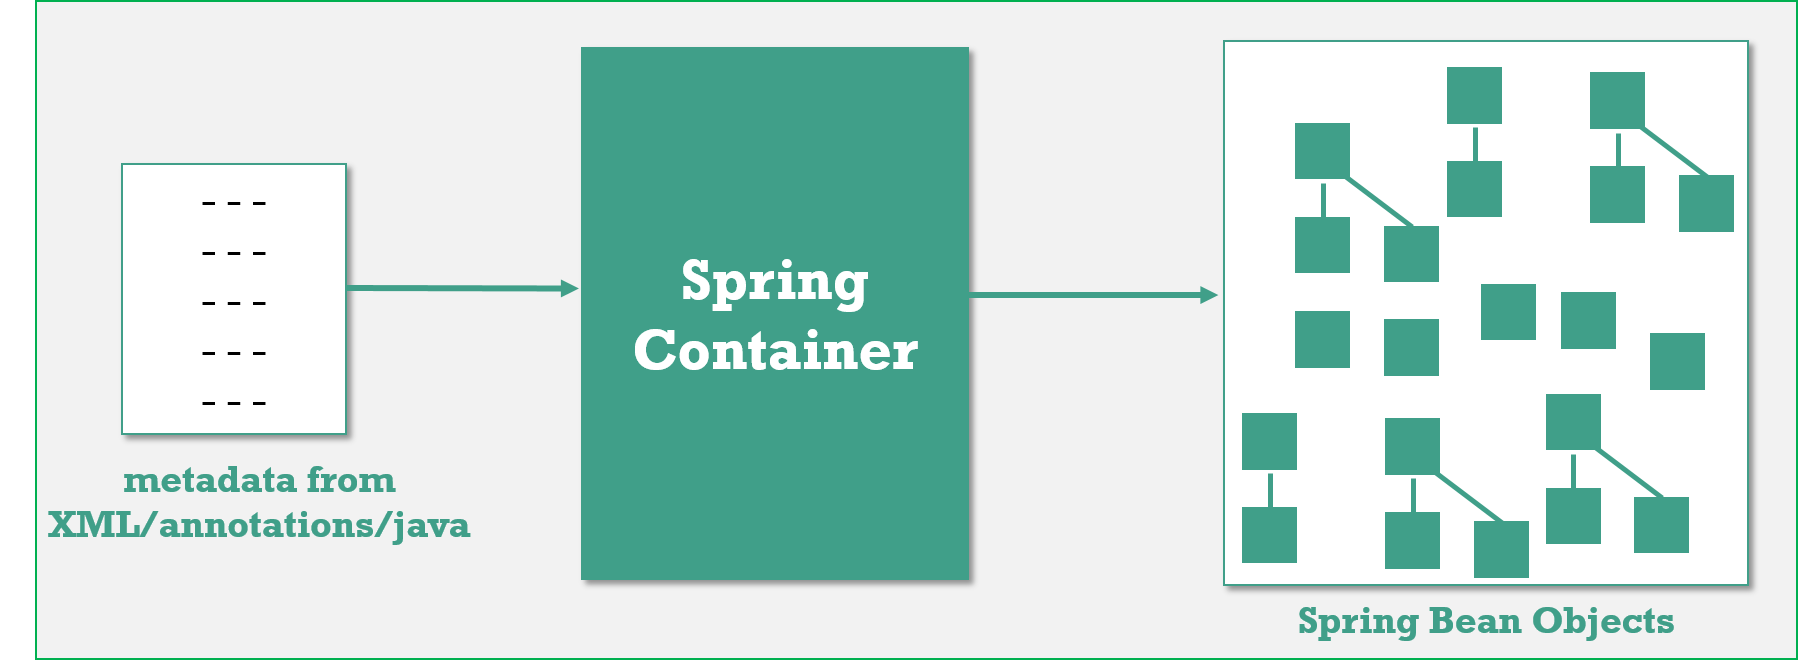
If you look at the picture above, you can see that there is a lot of squares in there.
That’s how the spring container would look like if you graphed it all out. The little squares are the Spring beans and you can see their references. Some of them are standalone, some of them are referencing other beans. Just how they wired up and how it makes all these objects that we’re using altogether.
Spring <bean> configuration
A Spring IoC container manages one or more beans. These beans are created with
the configuration metadata that you supply to the container, for example, in the
form of XML <bean> definitions.
bean definitions are represented as BeanDefinition objects, which contain following metadata:
<beans>

	<bean
	    id="student"
	    name="student"
	    class="core.Student"
	    scope="prototype"
	    autowire="byName"
	    dependency-check="simple"
	    lazy-init="true/false"
	    init-method="initIt"
	    destroy-method="cleanUp">
	</bean>


	<import resource="connection/Spring-Connection.xml" />
	<import resource="moduleA/Spring-ModuleA.xml" />

</beans>
1.Id
A bean will have only one Unique id, special charaters are not allowd.
2.name
A single bean can have multiple names(aliases) & allowes Special Charaters, However, the names must still unique, otherwise BeanDefinitionParsingException – Bean name ‘kingBean’ is already used in this file
<bean id="foo" name = "myFoo,kingBean,notBar" class="com.Foo">
</bean>
3.class
This attribute is mandatory and specify the bean class to be used to create the bean. You should specify fully qualified class name. Include package name.
4.scope
5 types of bean scopes supported:
-
singleton(default) – Return a single bean instance per Spring IoC container
-
prototype – Return a new bean instance each time when requested
-
request – each HTTP request has its own instance of a bean created
-
session – Scopes a single bean definition to the lifecycle of an HTTP Session
-
application – Scopes a single bean definition to the lifecycle of a ServletContext
The request, session, and application scopes are only available if you use a
web-aware Spring ApplicationContext implementation (such
as XmlWebApplicationContext).
If you use these scopes with regular Spring IoC
containers such as the ClassPathXmlApplicationContext, you get
an IllegalStateException:unknown bean scope complaining about an unknown bean scope.
By XML
<bean id="student" class="core.Student" scope="singleton/prototype/request/session/application">
---
</bean>
You can also use annotation to define your bean scope.
@Service
@Scope("prototype")
public class CustomerService
{
	String message;

	public String getMessage() {
 return message;
	}

	public void setMessage(String message) {
 this.message = message;
	}
}
Enable auto component scanning
<beans>
       <context:component-scan base-package="com.smlcodes.customer" />
</beans>
## SingleTon Vs Prototype
Singleton
when you define a bean definition and it is scoped as a singleton, the
Spring IoC container creates exactly one instance with that particular ID of
the object defined by that bean definition.
This single instance is stored in a cache of such singleton beans, and all subsequent requests and references for that named bean return the cached object.
The singleton scope is the default scope in Spring.
package core;

public class Customer {

	private int cid;
	private String name;

	public int getCid() {
 return cid;
	}

	public void setCid(int cid) {
 this.cid = cid;
	}

	public String getName() {
 return name;
	}

	public void setName(String name) {
 this.name = name;
	}

}
//Default is ‘SingleTon’
<beans xmlns="http://www.springframework.org/schema/beans"
	xmlns:xsi="http://www.w3.org/2001/XMLSchema-instance"
	xsi:schemaLocation="http://www.springframework.org/schema/beans
	http://www.springframework.org/schema/beans/spring-beans-3.0.xsd">

	<bean id="c1" class="core.Customer">
	</bean>

	<bean id="c2" class="core.Customer">
	</bean>


</beans>
public class ScopeApp {
	public static void main(String[] args) {

 // Instantiating a container
 ApplicationContext context = new ClassPathXmlApplicationContext("scope.xml");

	// *********** Setting Data
 Customer c1 = (Customer) context.getBean("c1");
  c1.setCid(101);
  c1.setName("Satya");

  Customer c2 = (Customer) context.getBean("c2");
  c2.setCid(102);
  c2.setName("RAM");


	//********* retrieve it again
  Customer r1 = (Customer) context.getBean("c1");
  System.out.println("R1 ==>" +r1.getCid()+" : "+r1.getName());


  Customer r2 = (Customer) context.getBean("c2");
  System.out.println("R2 ==>" +r2.getCid()+" : "+r2.getName());

	}
}
R1 ==>101 : Satya
R2 ==>102 : RAM
Since the bean ‘Customer’ is in singleton scope, the second retrieval by ‘R1, R2 will display the same data set by ‘C1, C2’ also, even it’s retrieve by a new getBean() method.
In singleton, only a single instance per Spring IoC container, no matter how many time you retrieve it with getBean(), it will always return the same instance
Prototype
The non-singleton, prototype scope of bean deployment results in the creation
of a new bean instance every time a request for that specific bean is made.
If you change scope="prototype" the Spring.Xml , it will create new bean
every time its called.
<beans>
	<bean id="c1" class="core.Customer" scope="prototype">
	</bean>

	<bean id="c2" class="core.Customer" scope="prototype">
	</bean>
</beans>
You will get following output.
R1 ==>0 : null
R2 ==>0 : null
In prototype scope, you will have a new instance for each getBean() method called.
6.dependency-check
In Spring, you can use dependency checking feature to make sure the required properties have been set or injected.
4 dependency checking modes are supported:
-
none (default) – No dependency checking.
-
simple – If any properties of primitive type (int, long, double…) and collection types (map, list..) have not been set, UnsatisfiedDependencyException will be thrown.
-
objects – If any properties of object type have not been set, UnsatisfiedDependencyException will be thrown.
-
all – If any properties of any type have not been set, an UnsatisfiedDependencyException
will be thrown
Explicitly define the dependency checking mode for every bean class is tedious and error prone.
you can set a default-dependency-check attribute in the
<beans> root element to force the entire beans declared within <beans> root element to apply this rule.
However, this root default mode will be overridden by a bean’s own mode if specified.
In XML
<beans xmlns="http://www.springframework.org/schema/beans"
	xmlns:xsi="http://www.w3.org/2001/XMLSchema-instance"
	default-dependency-check="all">

<bean id="CustomerBean" class="com.smlcodes.Customer"
                        dependency-check="simple/objects/all">
     <property name="person" ref="PersonBean" />
     <property name="action" value="buy" />
</bean>

</beans>
Using Annotations
Spring’s dependency checking in bean configuration file is used to make sure all properties of a certain types (primitive, collection or object) have been set.
In most scenarios, you just need to make sure a particular property has been set, but not all properties.
For this case, you need @Required annotation, see following example :
A Customer object, apply @Required in setPerson() method to make sure the person property has been set.
public class Customer
{
	private Person person;
	private int type;
	private String action;

	public Person getPerson() {
 return person;
	}
	@Required
	public void setPerson(Person person) {
 this.person = person;
	}
}
register an RequiredAnnotationBeanPostProcessor to aware of the @Required annotation in bean configuration file.
<beans>
	...
	<context:annotation-config />
	...
</beans>
7.Import
Using Java : You may load multiple Spring bean configuration files in the code :
ApplicationContext context = new ClassPathXmlApplicationContext(new String[] {"Spring-Common.xml",
              "Spring-Connection.xml","Spring-ModuleA.xml"});
Using xml : SpringAll.xml
<import resource="common/Spring-Common.xml"/>
<import resource="connection/Spring-Connection.xml"/>
<import resource="moduleA/Spring-ModuleA.xml"/>
Now you can load a single xml file like this :
ApplicationContext context = new ClassPathXmlApplicationContext(SpringAll.xml);
8.Lazy-init
By default, Spring -application context” eagerly creates and initializes all beans during application startup itself. It helps in detecting the bean configuration issues at early stage, in most of the cases.
But sometimes, you may need to mark some or all beans to be lazy initialized, means Beans should initailze when they are required, by using lazy-init attribute.
The Objects with huge data not required to initialize at Startup. those type of objects we should mark as lazy init objects.
public class A {
	public A(){
 System.out.println("-- A initialized");
	}
}

public class B {
	public B() {
 System.out.println("-- B initialized");
	}
}
<beans>
	 <bean id="a" class="core.A" lazy-init="default" />
	 <bean id="b" class="core.B" lazy-init="true" />
</beans>
public class LazyTest {
	public static void main(String[] args) {

 System.out.println("**** Eager Inits START ****");
 ApplicationContext context = new ClassPathXmlApplicationContext("Spring.xml");
 System.out.println("**** Eager Inits End ****");

 System.out.println("Lazy Init ...Intializes Only when calling getBean()");
 context.getBean("b");

	}
}
**** Eager Inits START ****
-- A initialized
**** Eager Inits End ****
Lazy Init ...Intializes Only when calling getBean()
-- B initialized
Using XML
1.Lazy load specific beans only
<beans>
<bean id="e" class="EmployeeManagerImpl"  lazy-init="true"/>
<beans>
2.Lazy load all beans
<beans default-lazy-init="true">
<bean id="e" class="EmployeeManagerImpl" />
<beans
Using Annotations
1.Lazy load specific beans only
@Configuration
public class AppConfig {

	@Lazy
	@Bean
	public EmployeeManager employeeManager() {
 return new EmployeeManagerImpl();
	}
}
2.Lazy load all beans
@Lazy
@Configuration
public class AppConfig {

	@Bean
	public EmployeeManager employeeManager() {
 return new EmployeeManagerImpl();
	}

}
init-method, destroy-method
to understand these, you must know Bean Lify Cycle, Let’s Start!!