Docker – Introduction
What is Virtualization?
Virtualization is the technique of importing a Guest operating system on top of a Host operating system. This eliminated the need for extra hardware resource.
The advantages of Virtual Machines or Virtualization are:
-
Multiple operating systems can run on the same machine
-
Maintenance and Recovery were easy in case of failure conditions
-
Total cost of ownership was also less due to the reduced need for infrastructure
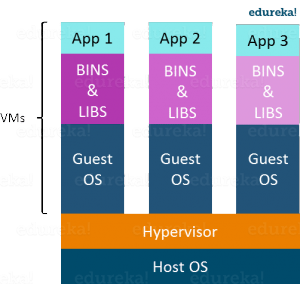
In above pic, you can see there is a host operating system on which there are 3 guest operating systems running which is nothing but the virtual machines.
Guest OS running on top of the host OS, which will have its own kernel and set of libraries and dependencies. This takes up a large chunk of system resources, i.e. hard disk, processor and especially RAM.
Disadvantages of Virtualization:
-
Running multiple Virtual Machines leads to unstable performance
-
Hypervisors are not as efficient as the host operating system
-
Boot up process is long and takes time
What is Containerization?
Containerization is also a type of Virtualization. Containerization is however more efficient because there is no guest OS here and utilizes a host’s operating system, share relevant libraries & resources as and when needed unlike virtual machines
All the containers share, host operating system and holds only the application related binaries & libraries. They are lightweight and faster than Virtual Machines.
Advantages of Containerization over Virtualization:
-
Containers on the same OS kernel are lighter and smaller
-
Better resource utilization compared to VMs
-
Boot-up process is short and takes few seconds
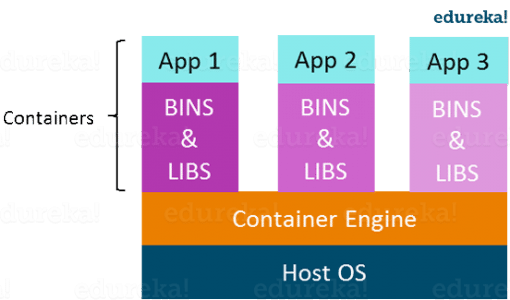
In the diagram , you can see that there is a host operating system which is shared by all the containers. Containers only contain application specific libraries which are separate for each container and they are faster and do not waste any resources.
Virtualization vs Containerization
Virtualization and Containerization both let you run multiple operating systems inside a host machine.
Virtualization deals with creating many operating systems in a single host machine. Containerization on the other hand will create multiple containers for every type of application as required
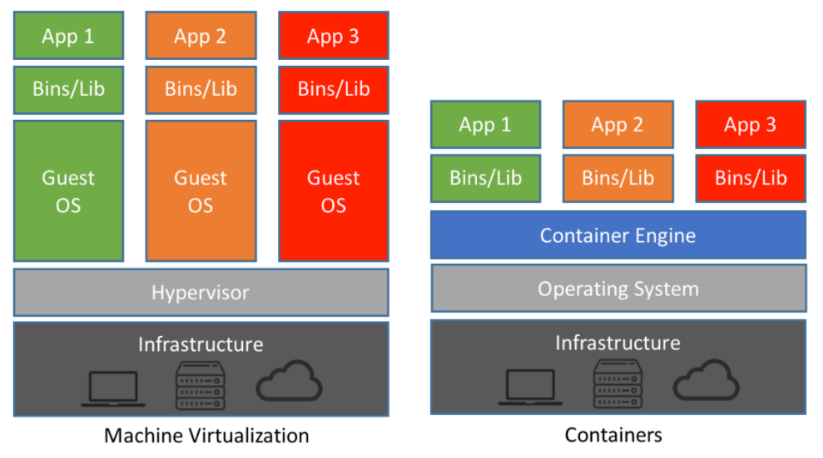
As we can see from the image, the major difference is that there are multiple Guest Operating Systems in Virtualization which are absent in Containerization. The best part of Containerization is that it is very light weight as compared to the heavy virtualization
What is Docker
Before we go ahead, let me summarize the learning till now:
-
Virtual Machines are slow and takes a lot of time to boot.
-
Containers are fast and boots quickly as it uses host operating system and shares the relevant libraries.
-
Containers does not waste or block host resources unlike virtual machines.
-
Containers have isolated libraries and binaries specific to the application they are running.
-
Containers are handled by Containerization engine.
-
Docker is one of the containerization platforms which can be used to create and run containers.
What is Docker
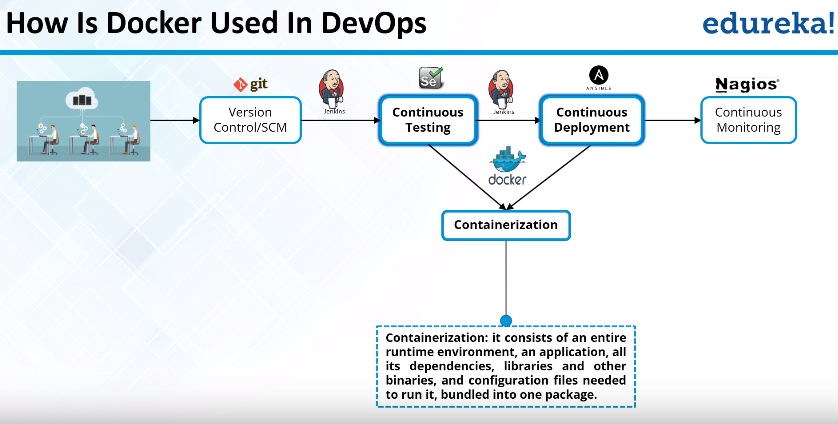
Docker is a containerization platform(it’s just a platform) that packages your application and all its dependencies together in the form of a docker container to ensure that your application works seamlessly in any environment
What is Container ?
Docker Container is a standardized unit which can be created on the fly to deploy a particular application or environment. It could be an Ubuntu container, CentOs container, etc. to full-fill the requirement from an operating system point of view. Also, it could be an application-oriented container like CakePHP container or a Tomcat-Ubuntu container etc.
**Let’s understand it with an example:**
A company needs to develop a Java Application. In order to do so the
developer will setup an environment with tomcat server installed in it. Once
the application is developed, it needs to be tested by the tester.
Now the tester will again set up tomcat environment from the scratch to test the application. Once the application testing is done, it will be deployed on the production server.
Again, the production needs an environment with tomcat installed on it, so that it can host the Java application. If you see the same tomcat environment setup is done thrice. There are some issues that I have listed below with this approach:
-
There is a loss of time and effort.
-
There could be a version mismatch in different setups i.e. the developer & tester may have installed tomcat 7, however the system admin installed tomcat 9 on the production server.
Now, I will show you how Docker container can be used to prevent this loss.
In this case, the developer will create a tomcat docker image ( A Docker Image is nothing but a blueprint to deploy multiple containers of the same configurations ) using a base image like Ubuntu, which is already existing in Docker Hub (Docker Hub has some base docker images available for free) .
Now this image can be used by the developer, the tester and the system admin to deploy the tomcat environment. This is how docker container solves the problem.
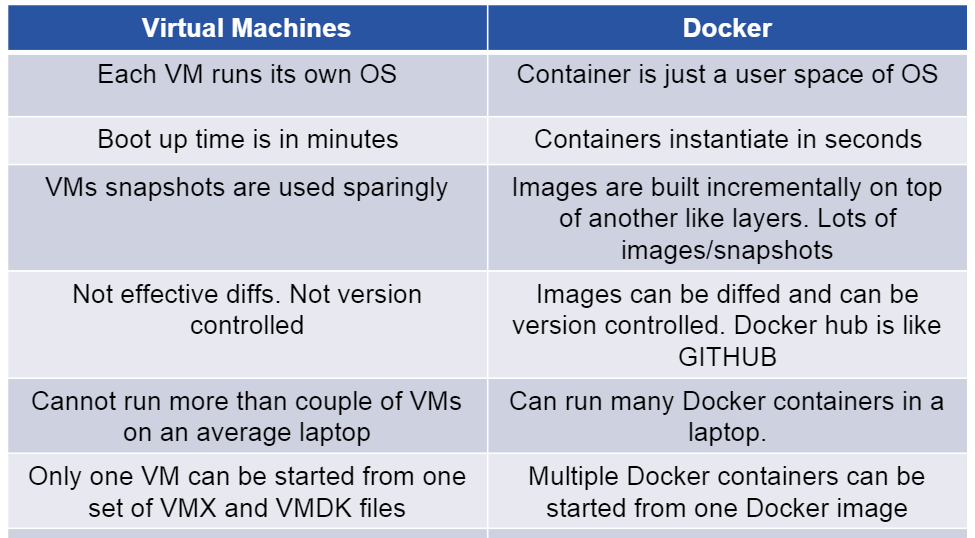
Let’s see a comparison between a Virtual machine and Docker Container to understand this better.
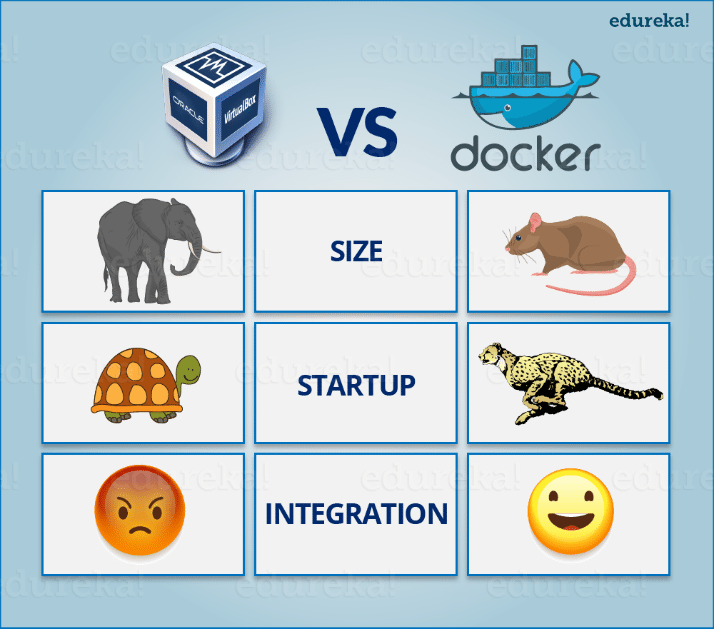
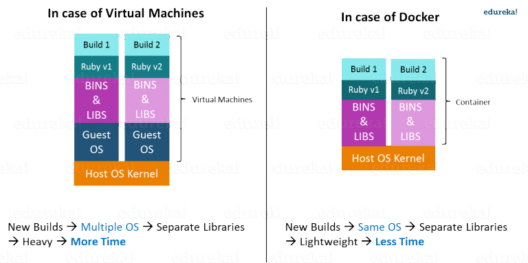
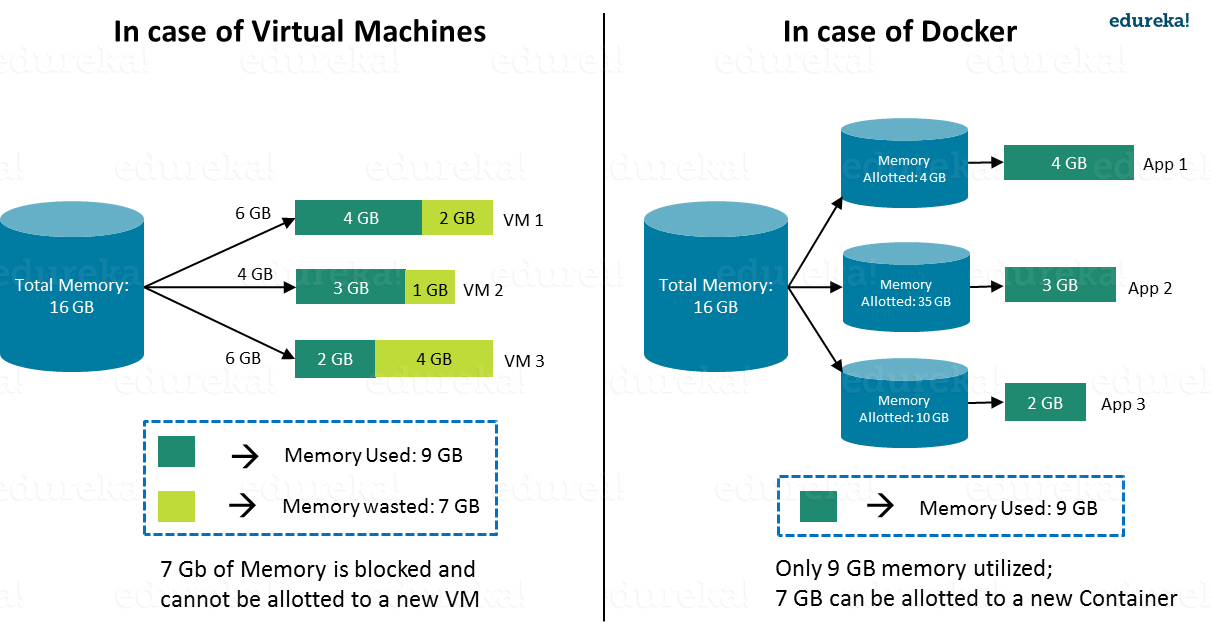
Size: The following image explains how Virtual Machine and Docker Container utilizes the resources allocated to them.
Traditioal vs Docker
Monolithic Application Architecture
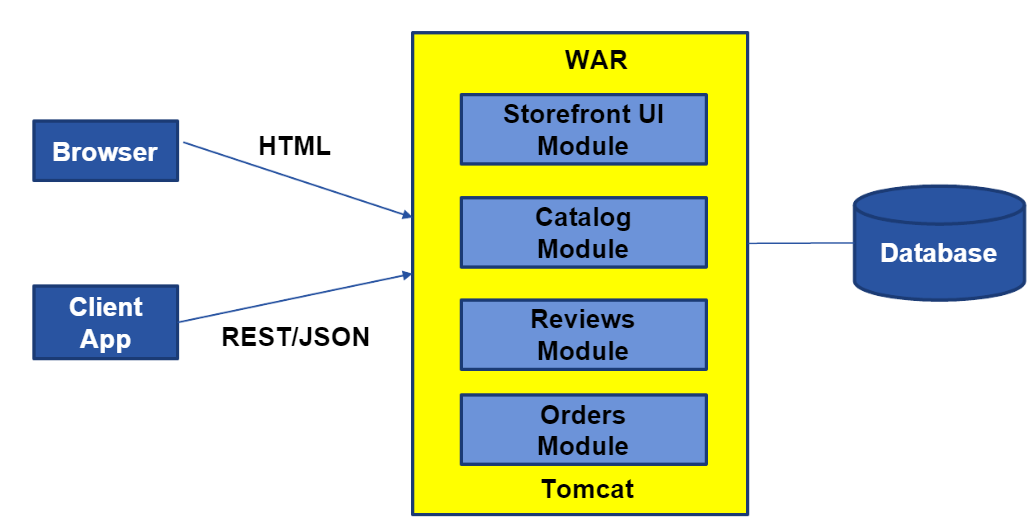
Simple to Develop, Test, Deploy & Scale
-
Simple to develop because of all the tools and IDEs support to that kind of application by default.
-
Easy to deploy because all components are packed into one bundle.
-
Easy to scale the whole application.
Microservice Architecture
Now a Days Applications developed in Microservices model
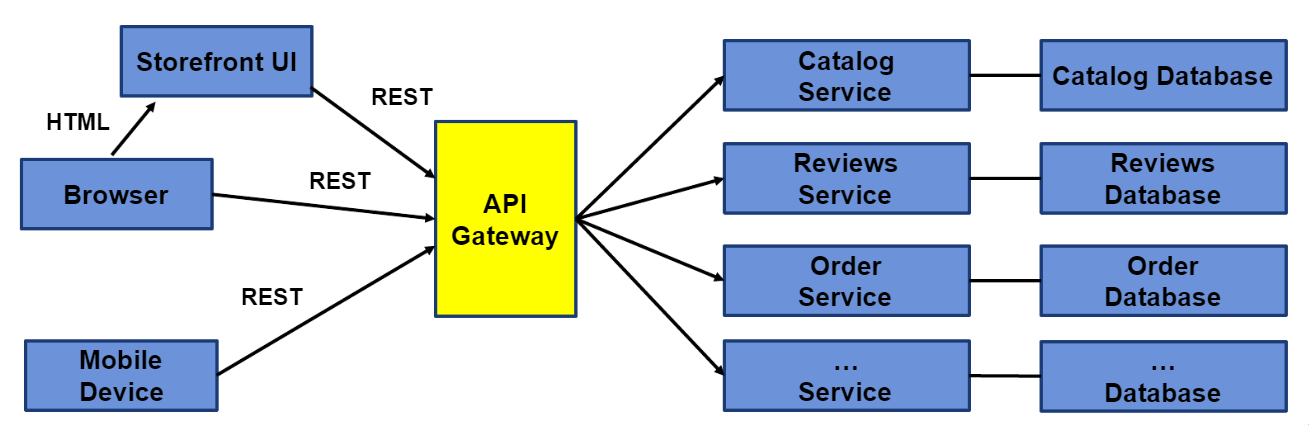
Benefits
-
Can scale independent microservices separately. No need to scale the whole the system
-
Can use the latest technologies to develop the microservices.
-
One component failure will not cause entire system downtimes.
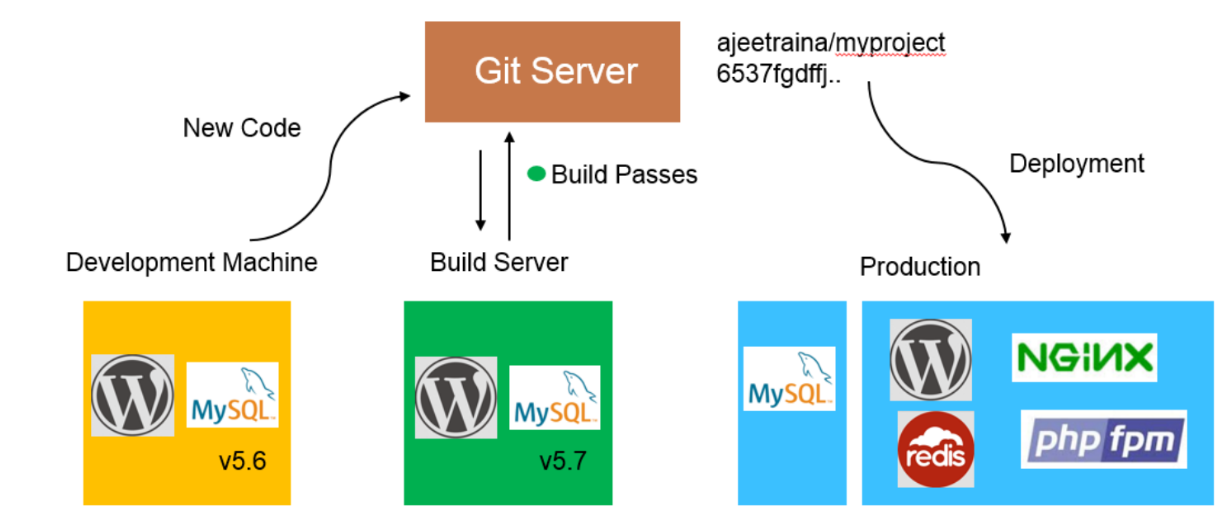
Traditional Software Development Workflow (without Docker)
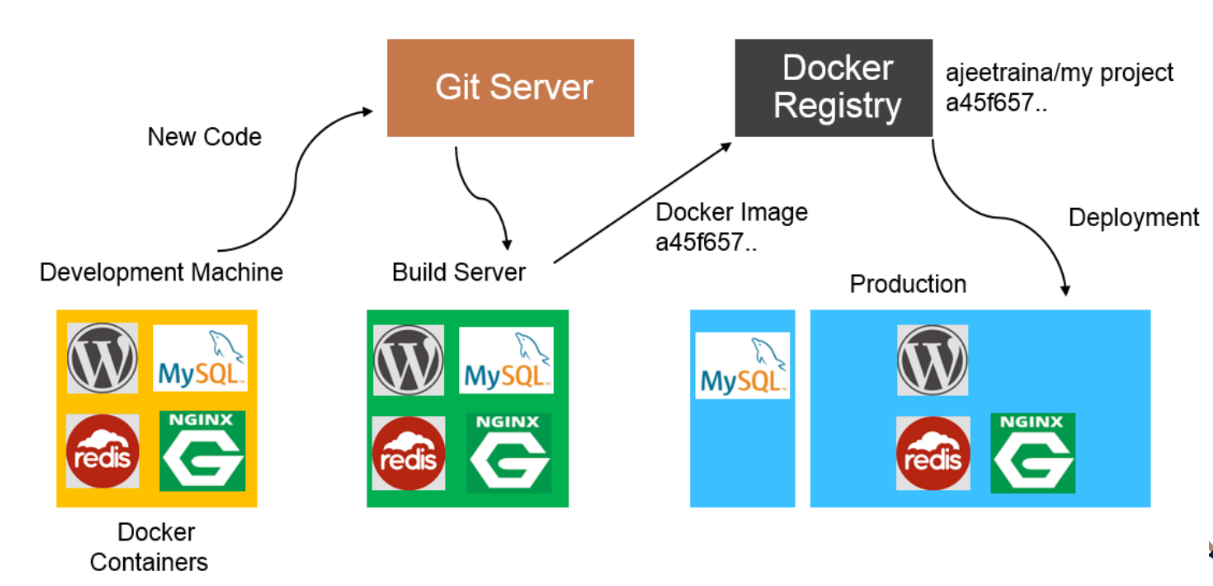
With Docker
Docker Architecture
Docker Architecture includes
- Docker client – used to trigger Docker commands,
- Docker Host – running the Docker Daemon
- Docker Registry – storing Docker Images.
- The Docker Daemon running within.
- Docker Host - is responsible for the images and containers.
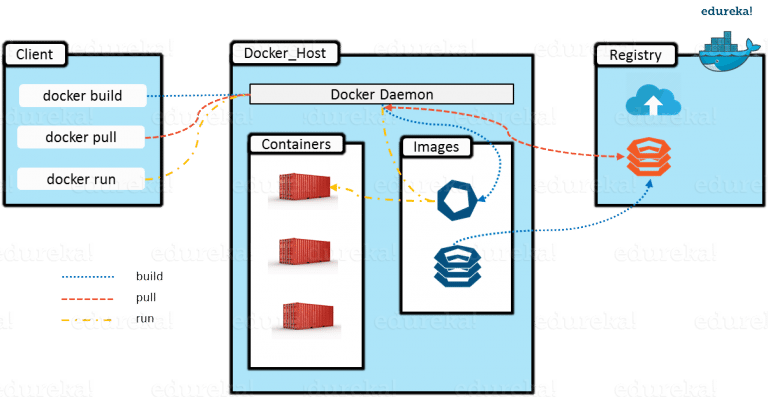
-
To build a Docker Image, we can use the CLI (client) to issue a build command to the Docker Daemon (running on Docker_Host). The Docker Daemon will then build an image based on our inputs and save it in the Registry, which can be either Docker hub or a local repository
-
If we do not want to create an image, then we can just pull an image from the Docker hub, which would have been built by a different user
-
Finally, if we have to create a running instance of my Docker image, we can issue a run command from the CLI, which will create a Docker Container.
How Docker Works
Docker Engine Architecture
Docker Engine
Docker Engine is simply the docker application that is installed on your host machine. It works like a client-server application which uses:
-
A server which is a type of long-running program called a daemon process
-
A command line interface (CLI) client
-
REST API is used for communication between the CLI client and Docker Daemon
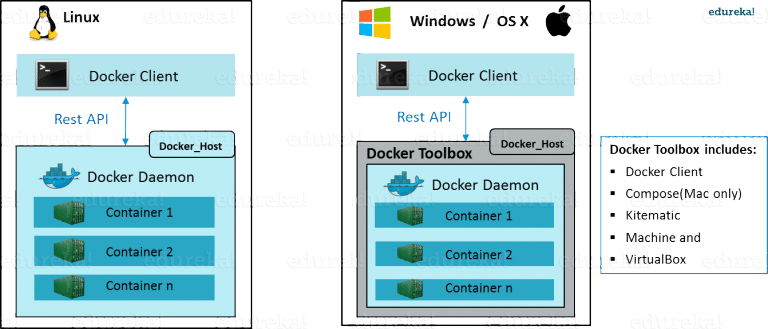
As per the above image, in a Linux Operating system, there is a Docker client which can be accessed from the terminal and a Docker Host which runs the Docker Daemon. We build our Docker images and run Docker containers by passing commands from the CLI client to the Docker Daemon.
Docker Image
Docker Image can be compared to a template which is used to create Docker Containers. They are the building blocks of a Docker Container. These Docker Images are created using the build command. These Read only templates are used for creating containers by using the run command.

Docker Container
Containers are the ready applications created from Docker Images or you can say a Docker Container is a running instance of a Docker Image and they hold the entire package needed to run the application. This happens to be the ultimate utility of Docker.
Docker Registry?
Docker Registry is where the Docker Images are stored. The Registry can be either a user’s local repository or a public repository like a Docker Hub allowing multiple users to collaborate in building an application.
Even with multiple teams within the same organization can exchange or share containers by uploading them to the Docker Hub. Docker Hub is Docker’s very own cloud repository similar to GitHub.

Docker Product offering
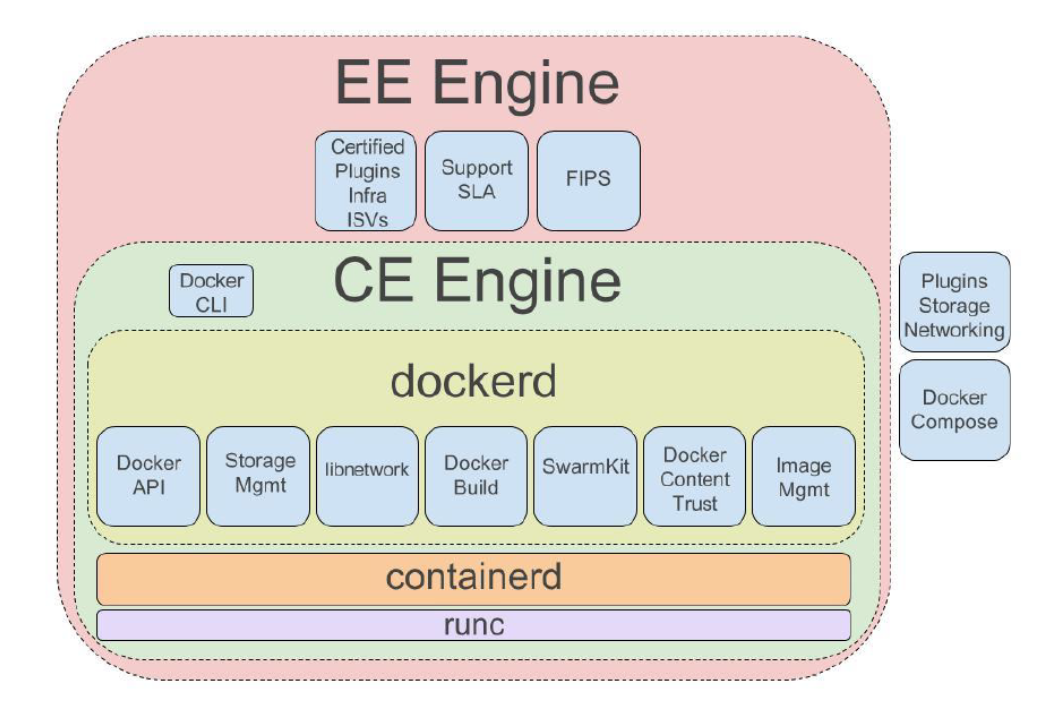
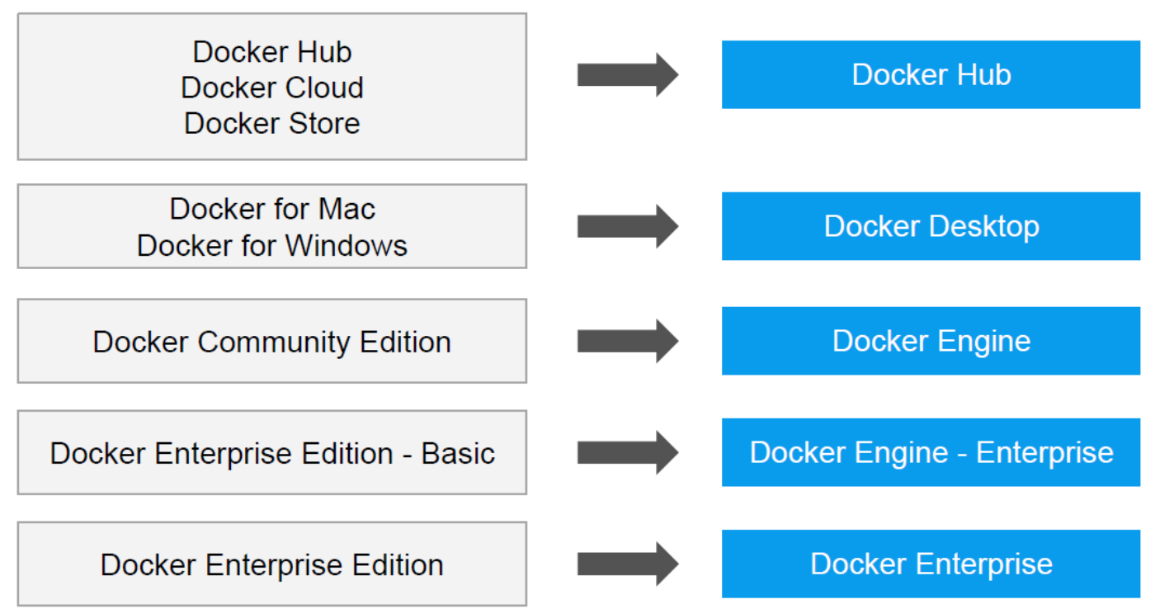
Docker Install Ubuntu
Manual Install
1.First, update your existing list of packages:
sudo apt update
2.Next, install a few prerequisite packages which let apt use packages over HTTPS:
sudo apt install apt-transport-https ca-certificates curl
software-properties-common
3.Then add the GPG key for the official Docker repository to your system:
curl -fsSL https://download.docker.com/linux/ubuntu/gpg \| sudo apt-key add -
4.Add the Docker repository to APT sources:
sudo add-apt-repository "deb [arch=amd64]
https://download.docker.com/linux/ubuntu bionic stable"
5.Next, update the package database with the Docker packages from the newly added repo:
sudo apt update
6.Make sure you are about to install from the Docker repo instead of the default Ubuntu repo:
apt-cache policy docker-ce
You’ll see output like this, although the version number for Docker may be different:
docker-ce:
  Installed: (none)
  Candidate: 18.03.1~ce~3-0~ubuntu
  Version table:
     18.03.1~ce~3-0~ubuntu 500
        500 https://download.docker.com/linux/ubuntu bionic/stable amd64 Packages
7.Notice that docker-ce is not installed, but the candidate for installation is from the Docker repository for Ubuntu 18.04 (bionic).So, install Docker:
sudo apt install docker-ce
8.Docker should now be installed, the daemon started, and the process enabled to start on boot. Check that it’s running:
sudo systemctl status docker

● docker.service - Docker Application Container Engine
   Loaded: loaded (/lib/systemd/system/docker.service; enabled; vendor preset: enabled)
   Active: active (running) since Mon 2018-10-01 21:10:48 IST; 3min 39s ago
if not start, start the service by running
sudo service docker start

satya@satya:~/.../docker$ docker --version
Docker version 18.06.1-ce, build e68fc7a
Using Ubuntu Vagrant Trusty
Get vagrant Box & run vagrant up
Vagrant.configure("2") do |config|
  config.vm.box = "ubuntu/trusty64"
  config.vm.network "private_network", ip: "192.168.33.10"
  config.vm.hostname = "master.satyacodes.vm"
  config.vm.network "forwarded_port", guest: 80, host: 8080, auto_correct: true
  config.vm.synced_folder "C:\\Ops\\vagrant\\ShareFolder", "/shareFolder"
  config.ssh.username = "vagrant"
  config.ssh.password = "vagrant"
end
Install Docker on Ubuntu 14.04 LTS(latest versions not working)
We will begin by installing with the following:
sudo apt-get install docker.io
We must then make a symbolic link between the original location of the Docker installation, so the program knows where to look for it.
sudo ln -sf /usr/bin/docker.io /usr/local/bin/docker
sudo sed -i '$acomplete -F _docker docker' /etc/bash_completion.d/docker.io
Furthermore, If you would like to install the latest version on your system, we will need to install additional dependencies in the following order to ensure everything checks out.
sudo apt-get install apt-transport-https

sudo apt-key adv --keyserver hkp://keyserver.ubuntu.com:80 --recv-keys 36A1D7869245C8950F966E92D8576A8BA88D21E9
sudo sh -c "echo deb https://get.docker.io/ubuntu docker main\ > /etc/apt/sources.list.d/docker.list"

sudo apt-get update

sudo apt-get install lxc-docker

sudo apt-get install apparmor
Finally, you can verify that the latest version of docker is installed with the following:
sudo docker version
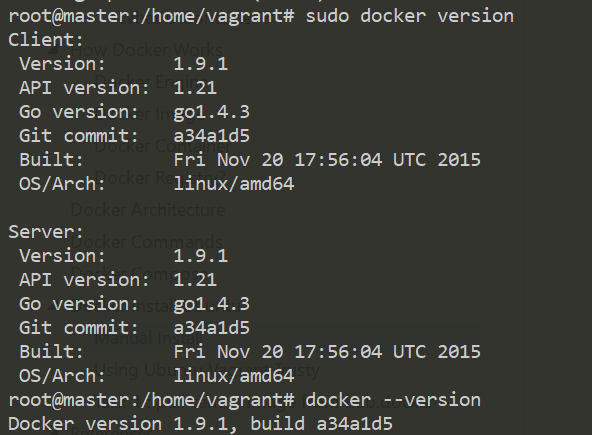
Check that the docker daemon has been started
service docker status
service docker start

# add vagrant user to Docker
sudo usermod -a -G docker "vagrant"