Ansible – Tower
Ansible Tower is web-based edition of Terminal based Ansible. Below are its features

Read More : https://www.edureka.co/blog/ansible-tower/
Ansible Tower – Jenkins Configure
https://www.ansible.com/blog/ansible-tower-jenkins-in-under-5-minutes
Ansible – Lab
Our company have complex multitier applications. Each of these applications contains many servers, like - load balancers(LB), web servers(WWW), database servers(DB), caching applications, and middleware queues etc.
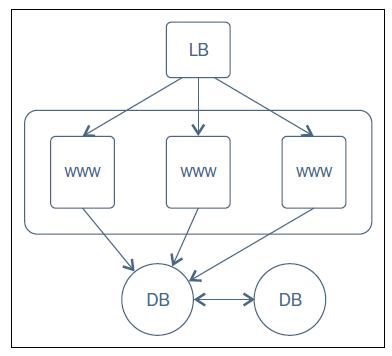
Example policies and the sequence in which those are to be applied is shown in the following steps:
1.Database servers(DB)
- Install & configure MySQL
2.Web Servers(WWW)
-
Install & configure Nginx with PHP bindings.
-
Deploy a WordPress application in Webservers and add respective configurations to Nginx.
3.Load Balancers(LB)
-
Install & configure HaProxy service on the load balancer hosts
-
Update haproxy configurations with the hostnames of all the web servers created earlier.
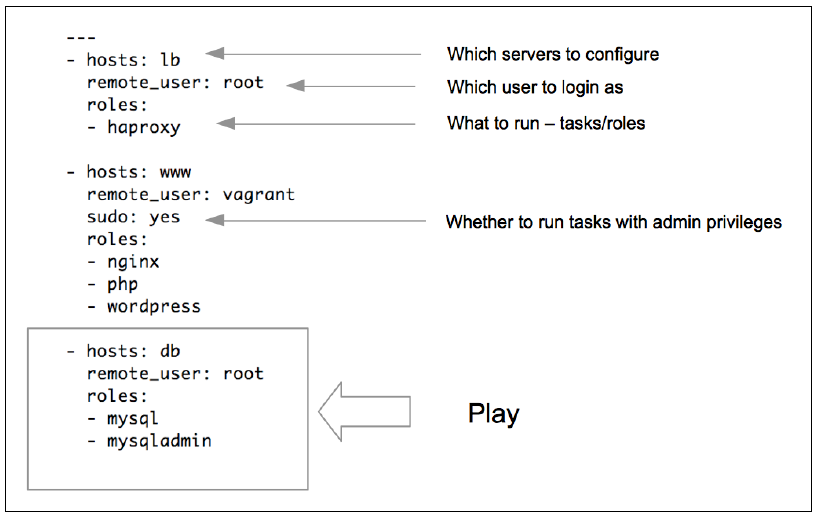
The following is a sample playbook that translates the infrastructure blueprint into policies enforceable by Ansible.
Task 1: Create a user, install htop & nginx on all hosts.
-
Create a ‘devops’ user under ‘DevOps’ group on all hosts.
-
Install the “htop” utility(upgrade alternative to top command).
-
Install Nginx on all web servers and start it as a service.
# p3_ngnix_usergroup.yml
---
- hosts: all
  remote_user: vagrant
  become: yes
  become_method: sudo
  tasks:
  - name: create devops group
    group: name=devops state=present
  - name: create devops user with admin previleges
    user: name=devops comment="Devops User" uid=2001 group=devops
  - name: install htop package
    action: apt name=htop state=present update_cache=yes

- hosts: web
  user: vagrant
  become: yes
  become_method: sudo
  tasks:
    - name: Install nginx with latest version
      apt: name=nginx state=present update_cache=true force=yes
    - name: start nginx
      service:
          name: nginx
          state: started


# inventory1_lb

[all]
web1 ansible_ssh_host=web1.satyacodes.vm ansible_user=vagrant
web2 ansible_ssh_host=web2.satyacodes.vm ansible_user=vagrant
db1 ansible_ssh_host=db1.satyacodes.vm ansible_user=vagrant
db2 ansible_ssh_host=db2.satyacodes.vm ansible_user=vagrant
lb  ansible_ssh_host=lb.satyacodes.vm ansible_user=vagrant

[web]
web1
web2

[db]
db1
db2

[backup]
db2

[lbs]
lb
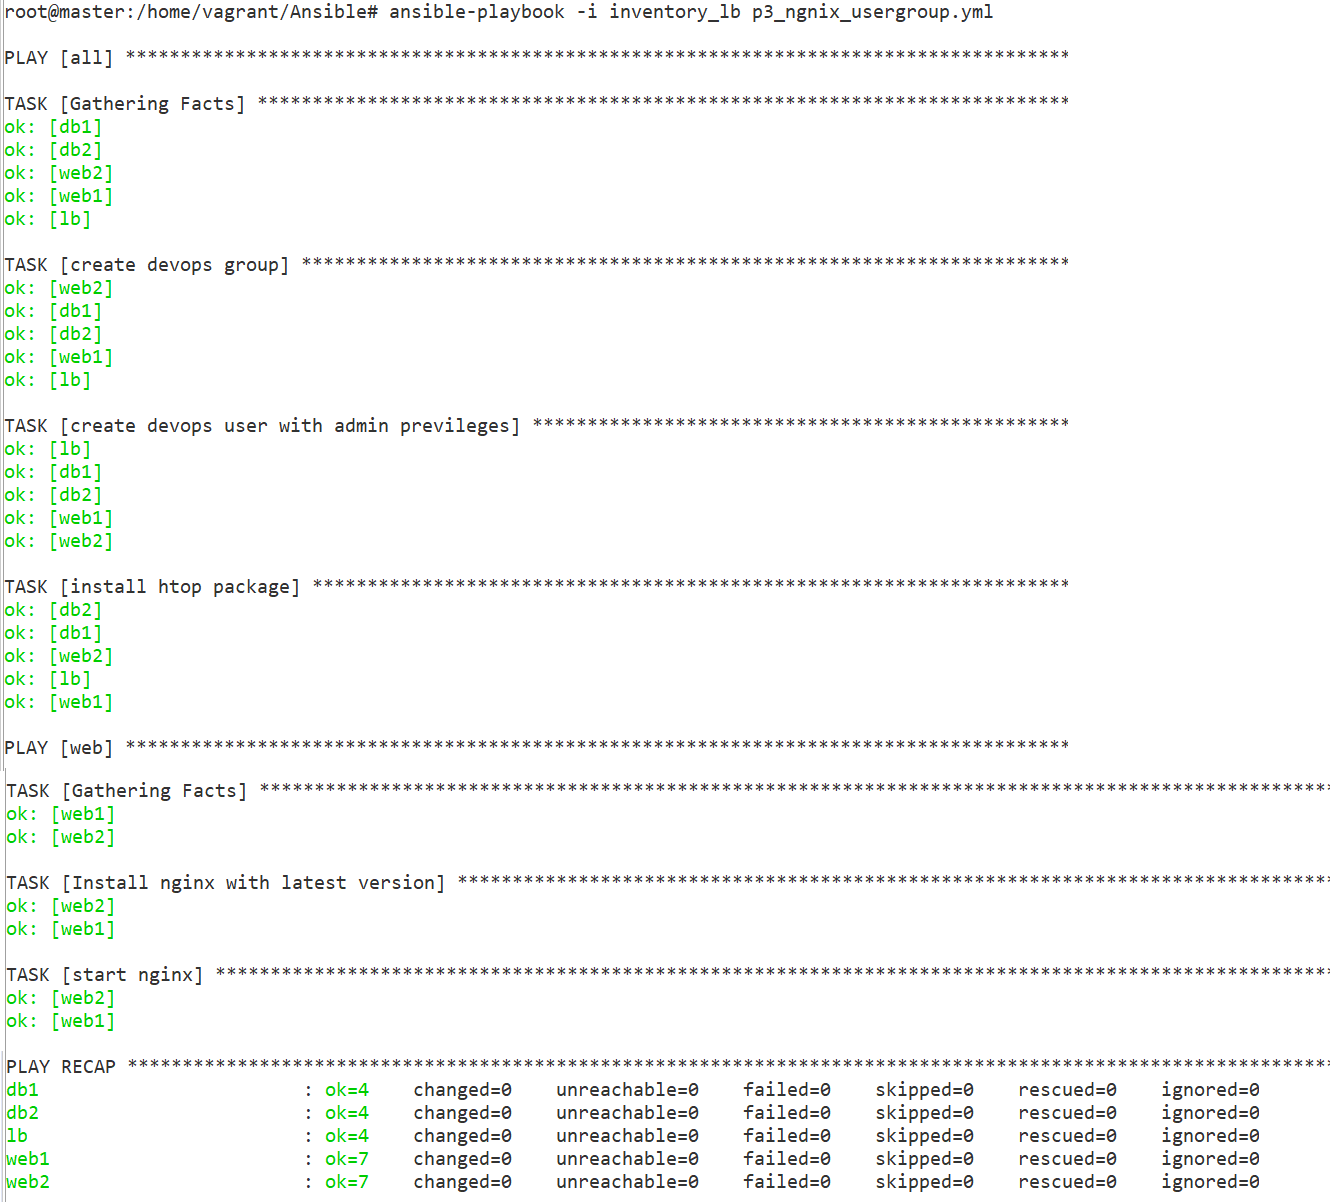
Run Playbook
ansible-playbook -i inventory_lb p3_ngnix_usergroup.yml
Task 2 – WordPress Install
Step 1 — Installing Ansible
In this section we’ll install Ansible on your build-server. SSH into your build-server and run this command to install Ansible:
sudo apt-get install ansible -y
You can make sure that Ansible is installed by running:
ansible --version
Step 2 - Create Roles
Create a directory for our playbook.
mkdir wordpress
Create two files: playbook.yml, hosts
touch playbook.yml
touch hosts
split our playbooks up into roles. For this project we’ll create four roles.
-
server
-
php
-
mysql
-
wordpress
From the project root folder (~/wordpress), create a directory called roles and
cd into it:
mkdir roles && cd roles
we will create above roles inside roles
directory(/home/vagrant/Ansible/wordpress/roles). For each role that we want to
create, we will run ansible-galaxy init:
ansible-galaxy init server
ansible-galaxy init php
ansible-galaxy init mysql
ansible-galaxy init wordpress
At this point we should have the following file structure:
[.]
|_ playbook.yml
|_ hosts
|_ [roles]
      |_ [server]
            |_ ...
      |_ [php]
            |_ ...
      |_ [mysql]
            |_ ...
      |_ [wordpress]
            |_ ...
a. server Role
1.Write server’s yml file, which does the following:
-
Update the apt-cache (apt-get update)
-
apt-get install Apache, MySQL, PHP, and related software
# roles/server/tasks/main.yml
---
- name: Update apt cache
  apt: update_cache=yes cache_valid_time=3600
  become: yes
  become_method: sudo

- name: Install required software
  apt: name={{ item }} state=present
  become: yes
  become_method: sudo
  with_items:
    - apache2
    - mysql-server
    - php5-mysql
    - php5
    - libapache2-mod-php5
    - php5-mcrypt
    - python-mysqldb
b.PHP role
will install the required PHP extensions.
roles/php/tasks/main.yml
---
- name: Install php extensions
  apt: name={{ item }} state=present
  become: yes
  become_method: sudo
  with_items:
    - php5-gd
    - libssh2-php
c.MySQL Role
We also need to set up a MySQL database for our WordPress site. We’ll do this in the mysql role.
This role does the following:
-
Create a MySQL database
-
Create a MySQL user
-
Give that user access to our database
roles/mysql/tasks/main.yml
# roles/mysql/tasks/main.yml
---
- name: Create mysql database
  mysql_db: name={{ wp_mysql_db }} state=present

- name: Create mysql user
  mysql_user:
    name={{ wp_mysql_user }}
    password={{ wp_mysql_password }}
    priv=*.*:ALL
We’re going to need a few variables for this one. For a role, you can specify default values for any variables in the defaults/main.yml file.
nano roles/mysql/defaults/main.yml
Add your database name, database username, and database password (that you want to create), in that order. Make sure you pick a secure wp_db_password.
roles/mysql/defaults/main.yml
---
# defaults file for mysql
wp_mysql_db: wordpress
wp_mysql_user: admin
wp_mysql_password: admin
d.WordPress
We’re adding a few different tasks to the roles/wordpress/tasks/main.yml file
-
First we need to download WordPress to the /tmp
-
extract the gzip file to /var/www, the location that Apache uses for storing web content
-
update Apache’s default site document root to point to our WordPress site:
-
Update constants in this file to match our database information:
# roles/wordpress/tasks/main.yml
# roles/wordpress/tasks/main.yml
---
- name: Download WordPress
  get_url:
    url=https://wordpress.org/latest.tar.gz
    dest=/tmp/wordpress.tar.gz
    validate_certs=no

- name: Extract WordPress
  unarchive: src=/tmp/wordpress.tar.gz dest=/var/www/ copy=no
  become: yes
  become_method: sudo

- name: Update default Apache site
  become: yes
  become_method: sudo
  lineinfile:
    dest=/etc/apache2/sites-enabled/000-default.conf
    regexp="(.)+DocumentRoot /var/www/html"
    line="DocumentRoot /var/www/wordpress"
  notify:
    - restart apache

- name: Copy sample config file
  command: mv /var/www/wordpress/wp-config-sample.php /var/www/wordpress/wp-config.php creates=/var/www/wordpress/wp-config.php
  become: yes
  become_method: sudo

- name: Update WordPress config file
  lineinfile:
    dest=/var/www/wordpress/wp-config.php
    regexp="{{ item.regexp }}"
    line="{{ item.line }}"
  with_items:
    - {'regexp': "define\\('DB_NAME', '(.)+'\\);", 'line': "define('DB_NAME', 'wordpress');"}
    - {'regexp': "define\\('DB_USER', '(.)+'\\);", 'line': "define('DB_USER', 'admin');"}
    - {'regexp': "define\\('DB_PASSWORD', '(.)+'\\);", 'line': "define('DB_PASSWORD', 'admin');"}
  become: yes
  become_method: sudo

# we can replace with Variables as well
  with_items:
    - {'regexp': "define\\('DB_NAME', '(.)+'\\);", 'line': "define('DB_NAME', '{{wp_mysql_db}}');"}
    - {'regexp': "define\\('DB_USER', '(.)+'\\);", 'line': "define('DB_USER', '{{wp_mysql_user}}');"}
    - {'regexp': "define\\('DB_PASSWORD', '(.)+'\\);", 'line': "define('DB_PASSWORD', '{{wp_mysql_password}}');"}
  become: yes
  become_method: sudo
We need to add our handler for restart apache. Save what you have so far, and open roles/wordpress/handlers/main.yml for editing:
# roles/wordpress/handlers/main.yml
---
- name: Restart Apache for Wordpress
  service: name=apache2 state=restarted
  become: yes
  become_method: sudo
Inventory (hosts file)
Edit hosts& Add the line for [wordpress], and below it, the IP address of your wordpress-server:
hosts
[wordpress]
192.168.33.11 ansible_user=vagrant
192.168.33.12 ansible_user=vagrant
playbook.yml
root\@master:/home/vagrant/Ansible/wordpress# cat playbook.yml
---
- hosts: wordpress
  remote_user: vagrant
  become: yes
  become_method: sudo

  roles:
      - server
      - php
      - mysql
      - wordpress
Test
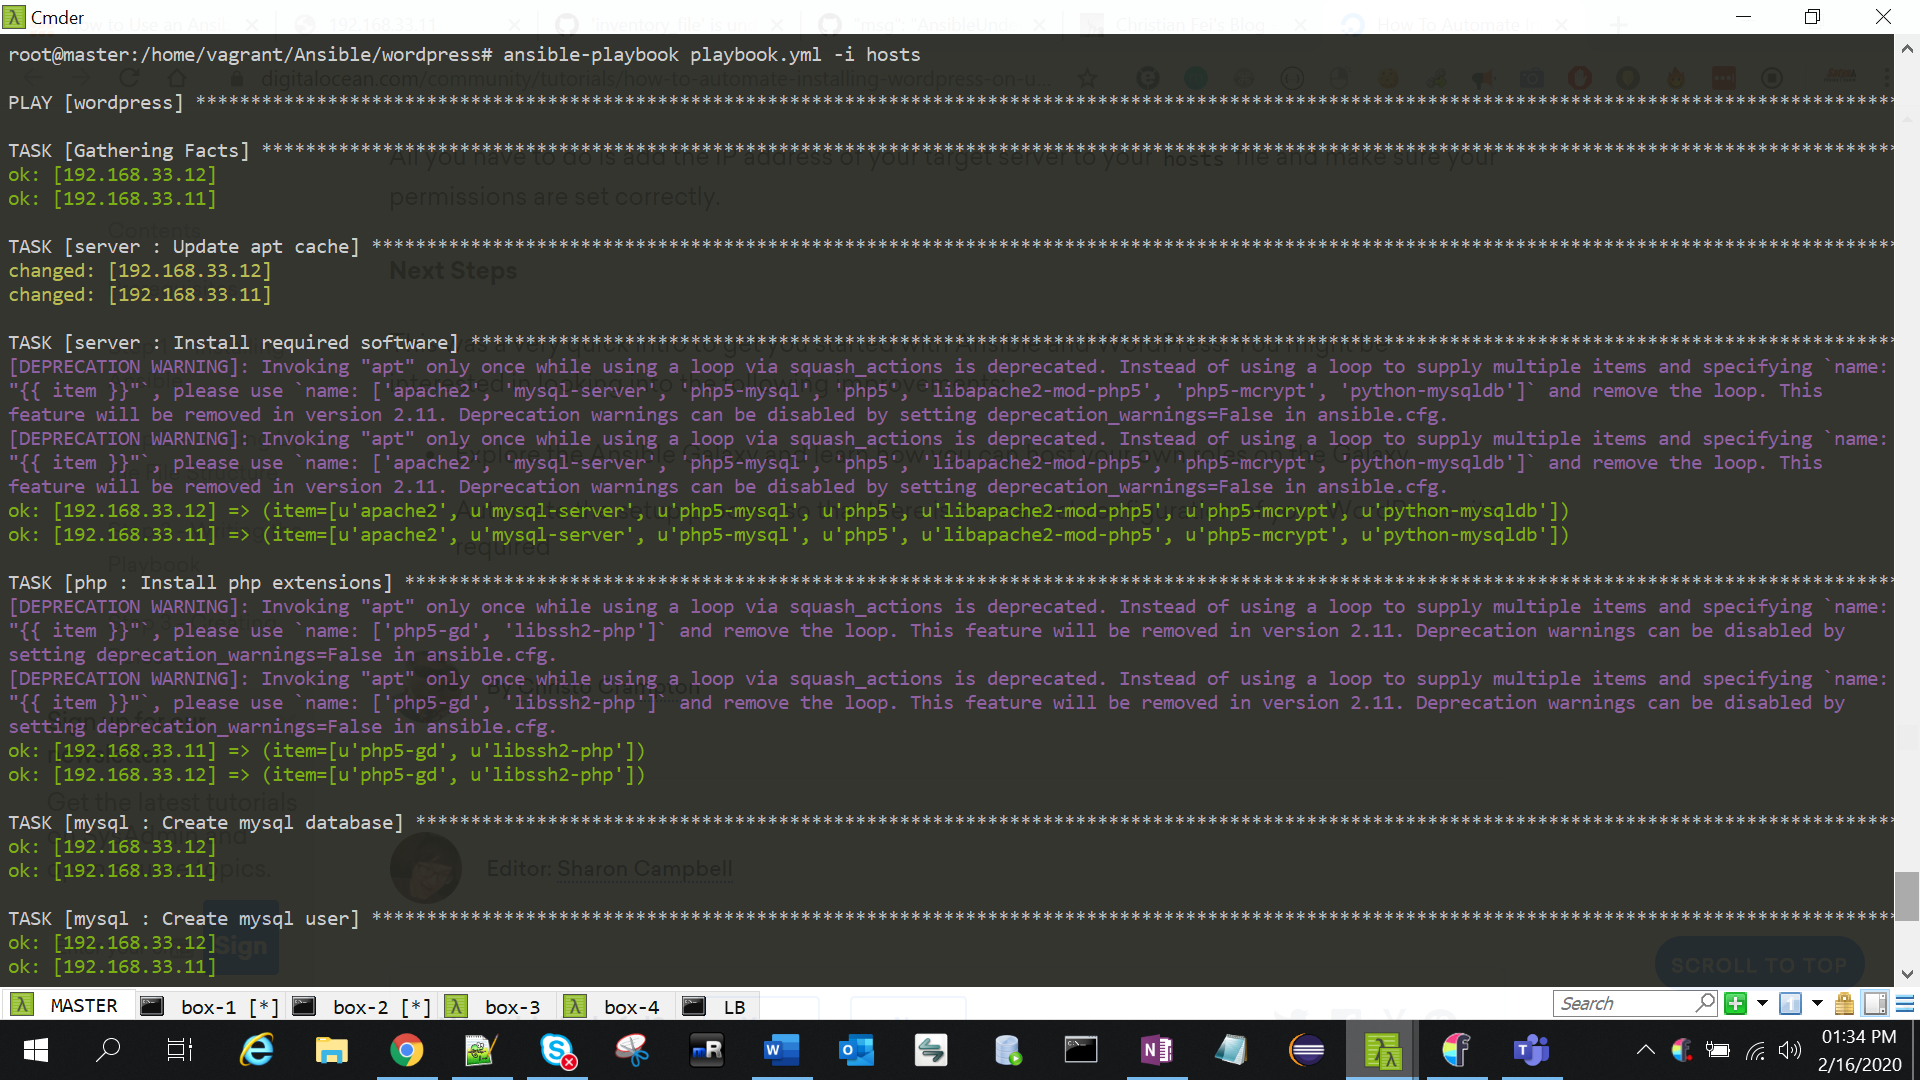
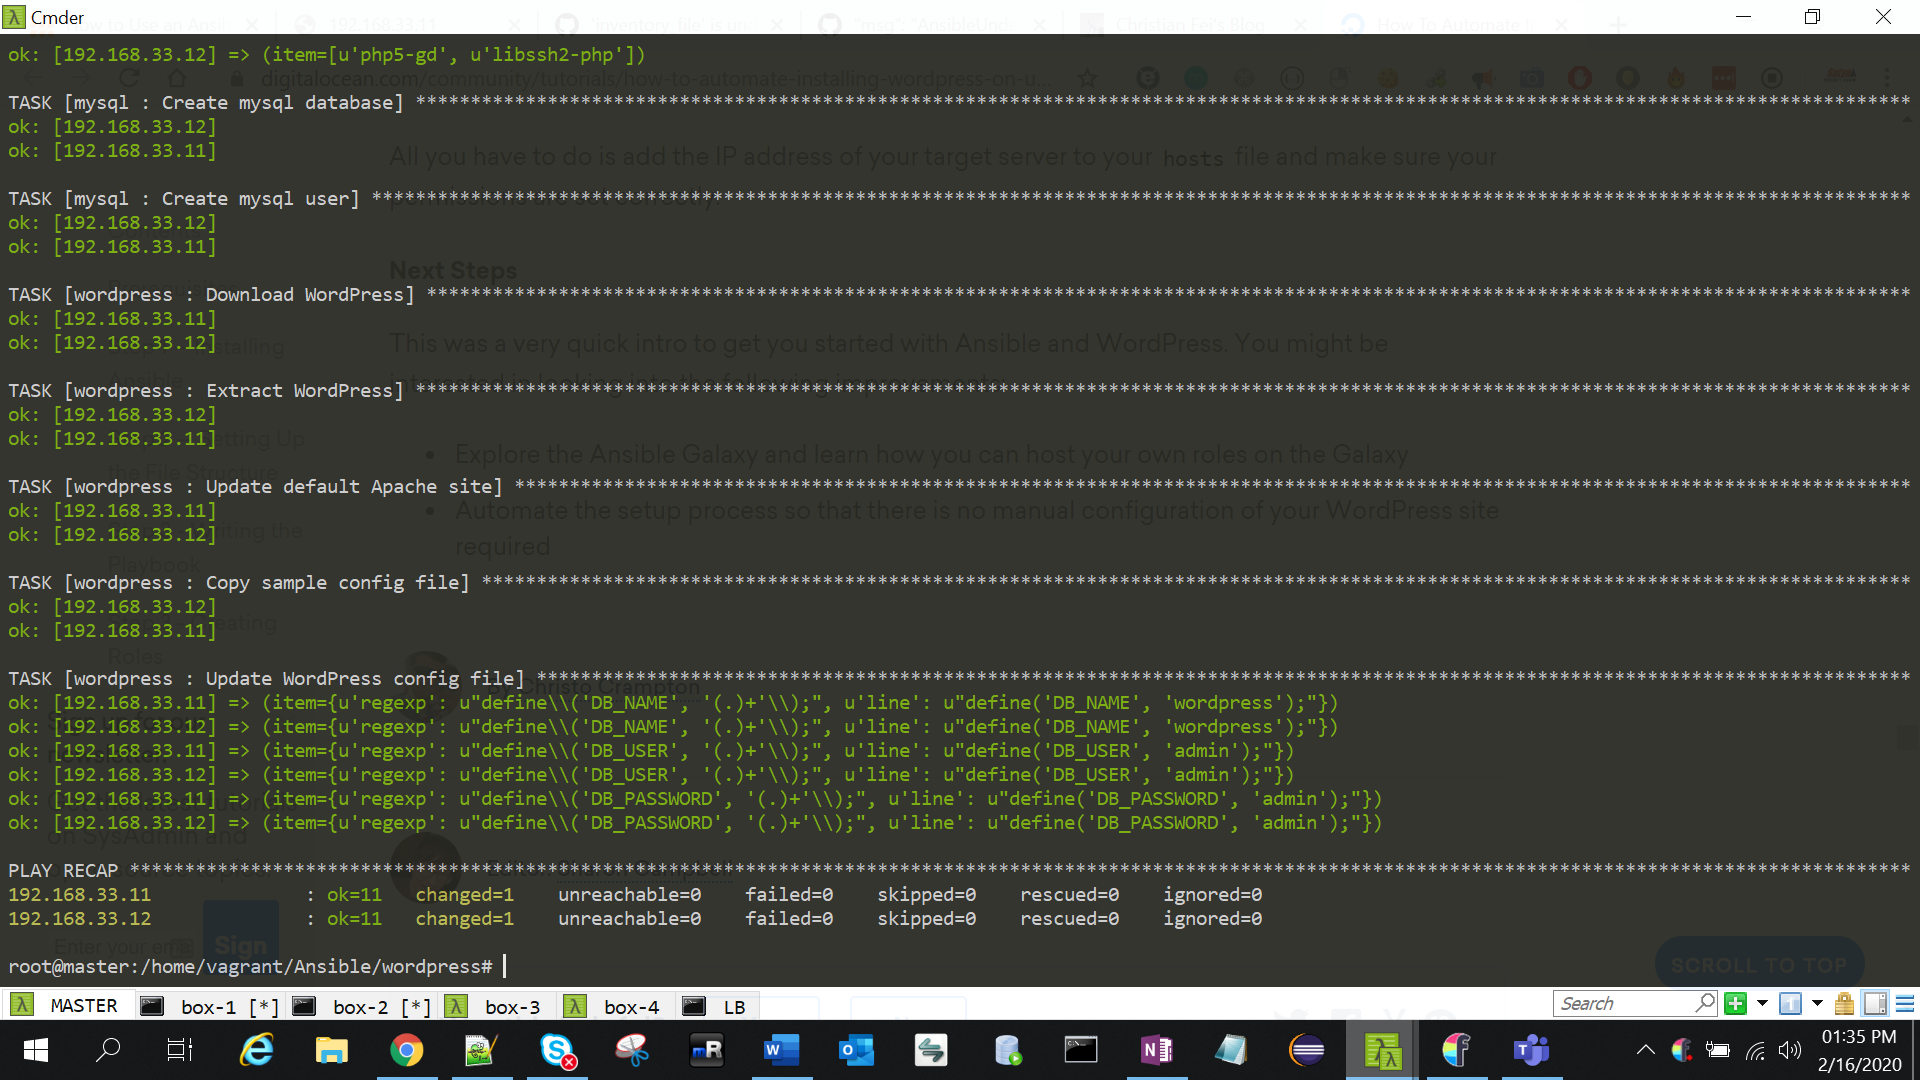
We’re done! Run the playbook to install and configure WordPress:
ansible-playbook playbook.yml -i hosts
sudo /etc/init.d/apache2 stop
sudo /etc/init.d/apache2 start
sudo service apache2 restart
Errors
1.”Failed to lock apt for exclusive operation”
Put:
become: yes
Now everything works as intended
-–
- hosts: all
remote_user: vagrant
become: yes
become_method: sudo
2. /usr/bin/apt-get -y -o Dpkg::Options::=–force-confdef -o Dpkg::Options::=–force-confold install ‘nginx’’ failed:
Use `force=yes` Option while doing apt:
apt: pkg=nginx state=installed update_cache=true force=yes
Ref : https://docs.ansible.com/ansible/latest/modules/apt_module.html
3 .To display OUTPUT in readable format
ANSIBLE_STDOUT_CALLBACK=debug
or
ansible-playbook … | sed ‘s/\\n/\n/g’
use plugin
To use it, edit your ansible.cfg file (either global, in /etc/ansible/ansible.cfg, or a local one in your playbook/project), and add the following lines under the [defaults] section:
# Use the YAML callback plugin.
stdout_callback = yaml
# Use the stdout_callback when running ad-hoc commands.
bin_ansible_callbacks = True
4.fatal: [192.168.33.11]: FAILED! => msg: ‘'’wp_mysql_db’’ is undefined’
fatal: [192.168.33.12]: FAILED! =>
msg: ‘'’wp_mysql_db’’ is undefined’
Remove {{ }} varibles from scipt & provide statsic values
5.Your VM has become “inaccessible.” Unfortunately, this is a critical error
Open VirtualBox > Find the VM > Remove
And hit vagrant up again
Ref.
https://docs.ansible.com/ansible/latest/user_guide/playbooks_intro.html
https://www.youtube.com/watch?v=cyylA0Yfn2o&list=PL8cE5Nxf6M6YUaKyuon-AWRDNr31ANuo2&index=9
https://dotlayer.com/how-to-use-an-ansible-playbook-to-install-wordpress/