Ansible – Inventory
Ansible works against multiple managed nodes or -hosts” in your infrastructure at the same time, using a list or group of lists know as inventory.
-
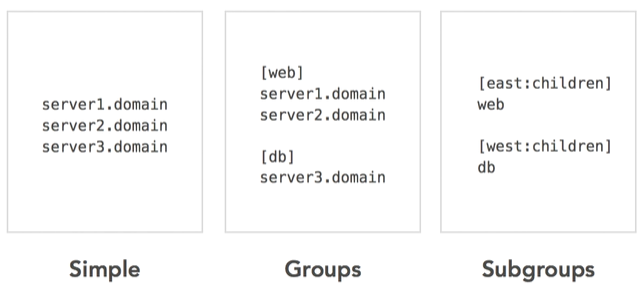
Inventory file contains list of Nodes & their IP/Hostnames
-
The default location for inventory is a file called /etc/ansible/host.
-
You can also specify a different inventory file at the command line using the -i <path> option.
Inventory Hosts Example
# /home/vagrant/Ansible/inventory

[all]
web1 ansible_ssh_host=web1.satyacodes.vm
web2 ansible_ssh_host=web2.satyacodes.vm
db1 ansible_ssh_host=db1.satyacodes.vm
db2 ansible_ssh_host=db2.satyacodes.vm

[web]
web1
web2

[db]
db1
db2

[backup]
db2
Here we have [Groups], each group have hosts.
Ansible – Master & Nodes/Hosts Configuration
I have placed a host inside /home/vagrant/Ansible/inventory_test
Hosts - Changing Hostnames in Ubuntu
If you want to change hostname to - web1.satyacodes.vm then you follow below steps
Open below files in editor & place hostname inside that.
sudo vi /etc/hostname
sudo reboot
Change Hostname in Vagrant
If you are using Vagrant, Edit vagrant file with
config.vm.hostname = "master.satyacodes.vm"

#To chane IP
config.vm.network "private_network", ip: "192.168.33.10"
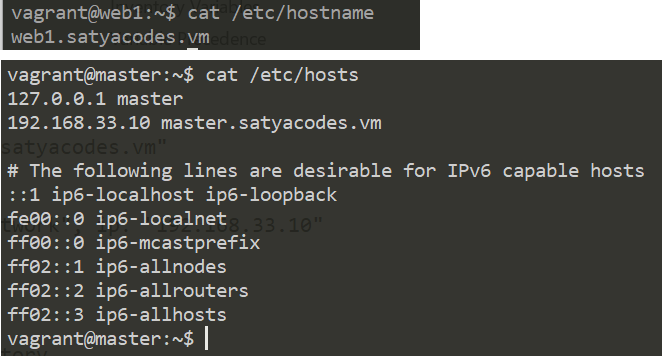
Master – configure Hosts IP address with Hostnames
We need to tell our master, while resolving hostname, given
host(web1.satyacodes.vm) is pointed to this IP (192.168.33.11). for that
we need to specify IPAddress <Hostname> mappings in /etc/hosts file
#sudo vi /etc/hosts
192.168.33.10 master.satyacodes.vm
192.168.33.11 web1.satyacodes.vm
192.168.33.12 web2.satyacodes.vm
192.168.33.13 db1.satyacodes.vm
192.168.33.14 db2.satyacodes.vm
Test Connection
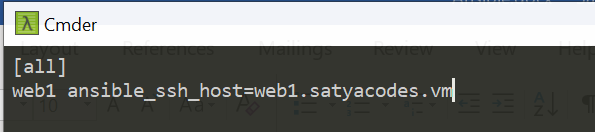
So, I have an inventory_test with a single host, which is grouped under [all] with a key web1
# home/vagrant/Ansible/inventory_test
[all]
web1 ansible_ssh_host=web1.satyacodes.vm
Test connection using ping
Here Iam trying to connect to machines and run a ping command on nodes using
ansible.
ansible -i inventory_test all -m ping

#Output
root@master:/home/vagrant/Ansible# ansible -i inventory_test all -m ping
web1 | UNREACHABLE! => {
    "changed": false,
    "msg": "Failed to connect to the host via ssh: ssh: Could not resolve hostname web1.satyacodes.vm: Name or service not known",
    "unreachable": true
}
If you Got above error, means master unable to connect with hosts, because we haven’t configured SSH / Usernames:password to connect with Hosts.
To connect with Hosts from Ansible Master node, we must configure the Login mechanism.
we can do this by in two ways
- Username/pwd Authentication
- SSH Authentication
1.Username/pwd Authentication
# home/vagrant/Ansible/inventory_test
[all]
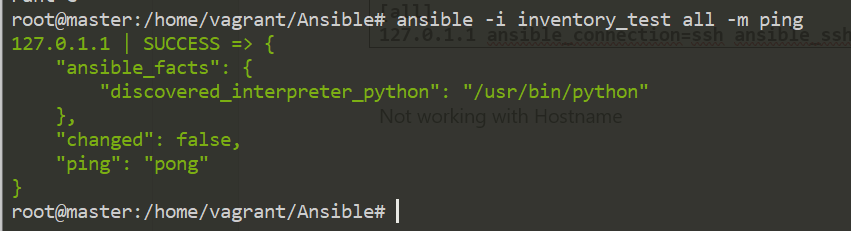
127.0.1.1 ansible_connection=ssh ansible_ssh_user=vagrant ansible_ssh_pass=vagrant
#Or
# home/vagrant/Ansible/inventory_test
[all]
web1.satyacodes.vm ansible_connection=ssh
ansible_ssh_user=vagrant ansible_ssh_pass=vagrant
ansible -i inventory_test all -m ping
Sometimes we get below error.
using a ssh password instead of a key is not possible because host key checking
is enabled and sshpass does not s upport this. please add this host's
fingerprint to your known_hosts file to manage this host
To Resolve this Run,
export ANSIBLE_HOST_KEY_CHECKING=False
Because, this is typically done by setting the following value in ansible.cfg:
[defaults]
host_key_checking = False
If you don’t want to modify ansible.cfg you can set an environment variable
like so:
export ANSIBLE_HOST_KEY_CHECKING=False
2.SSH key Authentication
Generate ssh key in the ansible master, which we have to copy to all the remote hosts for doing deployments or configurations on them.
To Generate SSH key, run ssh-keygen
root@master:/home/vagrant/Ansible# ssh-keygen
Generating public/private rsa key pair.
Enter file in which to save the key (/root/.ssh/id_rsa):
/root/.ssh/id_rsa already exists.
Overwrite (y/n)? y
Your identification has been saved in /root/.ssh/id_rsa.
Your public key has been saved in /root/.ssh/id_rsa.pub.
The key fingerprint is:
15:95:ba:2a:3f:d6:92:af:b6:61:a7:f8:ff:76:43:57 root@master
The key's randomart image is:
The key's randomart image is:
+--[ RSA 2048]----+
|         ..     E|
|      .**Boo.. . |
+-----------------+
-
Your identification has been saved in /root/.ssh/id_rsa.
-
Your public key has been saved in /root/.ssh/id_rsa.pub.
Now we need copy public key of Ansible Master to its nodes/hosts. Here my host ip is : 192.168.33.11
ssh-copy-id -i <user>@<ip address of your node machine>
ssh-copy-id -i vagrant@192.168.33.11
If you got Error : Permission denied (publickey,gssapi-keyex,gssapi-with-mic).
-
Go to /etc/ssh/sshd_config
-
uncomment ‘PasswordAuthentication yes’
-
re-start the service ‘sudo systemctl restart sshd’
Similarly copy MASTER public SSH Key to all the hosts(if you have many hosts )
ssh-copy-id -i vagrant@192.168.33.12
ssh-copy-id -i vagrant@192.168.33.13
ssh-copy-id -i vagrant@192.168.33.14
To Test, now write an Inventory file & Don’t write Credentials to It.
# /home/vagrant/Ansible/inventory_ssh
[all]
web1 ansible_ssh_host=web1.satyacodes.vm
Ping above Inventory hosts Using Ansible
ansible -i inventory_ssh all -m ping
Error:Failed to connect to the host via ssh: Permission denied (publickey,password).
We must include username
web1 ansible_ssh_host=web1.satyacodes.vm ansible_user=vagrant
web1 ansible_ssh_host=web1.satyacodes.vm ansible_user=vagrant

> ansible -i inventory_ssh all -m ping
web1 | SUCCESS => {
    "ansible_facts": {
        "discovered_interpreter_python": "/usr/bin/python"
    },
    "changed": false,
    "ping": "pong"
}
Once, that is done, you can restart the sshd service on your target server by
running:
$ service sshd restart
The next task is to test whether the ssh connection works. From build-server run:
$ ssh username@ip.address.of.host
More on Inventory
Adding variables to inventory
you may add variables directly to the hosts and groups in your main inventory file.
[atlanta]
host1 http_port=80 maxRequestsPerChild=808
host2 http_port=303 maxRequestsPerChild=909
Mostly we will use variables, to provide connection details like port, ssh ,username, pwd etc
[targets]
localhost              ansible_connection=local
other1.example.com     ansible_connection=ssh        ansible_user=myuser
other2.example.com     ansible_connection=ssh        ansible_user=myotheruser
If all hosts in a group share a variable value, you can apply that variable to an entire group at once.
[atlanta]
host1
host2

[atlanta:vars]
ntp_server=ntp.atlanta.example.com
proxy=proxy.atlanta.example.com
Inventory aliases
You can also define aliases in your inventory
web ansible_port=5555 ansible_host=192.0.2.50
In the above example, running Ansible against the host alias -web” will connect to 192.0.2.50 on port 5555
Adding ranges of hosts
If you have a lot of hosts with a similar pattern, you can add them as a range, separated by ` : `
[webservers]
www[01:50].example.com
You can also define alphabetic ranges:
[databases]
db-[a:f].example.com
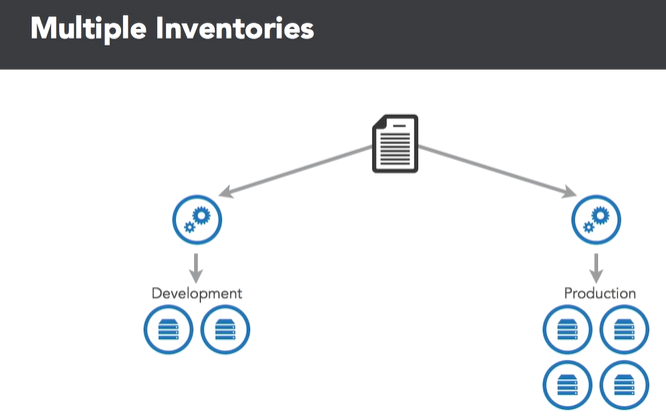
Using multiple inventory sources
You can target multiple inventory sources at the same time by giving multiple inventory parameters separated by -i.
This can be useful when you want to target separate environments, like staging and production, at the same time for a specific action. Target two sources from the command line like this:
ansible-playbook get_logs.yml -i staging -i production