1. Introduction -SonarQube Tutorial
SonarQube (previously known as Sonar) is an open source platform for Continuous Inspection of code quality. It is written in java and supported for 25+ languages such as Java, C/C++, C#, PHP, Flex, Groovy, JavaScript, Python, PL/SQL, COBOL, etc, it is also used for Android Development
1.1 SonarQube Architecture
The SonarQube Platform is made of 4 components:

1.One SonarQube Server starting 3 main processes:
-
Web Server for developers, managers to browse quality snapshots and configure the SonarQube instance
-
Search Server based on Elasticsearch to back searches from the UI
-
Compute Engine Server in charge of processing code analysis reports and saving them in the SonarQube Database
2.One SonarQube Database to store:
-
The configuration of the SonarQube instance (security, plugins settings, etc.)
-
The quality snapshots of projects, views, etc.
3.Multiple SonarQube Plugins installed on the server, possibly including language, SCM, integration, authentication, and governance plugins
4.One or moreSonarQube Scanners running on your Build / Continuous Integration Servers to analyze projects
1.2 SonarQube Integration
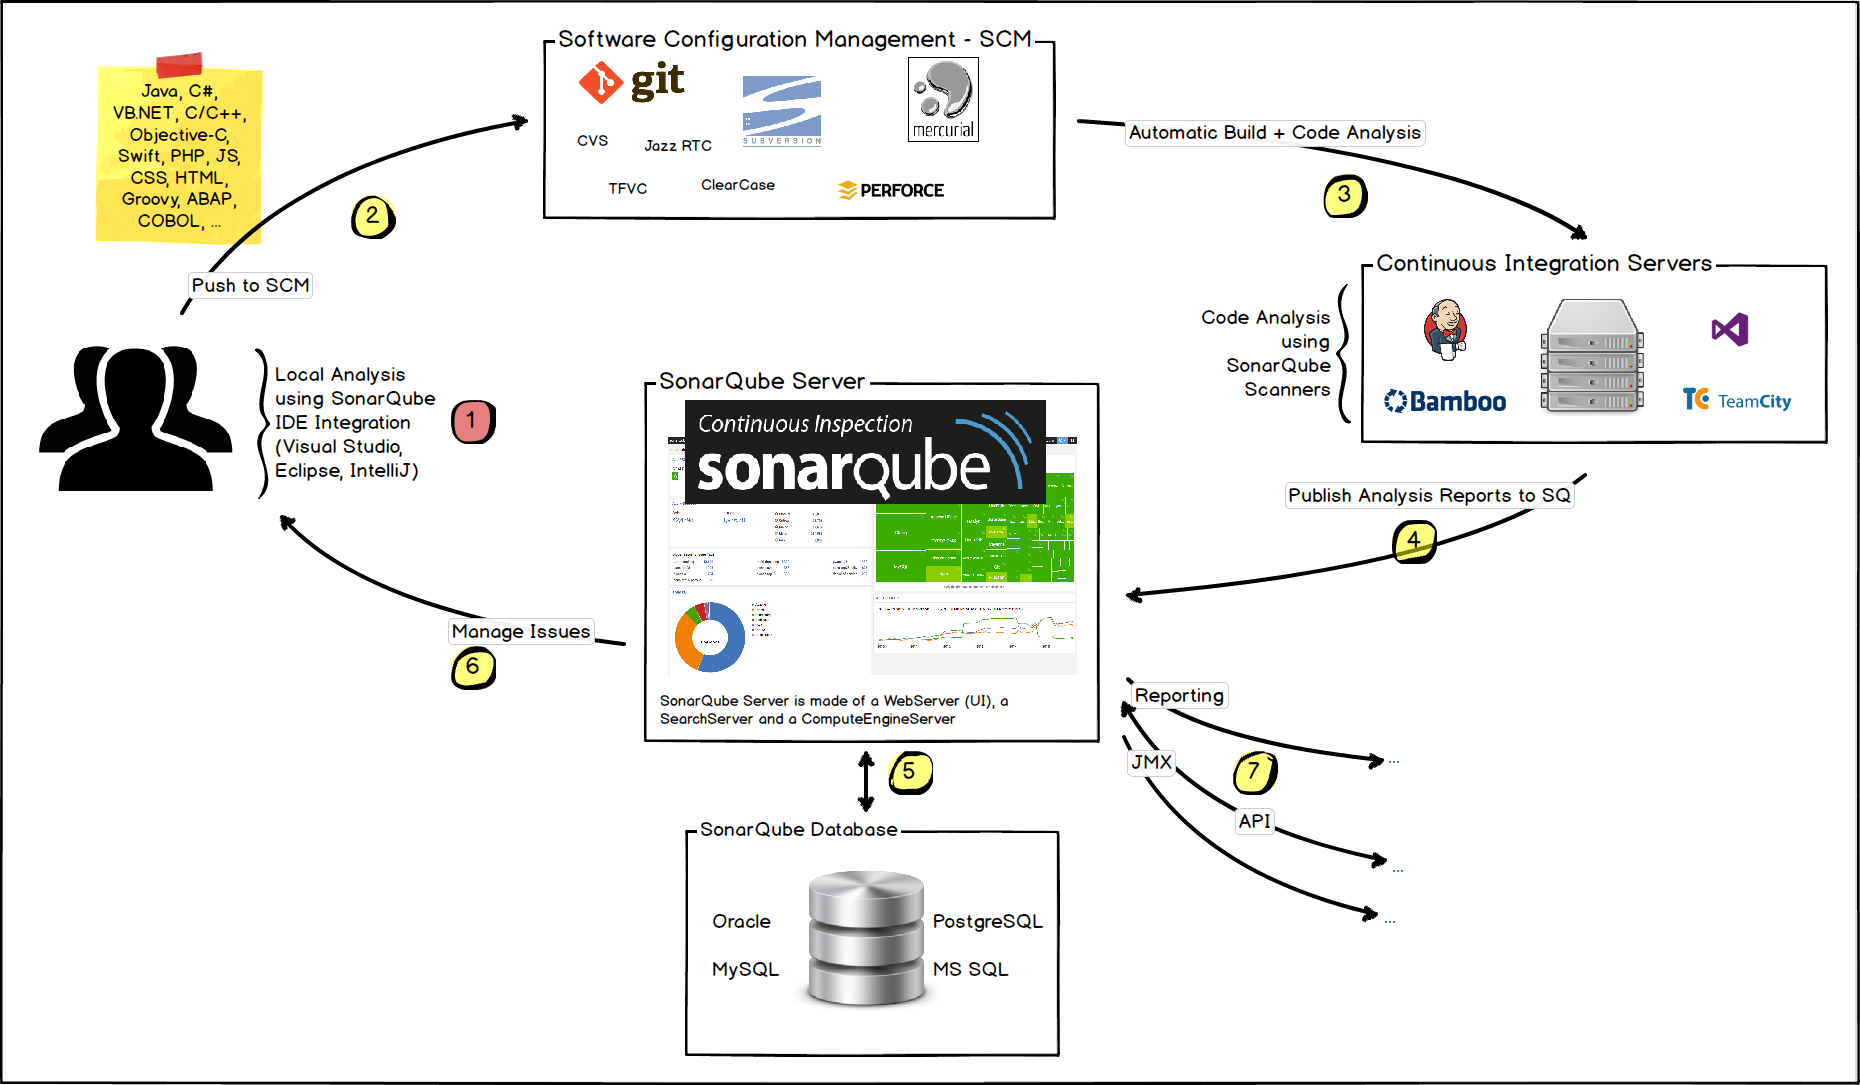
The following schema shows how SonarQube integrates with other ALM tools and where the various components of SonarQube are used.
-
Developers code in their IDEs and use SonarLint to run the local analysis.
-
Developers push their code into their favorite SCM: git, SVN, TFVC, …
-
The Continuous Integration Server triggers an automatic build, and the execution of the SonarQube Scanner required to run the SonarQube analysis.
-
The analysis report is sent to the SonarQube Server for processing.
-
SonarQube Server processes and stores the analysis report results in the SonarQube Database and displays the results in the UI.
-
Developers review, comment, challenge their Issues to manage and reduce their Technical Debt through the SonarQube UI.
-
Managers receive Reports from the analysis.
Ops use APIs to automate configuration and extract data from SonarQube.
Ops use JMX to monitor SonarQube Server.
2. Installation & Configuration
1.Download and unzip the SonarQube distribution (let’s say in “C:\sonarqube” or “/etc/sonarqube”)
2.Start the SonarQube server as follows
# On Windows, execute:
C:\sonarqube\bin\windows-x86-xx\StartSonar.bat

# On other operating system, execute:
/etc/sonarqube/bin/[OS]/sonar.sh console
3.It will Open the command prompt & you can observe the message once it is ready like.-SonarQube is up”
jvm 1    | 2017.03.21 18:18:36 INFO  app[][o.s.p.m.Monitor] Process[web] is up
jvm 1    | 2017.03.21 18:18:36 INFO  app[][o.s.p.m.JavaProcessLauncher] Launch p
rocess[ce]: E:\Users\SmlCodes\Desktop\Java\JDK 8.0\jre\bin\java -Djav
a.awt.headless=true -Dfile.encoding=UTF-8 -Xmx512m -Xms128m -XX:+HeapDumpOnOutOf
MemoryError -Djava.io.pngdir=C:\DevOps\sonarqube\temp -javaagent:E:\Users\smlcodes
_s.SmlCodes\Desktop\Java\JDK 8.0\jre\lib\management-agent.jar -cp ./lib/common
/*;./lib/server/*;./lib/ce/*;C:\DevOps\sonarqube\lib\jdbc\h2\h2-1.3.176.jar org.
sonar.ce.app.CeServer C:\DevOps\sonarqube\temp\sq-process5966313576283705229prop
erties
jvm 1    | 2017.03.21 18:18:55 INFO  app[][o.s.p.m.Monitor] Process[ce] is up
jvm 1    | 2017.03.21 18:18:55 INFO  app[][o.s.application.App] SonarQube is up
4.Once it is up, open http://localhost:9000/ from the browser to access SonarQube
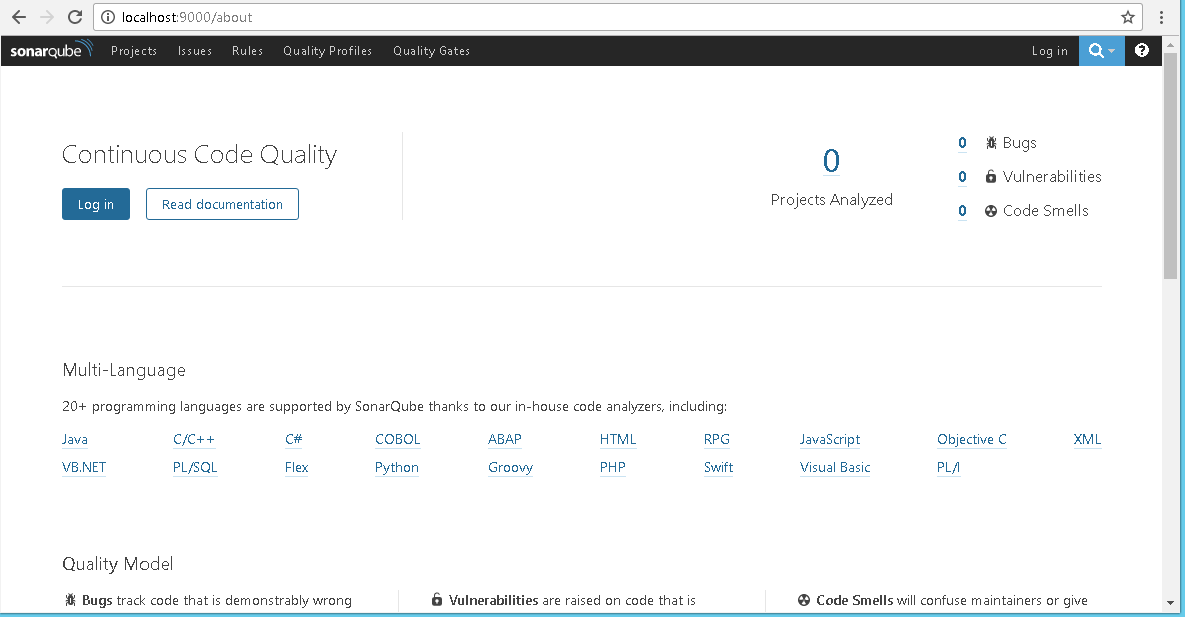
5.You can Login by using default System administrator credentials admin/admin
6.9000 is the default port and can be changed in
SONAR_HOME\conf\sonar.properties
2.1 Configure MySQL Database with SonarQube
1.Go to MySQL website, download & Install MySQL Server Database
2.Login to MySQL database
3.Create new Database. For Ex: CREATE DATABASE `sonarqube`;
4.Go To SonarQube config folder location(C:\DevOps\sonarqube\conf) edit sonar.properties file and uncomment the following line for MySql and save it
sonar.jdbc.url=jdbc:mysql://localhost:3306/sonar?useUnicode=true&
characterEncoding=utf8&rewriteBatchedStatements=true&useConfigs=maxPerformance
5.Start the sonar server by executing
C:\DevOps\sonarqube\bin\windows-x86-64\StartSonar.bat
2.2 SonarQube Runner (Old, Use SonarScanner)
SonarQube Runner Download the latest version of SonarQube runner from and unzip to the desired location. SonarQube Runner is recommended as the default launcher to analyze a project with SonarQube.
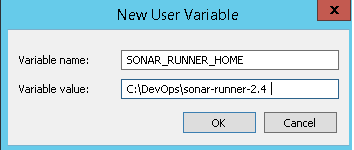
1.Set a new environment variable as SONAR_RUNNER_HOME. And its value should be the unzipped path of sonar-runner zip file. Example,-C:\DevOps\sonar-runner-2.4” don’t put the semicolon (;)
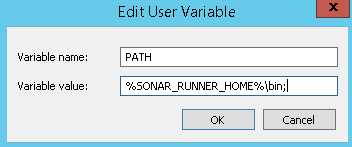
2.Append Sonar Runner’s bin path (%SONAR_RUNNER_HOME%\bin) to the environment variable -PATH”.
3.Uncomment the following lines in the property file, ‘C:\DevOps\sonar-runner-2.4\conf\sonar-runner.properties’ and save it.
#----- Default SonarQube server
 sonar.host.url=http://localhost:9000


#----- MySQL sonar.jdbc.url=jdbc:mysql://localhost:3306/sonar?useUnicode=true&characterEncoding=utf8
2.3 SonarQube Runner vs Scanner
Answer is very simple: “Runner” is the old name for “Scanner”. Everything you need to know about the different SonarQube Scanners is available on the Scanners part of the official documentation.
If you’re stuck to Java 7 , then you can use: SonarQube Runner (sonar-runner) up to version 5.5 of SonarQube.
Latest: Download -SonarQube-Scanner” (download as per your machine OS) https://docs.sonarqube.org/display/SCAN/Analyzing+with+SonarQube+Scanner
-
Unzip the file and add
Pathto environment variablesPath — D:\sonar-scanner-3.2.0.1227-windows\bin
2.Navigate to config folder of sonar scanner (D:\sonar-scanner-3.2.0.1227-windows\conf) here you will get a sonar-scanner.properties file
Edit it and add below lines
#Configure here general information about the environment, such as SonarQube server connection details for example
#No information about specific project should appear here

#----- Default SonarQube server
sonar.host.url=http://localhost:9000

#----- Default source code encoding
sonar.sourceEncoding=UTF-8
-
Go to
C:\sonar-scanner-4.3.0.2102\bin& Runsonar-scanner.batto make PATH changes effect. -
Navigate to Project Location & Hit
sonar-scanner
3. Analyzing Source Code
SonarQube can perform analysis on 20+ different languages. The outcome of this analysis will be quality measures and issues (instances where coding rules were broken). However, what gets analyzed will vary depending on the language
-
On all languages, “blame” data will automatically be imported from supported SCM providers. Git and SVN have supported automatically. Other providers require additional plugins.
-
On all languages, a static analysis of source code is performed (Java files, COBOL programs, etc.)
-
A static analysis of compiled code can be performed for certain languages (.classfiles in Java, .dll files in C#, etc.)
-
A dynamic analysis of code can be performed on certain languages.
During analysis, data is requested from the server, the files provided to the analysis are analyzed, and the resulting data is sent back to the server at the end in the form of a report, which is then analyzed asynchronously server-side.
3.1 Running Analysis
First, you should install the plugin(s) for the language(s) of the project to be
analyzed, either by a direct
download or through
the update center.
Then, you need to choose an analysis method. The following are available:
-
SonarQube Scanner: Launch analysis from the command line
-
SonarQube Scanner for MSBuild: Launch analysis of .Net projects
-
SonarQube Scanner for Ant: Launch analysis from Ant
-
SonarQube Scanner for Maven: Launch analysis from Maven with minimal configuration
-
SonarQube Scanner for Gradle: Launch Gradle analysis
-
SonarQube Scanner For Jenkins: Launch analysis from Jenkins
We can add any plugins by downloading jars and places sonarqube\extensions\plugins folder
3.2 Using the Update Center behind a Proxy
Update Center uses HTTP(S) connections to external servers to provide these
services. If SonarQube is located behind a proxy, additional information must be
provided in the SONAR_HOME/conf/sonar.properties configuration file:
http.proxyHost=<your.proxy.host>
http.proxyPort=<yout.proxy.port>

#If proxy authentication is required
http.proxyUser=<your.proxy.user>
http.proxyPassword=<your.proxy.password>
4. SonarQube Java Project Configuration
1.Go to the root folder of the Java Project to be analyze
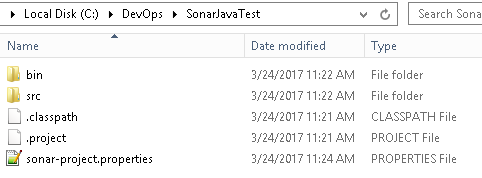
2.Create ‘sonar-project.properties’ file under the root folder of the project
3.Provide project details in sonar-project.properties like below
sonar.projectKey=SonarJavaTest
sonar.projectName=Sonar Java Test
sonar.projectVersion=1.0
sonar.sources=.
4.Go to the project root folder through the Command prompt
5.Execute the command
sonar-runner -e- if we use SonarRunner(old).-
sonar-scanner -X- if we use SonarRunner(old). -
‘-e’ option is useful when some error occurs and it gives the stack trace.
- ‘-X’ options will run it in debug mode.
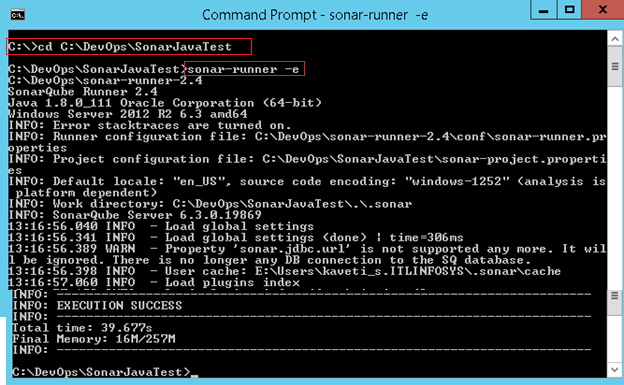
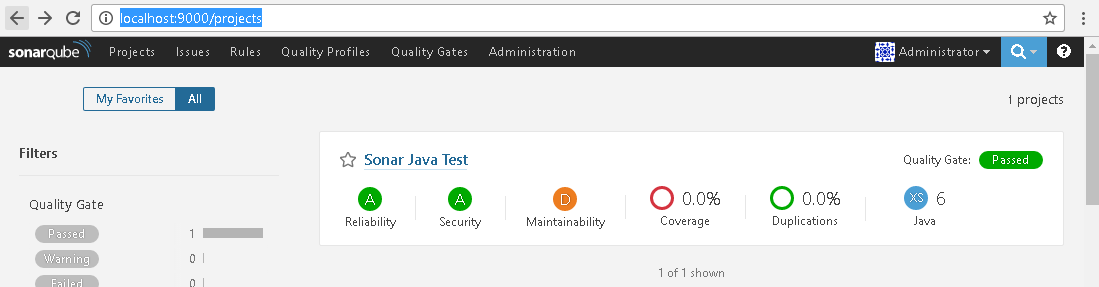
6.Once the analysis is successful, launch the sonar web application http://localhost:9000 and login as administrator.
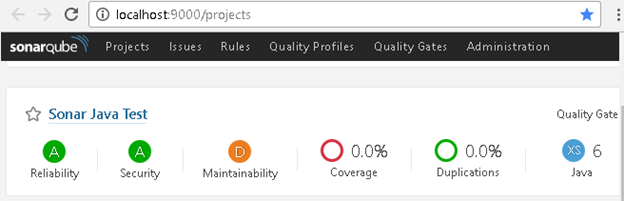
7.Go to http://localhost:9000/projects it will show the summary of the analysis of the project.
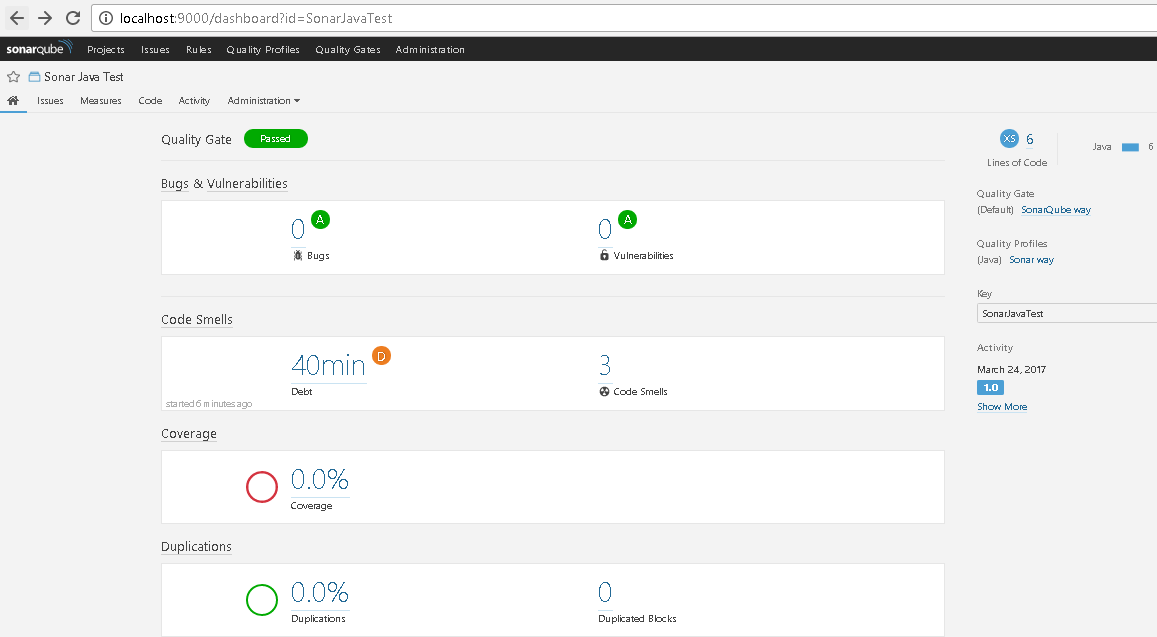
8.By Clicking on the Sonar Java Test, you can get the more details about the project
9.If you want to run the analysis in module wise just change sonar-project.properties’ file as below
sonar.projectKey=Project Name
sonar.projectName= Project project
sonar.projectVersion=1.0
sonar.sources=.
sonar.modules=Module1, Module2,Module3
Module1.projectName=Module 1
Module2.projectName=Module 2
Module3.projectName=Module 3
SonarQube Eclipse Configuration with SonarLint Plugin
SonarQube Eclipse Configuration with SonarLint Plugin
The SonarQube Eclipse plugin does not work with SonarQube 5.2+. It is replaced by SonarLint for Eclipse. SonarLint is an Eclipse plugin that provides on-the-fly feedback to developers on new bugs and quality issues injected into Java, JavaScript, and PHP code. To Configure SonarLint in eclipse follow below steps.
1.Open Eclipse IDE
2.Choose any one from below Options
-
open browser, navigate to https://marketplace.eclipse.org/content/sonarlint & Drag Install button from marketplace to Eclipse IDE
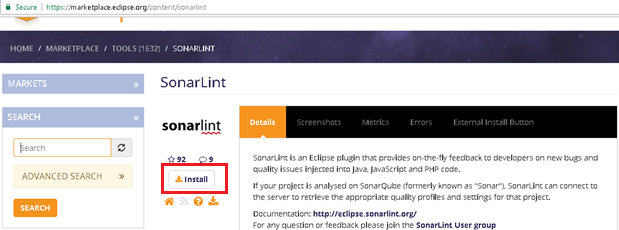
-
Go to Help > Eclipse Marketplace… and search for “SonarQube”
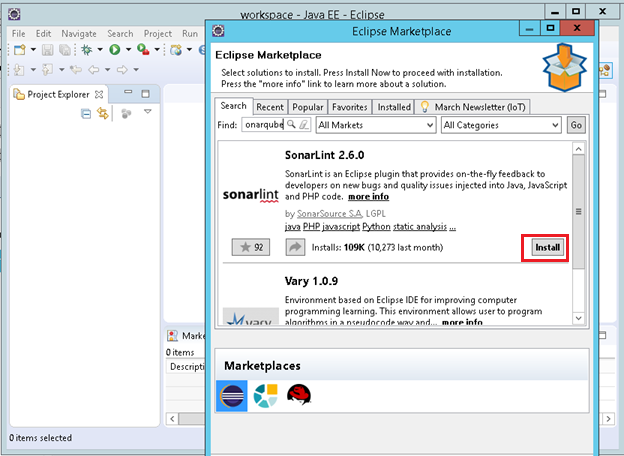
3.Select the Features and Confirm Installation
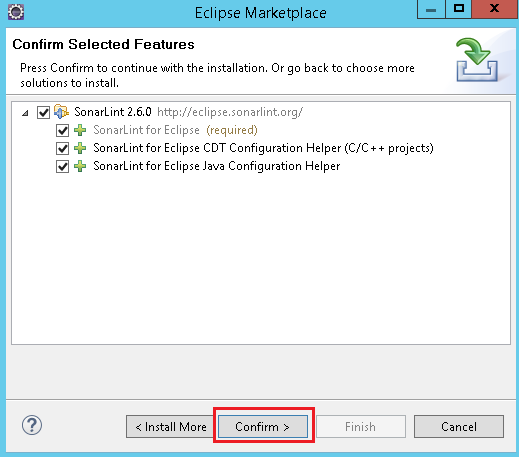
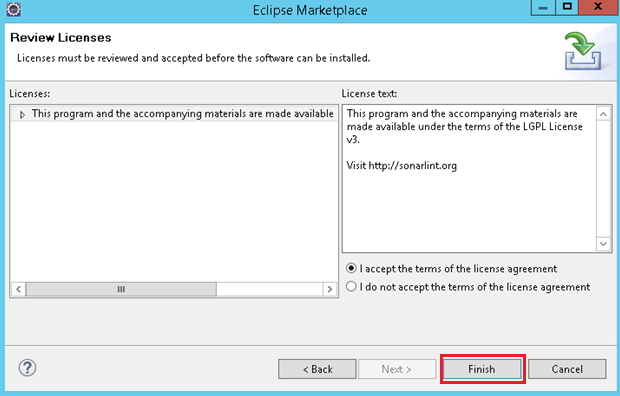
4.Accept the license, Finish the Installation and restart Eclipse
Add SonarQube Server to Eclipse
To add SonarQube Server to Eclipse do following things
1.Select File → New → Other → SonarLint → New Server → Next → fill the details

2.Test the Connection & Finish
Configuring Eclipse Project with SonarLint plugin
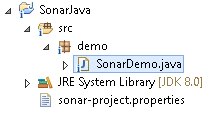
1.Select Project to be Configure SonarLint, for Ex: SonarJava as below
2.Navigate to root folder of the project & run sonar-runner -e
3.Open http://localhost:9000/projects check whether it is analyzed or not
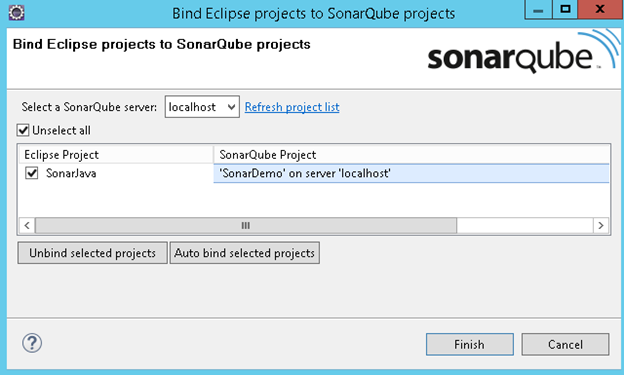
4.If analyzed, Right Click on Project & Select → SonarLint →Bind to SonarQube Object & Select appropriate SonarQube Project from the Server & Finish
Analyze Eclipse Project with SonarLint plugin
Do some changes in the files or add new Files to the Project & analyze project by
Right Click on Project & Select → SonarLint →Analized Changed files
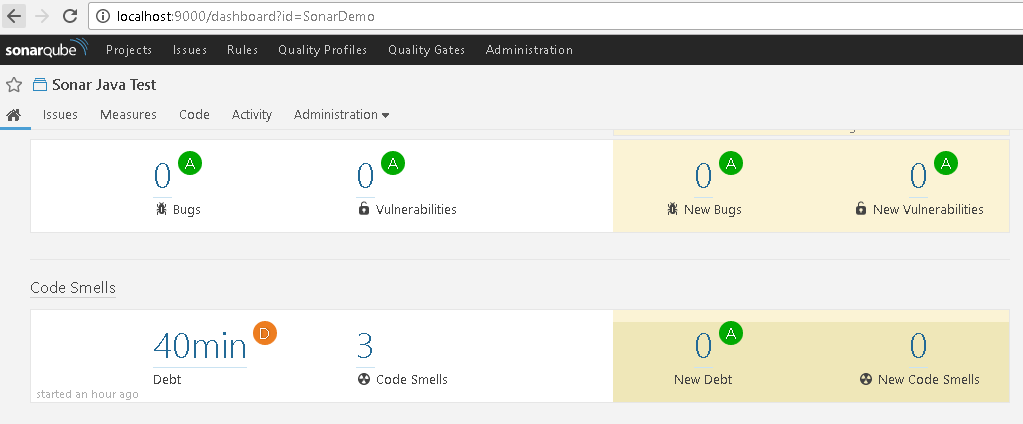
Go to project home page in SonarQube for Ex: http://localhost:9000/dashboard?id=SonarDemo and see the changes
SonarQube Maven Project Configuration
By Configring Maven Level Globally
1.Install & Configure Apache Maven in your local system
2.Go to Maven conf folder change the settings.xml by adding sonar details
<settings>
    <profiles>
        <profile>
            <id>sonar</id>
            <activation>
                <activeByDefault>true</activeByDefault>
            </activation>
            <properties>
<!-- Optional URL to server. Default value is http://localhost:9000 -->
                <sonar.host.url>
                  http://myserver:9000
                </sonar.host.url>
            </properties>
        </profile>
     </profiles>
</settings>
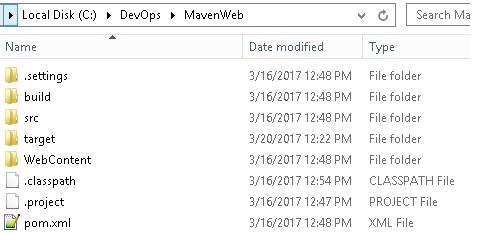
3.Chose the Java Maven Project for Analyzing Source Code. Ex:MavenWeb as below
4.Open pom.xml & Configure sonar plugin as below
<plugin>
        <groupId>org.codehaus.mojo</groupId>
        <artifactId>sonar-maven-plugin</artifactId>
        <version>2.7</version>
 </plugin>
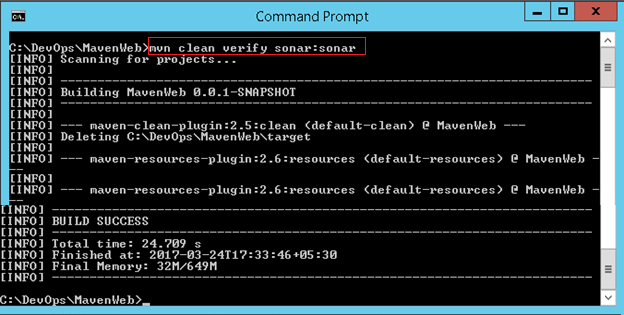
5.Open the command prompt, navigate to your maven project, and start giving the following commands
mvn clean verify sonar:sonar
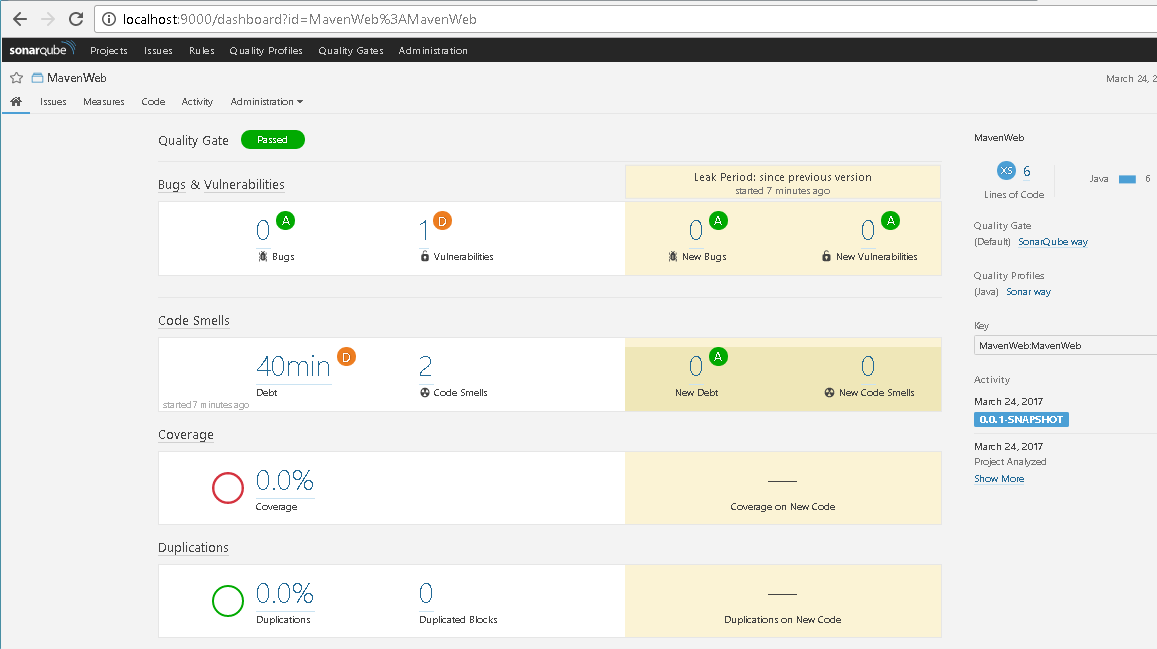
6.open http://localhost:9000/projects it will display the analysis report
By Project Level - pom.xml
Let’s define the plugin in the pom.xml:
<build>
    <pluginManagement>
        <plugins>
            <plugin>
                <groupId>org.sonarsource.scanner.maven</groupId>
                <artifactId>sonar-maven-plugin</artifactId>
                <version>3.4.0.905</version>
            </plugin>
        </plugins>
    </pluginManagement>
</build>
The latest version of the plugin is available here. Now, we need to execute this command from the root of our project directory to scan it:
mvn sonar:sonar -Dsonar.host.url=http://localhost:9000
  -Dsonar.login=the-generated-token
or
pom.xml
	<profiles>
		<profile>
			<id>sonar</id>
			<activation>
				<activeByDefault>true</activeByDefault>
			</activation>
			<properties>
				<!-- Optional URL to server. Default value is http://localhost:9000 -->
				<sonar.host.url>
					http://localhost:9000
				</sonar.host.url>
				<sonar.sources>src/main/java</sonar.sources>
				<sonar.tests>src/test/java</sonar.tests>
			</properties>
		</profile>
	</profiles>
run
mvn clean install sonar:sonar