React JS - Again
Front-end development refers to what the end user (also commonly referred to as the “client”) can see. In the most basic forms, front-end development consists of HTML, CSS, and JavaScript.
Eventually, developers decided that there must be a better way to manage all of that code, so they created libraries that could make life easier. React was one of those libraries.
React was created by Facebook and released to the public in May of 2013 and has been consistently maintained since then.
-
React is used to build user interfaces (UI) on the front end.
-
React is the view layer of an MVC application (Model View Controller)
React - Introduction
React is one of the most popular JavaScript libraries for front-end web applications.
Interactive websites need to update the DOM (Document Object Model) each time a change happens. This process is generally resourceful and slow.
Compared to other libraries that manipulate the DOM, React uses a Virtual DOM, allowing to update only the parts of the website that have changed. This increases the speed of updates dramatically, as modern web applications may contain thousands of elements.
Installation
To work with React, we don’t need to install anything. We just need to add following js files.
-
React - the React top level API
-
React DOM - adds DOM-specific methods
-
Babel - a JavaScript compiler that lets us use ES6+ in old browsers
First, we need to add the React library as two script tags to the head of our HTML document:
<script src="https://unpkg.com/react@16/umd/**react.development.js**"
crossorigin></script>
<script src="https://unpkg.com/react-dom@16/umd/**react-dom.development.js**"
crossorigin />
To enable the use of JSX, use babel. JSX is a syntax extension to JavaScript.
<script
src="https://unpkg.com/babel-standalone@6/**babel.min.js**"></script>
Hello, World – Using index.tml
After adding the required script tags, we can start building our React app!
We need to add a container to display something using React.
<!DOCTYPE html>
<html>
    <head>
        <title>Test</title>
        <script src="https://unpkg.com/react@16/umd/react.development.js" crossorigin/>
        <script src="https://unpkg.com/react-dom@16/umd/react-dom.development.js" crossorigin></script>
        <script src="https://unpkg.com/babel-standalone@6/babel.min.js"></script>
    </head>
    <body>
        <div id="container"></div>
        <script type="text/babel">

        ReactDOM.render(
          <h1>Hello, React!</h1>,
          document.getElementById('container')
        )

        </script>
    </body>
</html>
The code finds the container <div> and adds the h1 heading to it.
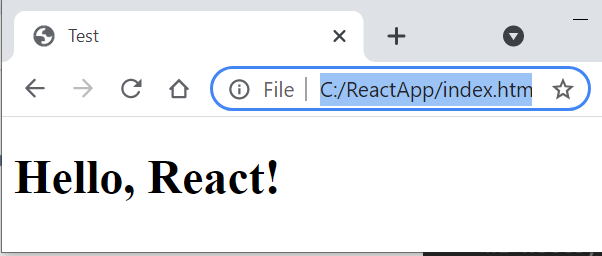
HelloWorld – Using Class
<!DOCTYPE html>
<html>
  <head>
    <script src="https://unpkg.com/react@16/umd/react.development.js"></script>
    <script src="https://unpkg.com/react-dom@16/umd/react-dom.development.js"></script>
    <script src="https://unpkg.com/babel-standalone@6.26.0/babel.js"></script>
  </head>
  <body>
    <div id="root"></div>

    <script type="text/babel">
      class App extends React.Component {
        render() {
          return <h1>Hello Satya!</h1>
        }
      }

      ReactDOM.render(<App />, document.getElementById('root'))
    </script>
  </body>
</html>
In above we are return single line content, if we have multiple lines – we need to use one of below.
1.using ( ) brackets
render() {
    return (
    <div className="App">
        <h1>Hello, React!</h1>
     </div>
    );
  }
2.using [ ] – as Array of elements
render() {
  return [
    <ChildA key="key1" />,
    <ChildB key="key2" />,
    <ChildC key="key3" />,
  ];
}
React - Create React App
In the previous lesson we learned how to add React to a simple HTML document
using the script tags.
However, real web apps have a different scale, contain multiple files, use 3rd
party libraries, etc.
Facebook has created a handy tool called create-react-app that makes it easy to setup a React project with just a simple command. Create React App allows us to focus on the code, rather than installing and configuring different tools.
To get started, make sure you have a recent version of
Node installed on your machine.
Run the following commands in the Terminal to create and start a React app
called “ReactApp”:
npx create-react-app reactapp

cd reactapp

npm start
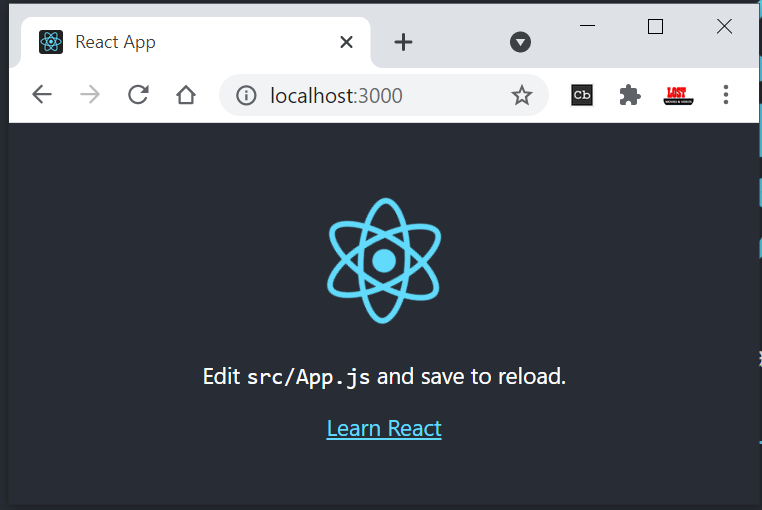
This will install all the required dependencies, configure and start the project
on localhost:3000.
This is the default output of our project in the browser:
Folder Structure
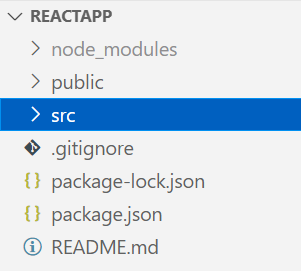
/public (Generated code, from src)folder contains files related to how the application will display on
the client, the most important of those being index.html, which is the HTML
template of our page.It is generated code, developers no need to touch this code.
/src folder contains all of the JavaScript, CSS, and image files that will be compiled into a bundle file and injected into index.html.. Developers Write Source code here.
The two files below are the only critical files:
-
index.js: This file is the entry point into our application. In our code, a method called ReactDOM.render() is used to find an element with id=”root” in the HTML and add content to it. -
app.js: This file is the main component that will be rendered to the DOM, which currently includes the React logo image and the default text, that we see in the output.
Webpack creates a “bundle” file containing the content of multiple files that need to be “bundled” together and it is all added together into a single file.
Customizing React App
Go ahead and delete all the files out of the /src directory, and we’ll create
our own boilerplate file without any bloat. We’ll just keep index.css and
index.js
Now in index.js, we’re importing React, ReactDOM, and the CSS file.
import React from 'react'
import ReactDOM from 'react-dom'
import './index.css'

class App extends React.Component {
    render() {
        return (
        <div className="App">
            <h1>Hello, Customized App</h1>
         </div>
        );
      }
}

ReactDOM.render(<App />, document.getElementById('root'));
In index.html, just place only <div> & start the Application
<div id="root"></div>
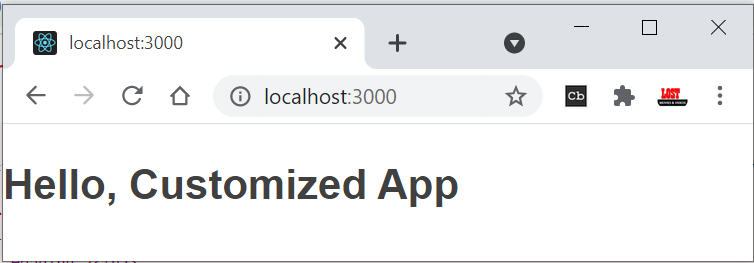
If we use import React, {Component} from ‘react’, No need to write complete extends class name
import React, {Component} from 'react'

class App extends Component {
}
React - JSX - JavaScript + XML
ReactDOM.render(
  <h1>Hello, React!</h1>,
  document.getElementById('root')
);
We will start with the <h1>Hello, React!</h1> element.
As you can see, the element is not in quotes to represent a string. It’s like an
HTML element, however we use it right in the JavaScript code!
This is called JSX, and it is a syntax extension to JavaScript. It allows us
to build UI elements right in the JavaScript code!
The code calls React’s render method, and passes it two arguments, a JSX element and a container. The render method displays the provided element in the container, which, in our case, is the HTML element with id=”root”.
Expressions in JSX
We can use any JavaScript expression inside JSX using curly braces.
** For example:**
const name = "David";
const el = <p>Hello, {name}</p>;

ReactDOM.render(
el,
document.getElementById('root')
);
Attributes in JSX
We can specify attributes using quotes, just like in HTML:
<div id="name" ></div>
When using a JavaScript expression as the attributes value, the quotes should not be used:
<div **id={user.id}**></div>
Diffrence between JavaScript, JSX Attributes is - in JSX attributes are in camelCase(2nd Word is Start with CAPITAL Letter)
className
buttonName
onClick
onHower
Finally, When the JSX expressions are compiled, they are converted into JavaScript objects, representing React elements.
React then uses these elements to build the corresponding HTML DOM and display it in the browser.
Virtual DOM
We learned in the previous part that React updates only the elements that are
necessary.
This allows React apps to be much faster than apps built with other front-end
technologies.
But how does React achieve that?
React uses a Virtual DOM, which is a lightweight representation of the DOM.
When an element gets changed, it is first updated in the Virtual DOM. That process is fast, as the virtual DOM is represented by simple objects.
After that, React compares the Virtual DOM to its previous state and only applies the DOM updates necessary to bring the DOM to the desired state.
React - Inheritance
import React, { Component } from "react";

class App extends Component {
  render() {
    return (
      <div className="App">
      Hello, World
      </div>
    );
  }
}
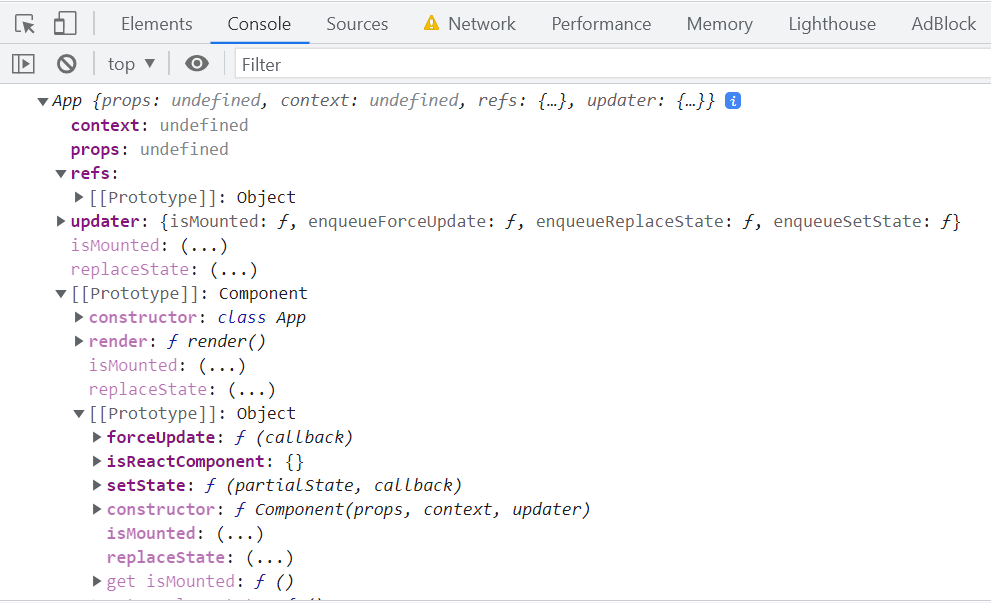
const ob = new App();
console.log(ob);

export default App;
App class extends component class. It inherts basic data componets, which are printed below
React – Data Handling
To handle data in React, we do with properties, referred to as props, and with state
Props (Properties)
Props is short form of “Properties”. Functional components can accept arguments, similar to JavaScript functions. These arguments are called props, and represent an object.
For example, we can use props in our Hello component:
function Hello(props) {
  return <p>Hello, {props.name}!</p>;
}
Props can be accessed in class components using this.props.
class Hello extends React.Component {
  render() {
    return <p>Hello, {this.props.name}!</p>;
  }
}
An important thing to consider is that props are read-only, meaning
components cannot modify their props.

State
Many web apps need their components to change their data, for example, after user interaction (clicking a button, submitting a form, etc.).However, props cannot be changed.
In order to allow components to manage and change their data, React provides a
feature called state.
State is an object that is added as a property in class components.
State is just a simple object, that contains key:value pairs.Similar to props, the values can be accessed using this.state.
class Hello extends React.Component {
  state = {
    name: "James"
  }
  render() {
    return <h1>Hello {this.state.name}.</h1>;
  }
}
Changing State
this.setState({
name: "James",
age: 25
});
React – Components
So far, we’ve created one component - the App component. Most React apps have many small components, and everything loads into the main App component.
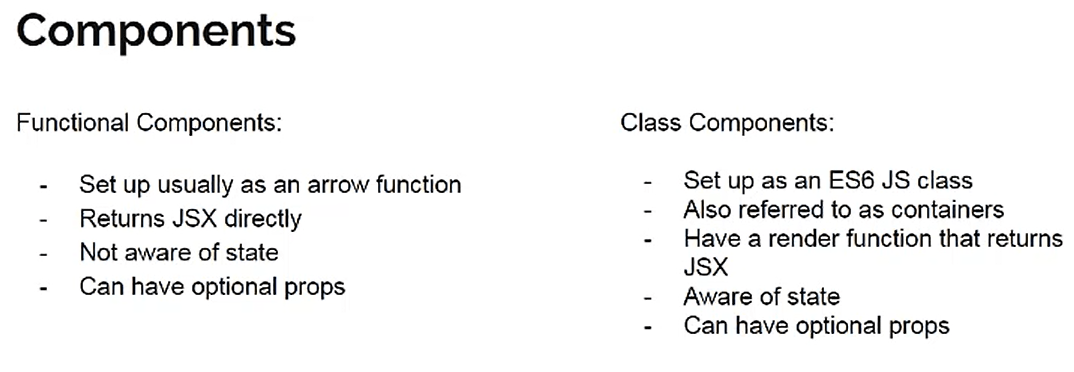
In React, there are two types of components that you can use:
-
Functional Components
-
Class Components(Mostly used in Realtime).
Functional Components
A functional component is a simple JavaScript function:
function Hello() {
    return <h1>Hello world.</h1>;
}
The code above defined a functional component called Hello, that returns a simple React element.
Notice that the name of the functional component begins with a capital letter. This is absolutely critical. If we start the name of a component with a lowercase letter, the browser will treat our component like a regular HTML element instead of a Component.
In order to display the component, we need to create the corresponding JSX element, by calling the function.
For example, for our user-defined component Hello:
const el = <Hello/>;
Now, we can use our user-defined element and render it on the page:
function Hello() {
  return <h1>Hello world.</h1>;
}

const el = <Hello />;
ReactDOM.render(
  el,
  document.getElementById('root')
);
Remember, all component names need to start with a capital letter.
Class Components
Class components are typically used when there are more advanced user interactions, like forms, and animations.
All class components need to extend the React.Component class. Class components need to have a render() method, which is in charge of telling what the page should show.
Remove the App class from index.js, place it in new file called
app.js
//app.js
import React, {Component} from 'react'

class App extends Component {
    render() {
        return (
        <div className="App">
            <h1>Hello, Customized App</h1>
         </div>
        );
      }
}
export default App
Import in index.js
import React from 'react'
import ReactDOM from 'react-dom'
import './index.css'
import App from './app'

 //Code Removed

ReactDOM.render(<App />, document.getElementById('root'));
We export the component as App and load it in index.js.
In index.html, just place only <div> & start the Application
<div id="root"></div>
Example Simple Component
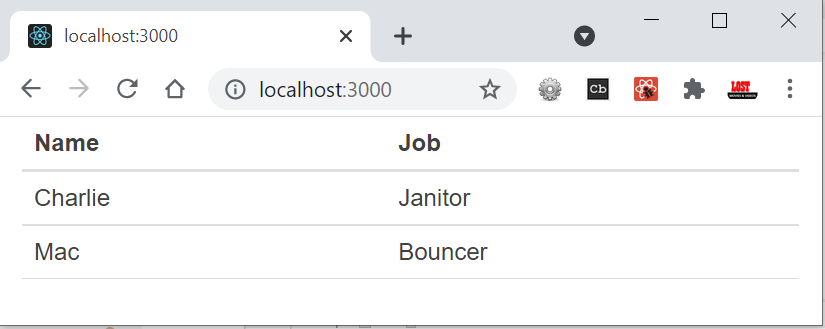
simple component, which is a function. This component doesn’t use the class keyword. Let’s take our Table and make two simple components for it - a TableHeader, and a TableBody.
We’re going to use ES6 arrow functions to create these simple components.
--------------------------------------
First, the TableHeader
--------------------------------------
const TableHeader = () => {
    return (
      <thead>
        <tr>
          <th>Name</th>
          <th>Job</th>
        </tr>
      </thead>
    )
  }

--------------------------------------
Then the TableBody .
--------------------------------------
  const TableBody = () => {
    return (
      <tbody>
        <tr>
          <td>Charlie</td>
          <td>Janitor</td>
        </tr>
        <tr>
          <td>Mac</td>
          <td>Bouncer</td>
        </tr>
      </tbody>
    )
  }
Now our Table file will look like this. Note that the TableHeader and TableBody components are all in the same file and being used by the Table class component.
const TableHeader = () => { ... }
const TableBody = () => { ... }

class Table extends Component {
  render() {
    return (
      <table>
        <TableHeader />
        <TableBody />
      </table>
    )
  }
}
Example Class Component
We are created Table component to display table data in table.js – and export as Table component
import React, {Component} from 'react'

class Table extends Component {
  render() {
    return (
      <table>
        <thead>
          <tr>
            <th>Name</th>
            <th>Job</th>
          </tr>
        </thead>
        <tbody>
          <tr>
            <td>Charlie</td>
            <td>Janitor</td>
          </tr>
          <tr>
            <td>Mac</td>
            <td>Bouncer</td>
          </tr>
        </tbody>
      </table>
    )
  }
}
export default Table
Import Table in app.js – pass it to index.html
import React, {Component} from 'react'
import Table from './table'

class App extends Component {
  render() {
    return (
      <div className="container">
        <Table />
      </div>
    )
  }
}
export default App
In index.html, just place only <div> & start the Application
<div id="root"></div>
Lifecycle Methods
Enough, from now onwards read https://www.w3schools.com/react/react_props.asp
Ref.
https://www.sololearn.com/learning/1097/3370/7610/2 https://www.w3schools.com/react/react_sass.asp
Best https://www.taniarascia.com/getting-started-with-react/
ReactJS
This README files contains basic information required to learn and create react app.
Quick Links
React Basics
What is React
- React is a Javascript library created by Facebook and is used for building user interfaces (UIs) and front-end applications.
- React is often called a framework because of its behaviour and capabilities.
- React is the most popular framework in the industry (for now)
Create React App
To create a new app, you may choose one of the following methods:
npx
npx create-react-app myapp
OR
npm
npm install create-react-app

create-react-app myapp
It will create a directory called my-app inside the current folder.
Inside that directory, it will generate the initial project structure and install the transitive dependencies:
myapp
├── README.md
├── node_modules
├── package.json
├── .gitignore
├── public
│   ├── favicon.ico
│   ├── index.html
│   └── manifest.json
└── src
    ├── App.css
    ├── App.js
    ├── App.test.js
    ├── index.css
    ├── index.js
    ├── logo.svg
    └── serviceWorker.js
    └── setupTests.js
No configuration or complicated folder structures, only the files you need to build your app.
Once the installation is done, you can open your project folder:
cd myapp
Inside the newly created project, you can run some built-in commands:
npm start
Runs the app in development mode.
Open http://localhost:3000 to view it in the browser.
The page will automatically reload if you make changes to the code.
Please install these extensions in visual studio code, these will really healp us in the development.

Components
A website consists of several comonents as shown below:

Each componenets plays its own role. In ReactJS App.js acts as the root components, and all other components will pe placed in the root component.
There are two types of components in React
- Functional Component
- Class Component
Functional Components
These components are purely presentational and are simply represented by a function that optionally takes props and returns a React element to be rendered to the page.
- Functional because they are basically functions
- Stateless because they do not hold and/or manage state
- Presentational because all they do is output UI elements
Example:
import React from 'react'
function FunctionalComponentExample() {
    return (
        <div>
            <h1>Hello World!</h1>
        </div>
    )
}
export default FunctionalComponentExample
Class Components
These components are created using ES6’s class syntax. They have some additional features such as the ability to contain logic (for example methods that handle onClick events), local state and some other features.
- Class because they are basically classes
- Smart because they can contain logic
- Stateful because they can hold and/or manage local state Example: ```javascript import React, { Component } from ‘react’ class ClassComponentExample extends Component { render() { return ( <div> <h1>Hello from Class Component</h1> </div> ) } } export default ClassComponentExample
## Lifecycle
The three most useful lifecycle functions are **render** **componentDidMount** and **componentWillRecieveProps**

## Props
props provide a way of passing properties/data down from one component to another, typically from a parent to a child component (unidirectional dataflow).
It’s important to note that props are **read-only** and that a component must never modify the props passed to it.
Example:
**Parent Component**
```javascript
<div className="App">
<ClassComponentExample myname="Fawad" />
<FunctionalComponentExample myname="Fawad Bin Tariq" />
</div>
props in Class Component
import React, { Component } from 'react'
class ClassComponentExample extends Component {
    render() {
        return (
            <div>
                <h1>Hello {this.props.myname} from Class Component</h1>
            </div>
        )
    }
}
export default ClassComponentExample
props in Functional Component
import React from 'react'
function FunctionalComponentExample(props) {
    return (
        <div>
            <h1>Hello {props.myname} from Functional Component!</h1>
        </div>
    )
}
export default FunctionalComponentExample
state
State is the place where the data comes from.
Example:
class ClassComponentExample extends Component {
    constructor(props) {
        super(props)

        this.state = {
             message: 'Hello World'
        }
    }
    render() {
        return (
            <>
                <h1>{this.state.message}</h1>
            </>
        )
    }
}
export default ClassComponentExample
setState and Event handling
You can change value of state by using setState method. Example:
   constructor(props) {
        super(props)

        this.state = {
             counter: 0
        }
    }
    incrementOne = () =>{
        this.setState({
            counter:this.state.counter+1
        })
    }
    render() {
        return (
            <>
                <h1>{this.state.counter}</h1>
                <button type="button" onClick={this.incrementOne}>Increment</button>
            </>
        )
    }
If you call setState again and again in on request, it may not work, for that you need to pass previous state too.
Example:
        this.setState(prevState=>({
            counter:prevState.counter+1
        }))
Destructure Props and State
You can de structure props and state to get rid of this.prop or this.state
Example:
  render() {
        const {myname} = this.props
        return (
            <>
                <p>{myname}</p>
            </>
        )
    }
Forms
Basic Form
class FormExample extends Component {
    constructor(props) {
        super(props)
        this.state = {
             email:'',
             password:''
        }
        this.handleSubmit = this.handleSubmit.bind(this)
    }
    changeHandler = (event) =>{
        this.setState({
            [event.target.name]: event.target.value
        })
    }
    handleSubmit(event) {
        alert('Email was ' + this.state.email+' Password was '+this.state.password);
        event.preventDefault();
      }
    render() {
        return (
            <React.Fragment>
                <h1>Form Example</h1>
                <form  onSubmit={this.handleSubmit}>
                    <label>Email :</label>
                    <input type="text" name="email" value={this.state.email} onChange={this.changeHandler}/><br/>
                    <label>Password :</label>
                    <input type="password" name="password" value={this.state.password} onChange={this.changeHandler}/><br/>
                    <input type="submit" value="Submit" />
                </form>
            </React.Fragment>
        )
    }
}
export default FormExample
Generic Form
Lets make a change handler that will work for everything, checkboxes, radio buttons, input types, text areas, select…
import React, { Component } from 'react'

class FormExample extends Component {
    constructor(props) {
        super(props)
        this.state = {
            email:'',
            password:'',
            description:'',
            flavor:'',
            gender:'male',
            agreement:false
        }
        this.handleSubmit = this.handleSubmit.bind(this)
    }
    changeHandler = (event,fieldName,checkbox) =>{
        this.setState({
            [fieldName]: checkbox ? event.target.checked : event.target.value
        })
    }
    handleSubmit(event) {
        event.preventDefault();
      }
    render() {
        return (
<React.Fragment>
                <h1>Form Example</h1>
                <form  onSubmit={this.handleSubmit}>
                <label>Email :</label>
                    <input type="text" value={this.state.email} onChange={event=>this.changeHandler(event,"email",false)}/><br/>
                    <label>Password :</label>
                    <input type="password" value={this.state.password} onChange={event=>this.changeHandler(event,"password",false)}/><br/>
                    <label>Description : </label>
                    <textarea value={this.state.description} onChange={event=>this.changeHandler(event,"description",false)}></textarea><br/>
                    <label>
                        Pick your favorite flavor:
                        <select value={this.state.flavor} onChange={event=>this.changeHandler(event,"flavor",false)}>
                            <option value="grapefruit">Grapefruit</option>
                            <option value="lime">Lime</option>
                            <option value="coconut">Coconut</option>
                            <option value="mango">Mango</option>
                        </select>
                    </label><br/>
                    <label>Gender : </label>
                    <label><input type="radio" value="male" checked={this.state.gender==='male'} onChange={event=>this.changeHandler(event,"gender",false)}></input>male</label>
                    <label><input type="radio" value="female" checked={this.state.gender==='female'} onChange={event=>this.changeHandler(event,"gender",false)}></input>female</label><br/>
                    <label><input type="checkbox" checked={this.state.agreement} onChange={event=>this.changeHandler(event,"agreement",true)}></input> I agree with terms and conditions</label><br/>
                    <input type="submit" value="Submit" />
                </form>
            </React.Fragment>
        )
    }
}
export default FormExample
Form Validations
import React, { Component } from 'react'

const initialState = {
    email:'',
    password:'',
    description:'',
    flavor:'',
    gender:'male',
    agreement:false,
    errors:{
        email:'',
        password:'',
        description:'',
        agreement:''
    }
}
const danger ={color:'red'}
class FormExample extends Component {
    constructor(props) {
        super(props)
        this.state = initialState
        this.handleSubmit = this.handleSubmit.bind(this)
    }
    validateForm = (errors) =>{
        let valid = true;
        if(!this.state.agreement || this.state.email ==='' || this.state.password === '' || this.state.description === ''){
            valid = false;
        }
        Object.values(errors).forEach(
            // if we have an error string set valid to false
            (val) => val.length > 0 && (valid = false)
        );
        return valid;
    }
    changeHandler = (event,fieldName,checkbox) =>{
        let errors = this.state.errors
        const {value} = event.target
         // eslint-disable-next-line
        const validEmailRegex = RegExp(/^(([^<>()\[\]\.,;:\s@\"]+(\.[^<>()\[\]\.,;:\s@\"]+)*)|(\".+\"))@(([^<>()[\]\.,;:\s@\"]+\.)+[^<>()[\]\.,;:\s@\"]{2,})$/i);
        switch(fieldName){
            case 'email':
                errors.email = validEmailRegex.test(value)
                                ? ''
                                : 'Email is not valid';
                break;
            case 'password':
                errors.password = value.length < 8
                                    ? 'Password must be greater than 8'
                                    : '';
                break;
            case 'description':
                errors.description = value.length < 10
                                    ? 'Description must be greater than 10 characters long!'
                                    : '';
                break;
            case 'agreement':
                errors.agreement = event.target.checked
                                ? ''
                                : 'agreement must be checked';
                break;
            default:
                break;
        }
        this.setState({
            [fieldName]: checkbox ? event.target.checked : event.target.value,
            errors
        })
    }
    handleSubmit(event) {
        event.preventDefault();
        if(this.validateForm(this.state.errors)){
            console.info("Valid Form")
        }else{
            console.error('Invalid Form')
        }
      }
    render() {
        return (
            <React.Fragment>
                <h1>Form Example</h1>
                <form  onSubmit={this.handleSubmit}>
                <label>Email :</label>
                    <input type="text" value={this.state.email} onChange={event=>this.changeHandler(event,"email",false)}/><br/>
                    <span style={danger}>{this.state.errors.email}<br/></span>
                    <label>Password :</label>
                    <input type="password" value={this.state.password} onChange={event=>this.changeHandler(event,"password",false)}/><br/>
                    <span style={danger}>{this.state.errors.danger}<br/></span>
                    <label>Description : </label>
                    <textarea value={this.state.description} onChange={event=>this.changeHandler(event,"description",false)}></textarea><br/>
                    <span style={danger}>{this.state.errors.description}<br/></span>
                    <label>
                        Pick your favorite flavor:
                        <select value={this.state.flavor} onChange={event=>this.changeHandler(event,"flavor",false)}>
                            <option value="grapefruit">Grapefruit</option>
                            <option value="lime">Lime</option>
                            <option value="coconut">Coconut</option>
                            <option value="mango">Mango</option>
                        </select>
                    </label><br/>
                    <label>Gender : </label>
                    <label><input type="radio" value="male" checked={this.state.gender==='male'} onChange={event=>this.changeHandler(event,"gender",false)}></input>male</label>
                    <label><input type="radio" value="female" checked={this.state.gender==='female'} onChange={event=>this.changeHandler(event,"gender",false)}></input>female</label><br/>
                    <label><input type="checkbox" checked={this.state.agreement} onChange={event=>this.changeHandler(event,"agreement",true)}></input> I agree with terms and conditions</label><br/>
                    <span style={danger}>{this.state.errors.agreement}<br/></span>
                    <input type="submit" value="Submit" />
                </form>
            </React.Fragment>
        )
    }
}
export default FormExample
Map-List Ilterations
In React, the map method used to traverse and display a list of similar objects of a component. A map is not the feature of React. Instead, it is the standard JavaScript function that could be called on any array. The map() method creates a new array by calling a provided function on every element in the calling array.
Example:
    constructor(props) {
        super(props)
        this.state = {
             usersList:[
                 {
                     id:1,
                     name:"Fawad",
                     age:23
                 },
                 {
                    id:2,
                    name:"Asad",
                    age:25
                }
             ]
        }
    }
    render() {
        const users = this.state.usersList.map((user)=> <h1 key={user.id}>Name is {user.name} and age is {user.age}</h1>)
        return (
            <>
                {users}
            </>
        )
    }
React Router
Since we’re building a web app, we’ll use react-router-dom. To use routing in react, you need to install react-router-dom first.
bash npm install react-router-dom
import React, {Component} from 'react';
import {BrowserRouter, Route, Switch, Link} from 'react-router-dom';
import './App.css';
import Home from './components/Home';
import About from './components/About';
import Contact from './components/Contact';
import NotFound from './components/NotFound';
import Post from './components/Post';
class App extends Component{
  render(){
    return (
      <BrowserRouter>
      <Link to="/">Home</Link>
      <Link to="/about">About</Link>
      <Link to="/contact">Contact</Link>
        <Switch>
          <Route path="/" exact component={Home} />
          <Route path="/about" exact component={About} />
          <Route path="/contact" exact component={Contact} />
          <Route path="/post/:id" exact component={Post} />
          <Route path="/" component={NotFound} />
        </Switch>
      </BrowserRouter>
    );
  }
}
export default App;
Post.js
function Post(props) {
    console.log(props)
    return (
        <h1> Post {props.match.params.id}</h1>
    )
}
export default Post
Change Active class when path changes
<li className={this.getNavLinkClass("/")}><NavLink to="/">Home</NavLink></li>
<li className={this.getNavLinkClass("/error")}><NavLink to="/error">404</NavLink></li>
getNavLinkClass = (path) => {
    return this.props.location.pathname === path ? 'active' : '';
}
<Route path="/" component={NavBar} />
Programming Redirects
to redirect form program use history.push() function. Example
setTimeout(()=>{
    this.props.history.push('/error')
},5000);
Using Bootstrap or MaterializeCSS
To install bootstrap, run command npm install bootstrap OR to install materializecss run command npm install materialize-css@next
Then include them in your project.
import 'materialize-css/dist/css/materialize.min.css';
Redux
Install redux and react-redux and redux-thunk


npm install redux and npm install react-redux and npm install redux-thunk
OR directly in one command
npm install redux react-redux redux-thunk
Create Store
Create a new file named Store.js in src folder.
and use the following code
import { createStore, applyMiddleware, compose } from 'redux'
import thunk from 'redux-thunk'
import rootReducer from './reducers/rootReducer'

const initialState = {}
const middleWare = [thunk]
let store;

if (window.navigator.userAgent.includes("Chrome")) {
    store = createStore(rootReducer,
        initialState,
        compose(applyMiddleware(...middleWare),
            window.__REDUX_DEVTOOLS_EXTENSION__ &&
            window.__REDUX_DEVTOOLS_EXTENSION__()
        ))
} else {
    store = createStore(rootReducer,
        initialState,
        compose(applyMiddleware(...middleWare)))
}

export default store;
Root Reducer
Create a folder named reducer and create a new file rootReducer.js that will contain all the reducers.
import {combineReducers} from 'redux'

export default combineReducers({

});
Now go to App.js and wrap all components with store Provider.
import { Provider } from 'react-redux';
import store from './Store';

//AND

<Provider store={store}>
    //ALL COMPONENTS HERE
</Provider>
Deployment
Before deployment, make sure to install npm install react-app-polyfill because react apps are not by default supported by IE. and add
import 'react-app-polyfill/stable'
in App.js
Also, remove Redux extension code from ““store.js** and only use
     store = createStore(rootReducer,
        initialState,
        compose(applyMiddleware(...middleWare)))
run command npm run build to get build copy of your project… deploy it on any web server