1. Introduction to Hygieia
Hygieia℠ is a single, configurable, easy to use dashboard to visualize near real-time status of the entire delivery pipeline.
A typical project deals with Agile Project Management tool, Source Control, Continuous Integration (CI) tool, Testing tools, Static Code Analysis and Security Scanning tools, Deployment and Monitoring tools to name a few.
Large enterprises and complex systems sometimes use multiple CI, Testing and Scanning tools. Each of these has nice dashboards to present key information stored in it. But what is lacking is a single, comprehensive end-to-end view of the state of a delivery pipeline in near real time.
Hygieia is the solution & provides One Dashboard for the Entire CI/CD Pipeline
Features
-
Team Dashboard: Monitor things like workitems, code repo, builds, quality items (unit tests, security, coverage, etc.), and deployments in one dashboard.
-
Real-time Status: Monitor quality, productivity, and work in process on a real-time basis within the dashboard.
-
Configurable View: Set up the dashboard to display the widgets that matter most to your project, which helps amplify and shorten the feedback loop.
-
Open Source Hygieia is open source and free for everyone to use. We also encourage external users to commit to the project.
Hyigiea Layers
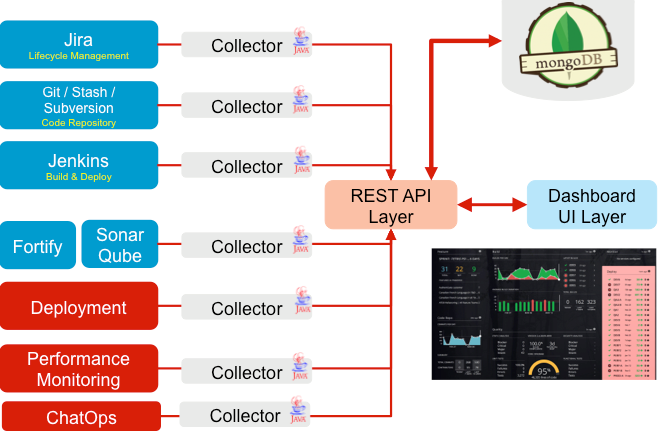
There are 3 main Layers of Hygieia Dashboard
-
UI Layer
-
API Layer
-
Collectors Layer
1.UI Layer
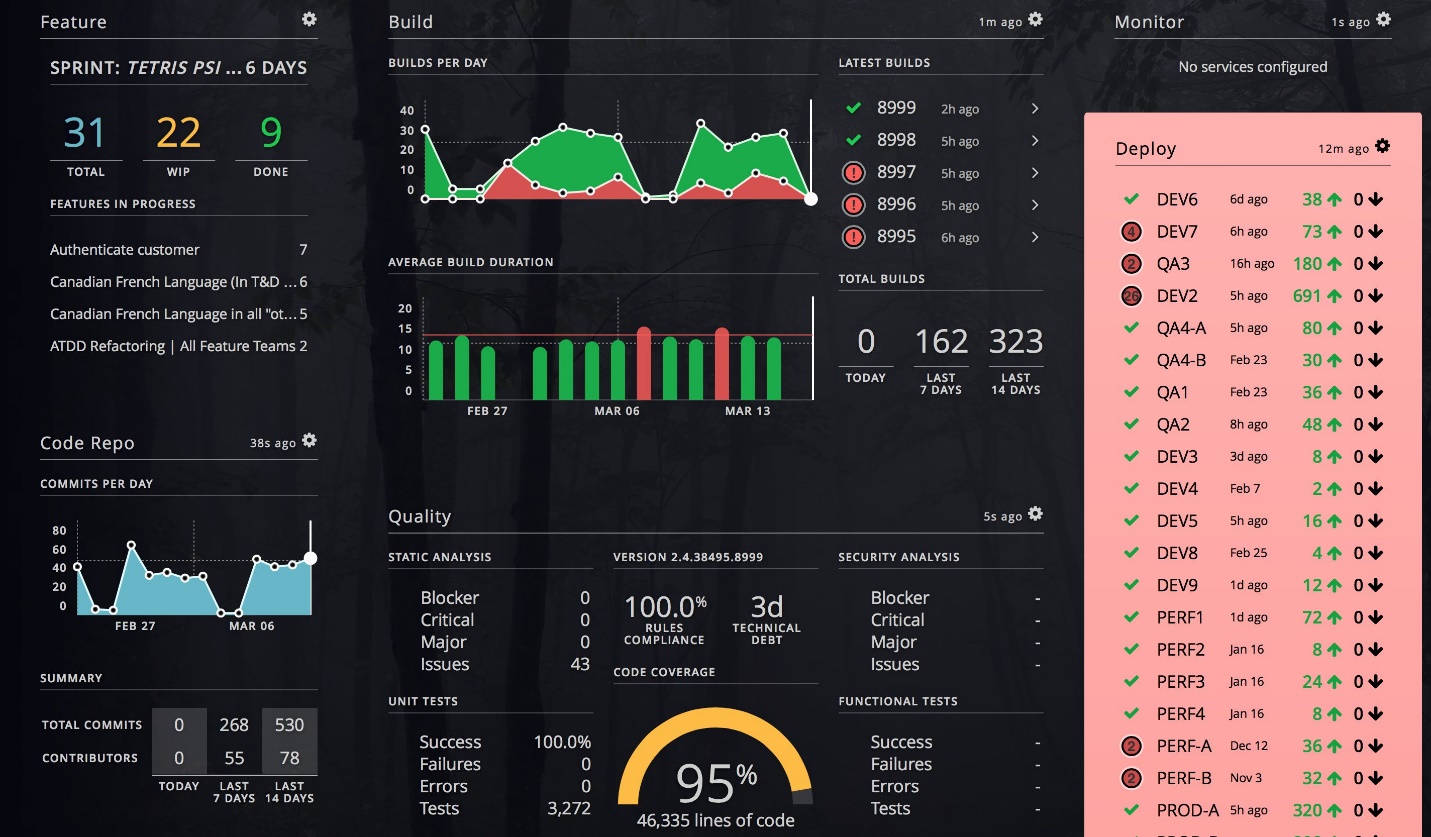
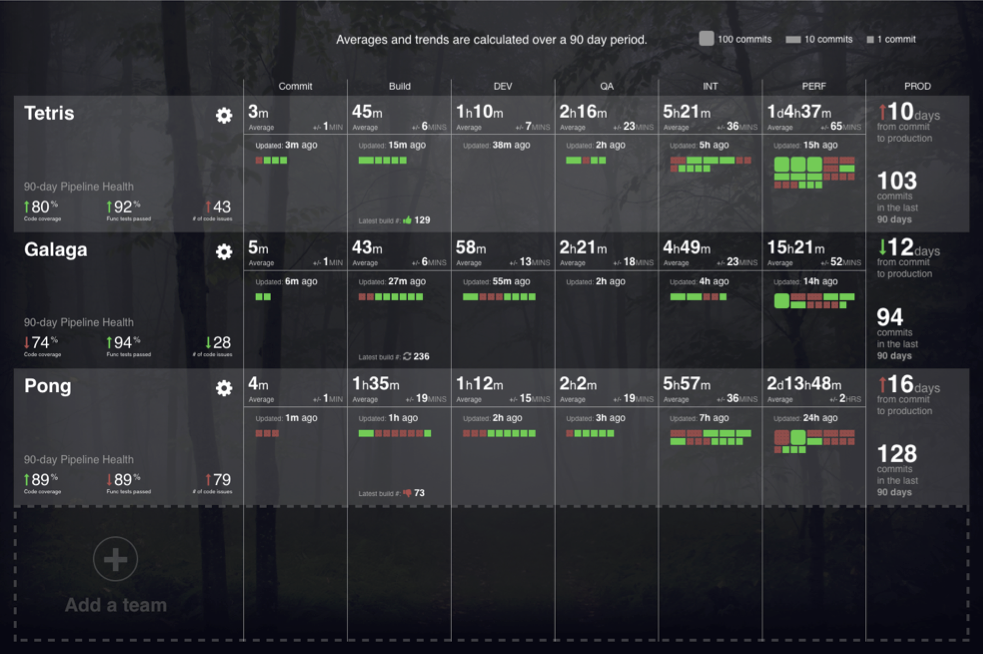
This layer is view level layer & displays the Daaashboard content to user.there are two types of Dashboards
a.Team Level Dashboard
b.Product Level Dashboard
2.API Layer
API is work as an Interface between Collector and UI.It contains the Controller classes, which helps to UI which Collector logic has to be execute whenever request comes from UI.
API module contains following major packages
-
Request: this package classes are used to store Request details
-
Rest : this package classes contains Controller classes
-
Service : this package classes are used for send response to UI
3.Collector Layer
Ecah and every DevOps Tool having their own collector. For example Jenkins tool having its own collector call it as Jenkins Build Collector.The main job of the collector is, it will collects the Data from DevOps tool and save that data into the MongoDB
We have following Collectors in the latest version of Hygieia(2.0.4)
-
Build Collectors:
-
Cloud Collectors:
-
Deploy Collectors:
-
Feature Collectors:
-
Misc Collectors:
-
SCM Collectors:
How Hygieia Dashboard Works
-
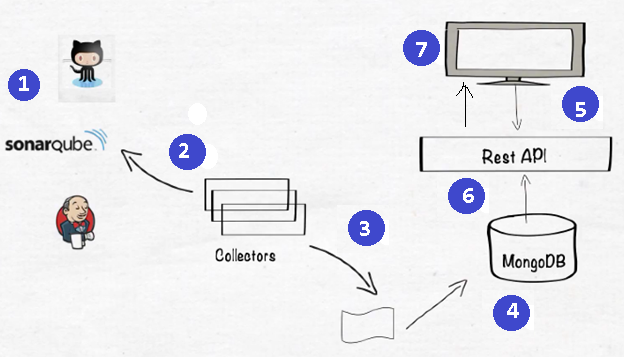
Install & Congigure DevOps Tools in Hygiea Dashboard
-
Collectors will collect the data from the DevOps tool based on the configuration
-
Collector will convert the collected data into MongoDB data format
-
Saves the converted data into MongoDB Collector
-
UI calls the RestAPI call to get the Data from the Database
-
RestAPI get the data from database and returns to UI
-
UI will Displays the collected data in the Dashboard
2. Hygieia Dashboard Setup
To install & configure Hygieia Dashboard we need to install below Software Tools.
2.1 Install Java & Set JAVA_HOME
-
Download Java JDK from Oracle Official website & Install It.
-
Configure theJAVA_HOME Windows environment variables by specifying Java Installation Location
Control Panel → User Accounts → User Accounts → Change my EnvironmentVariables

-
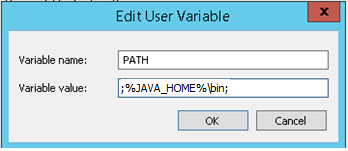
Also update thePATH variable with bin location
2.2 Install Apache Mavem & Set MAVEN_HOME
1.Download Apache Maven
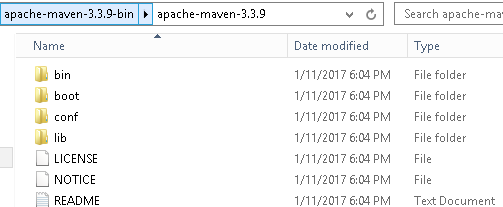
Go toMaven official website, download the Maven zip file, Unzip It.
2.Configure theJAVA_HOME Windows environment variables by specifying Java Installation Location
Control Panel → User Accounts → User Accounts → Change my EnvironmentVariables
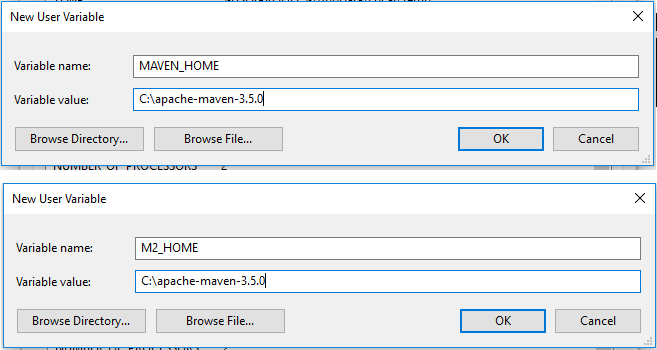
3.AddbothM2_HOMEandMAVEN_HOME as Windows environment variable & point it to Maven folder
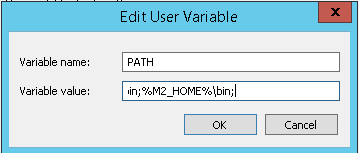
4.UpdatePATHvariable, append Maven bin folder –%M2_HOME%\bin, so that you can run the Maven’s command everywhere.
5.Verify Maven is installed properly or not by mvn –version command
mvn -version" >>mvn -version

Apache Maven 3.0.5 (...)
Maven home: ...
Java version: 1.8.0_60, vendor: Oracle Corporation
Java home: ...
Default locale: en_US, platform encoding: Cp1252
OS name: "windows 7", version: "6.1", arch: "amd64", family: "dos"
6.Change PROXY Settings
If you are behind a proxy, Maven will fail to download any dependencies.in this
type of situation we have to declare the proxy server setting in Maven
configuration filesettings.xml.
Find {M2_HOME}/conf/settings.xml, and put your proxies detail inside. Un-comment the proxy options and fill in your proxy server detail.
<!-- proxies
   | This is a list of proxies which can be used on this machine to connect to the network.
   |-->
  <proxies>
      <proxy>
      <id>optional</id>
      <active>true</active>
      <protocol>http</protocol>
      <username>smlcodes</username>
      <password>password</password>
      <host>proxy.smlcodes.com</host>
      <port>8888</port>
      <nonProxyHosts>local.net|some.host.com</nonProxyHosts>
    </proxy>
  </proxies>
2.3 Configure Apache Maven in Eclipse
1.DownloadEclipse IDE for Java EE Developers , Extract and Run Eclipse
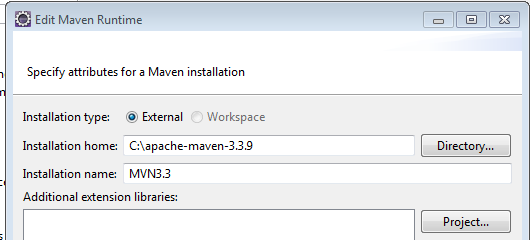
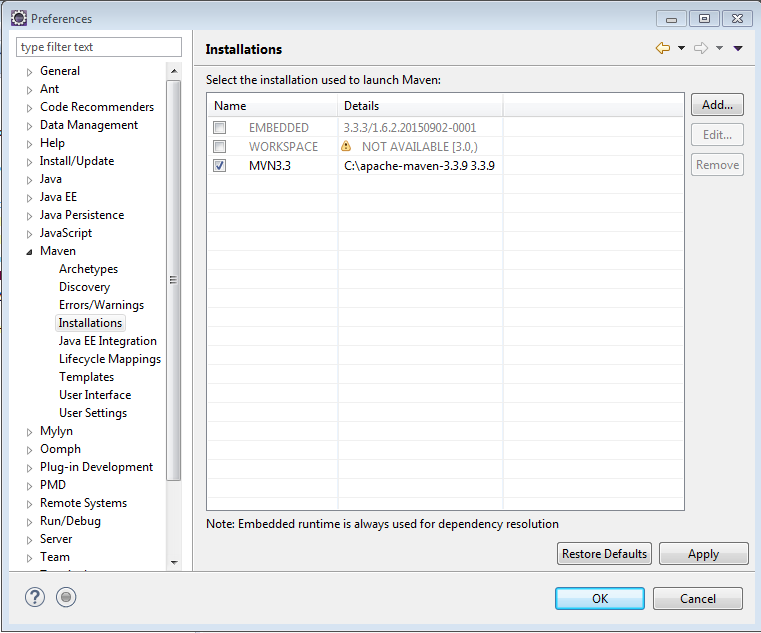
2.Copy maven installation path (Ex. C:\apache-maven-3.3.9)
Window → preferences → Maven → Installations == add maven path
3.Change Settings.xml file path
Window → preferences → Maven → User Settings
2.4 MongoDB Installation
Know your PC Architecture, Open Command prompt and run below command
C:>wmic os get osarchitecture
1.Download MongoDB
There are three builds of MongoDB for Windows:
-
MongoDB for Windows Server 2008 R2 edition [Download link]
-
MongoDB for Windows 64-bit [Download link]
-
MongoDB for Windows 32-bit [Download link]
2.Extract and create Folders
download zip files which you extract directly onto any place in your system of
your choice.I have extracted them in -d:/mongodb-.
Also,create following directoriesinside d:/mongodb
-
D:\mongodb\data
-
D:\mongodb\log
3.Path and Installation
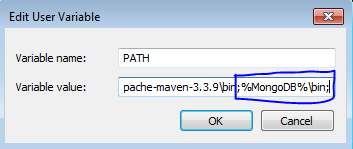
Go to Control Panel →User Accounts →Change my Environment Variables →Add below Variables
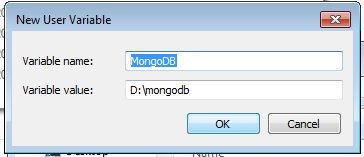
D:\mongodb\bin
4.Create a MongoDB config file
Create new file,add below content to mongo.config in given location for
//Ex:d:\\mongodb\\mongo.config

##store data here
dbpath=D:\mongodb\data

##all output go here
logpath=D:\mongodb\log\mongo.log

##log read and write operations
diaglog=3
5.Start/Shutdown the MongoDB Server
Start: Run below command in command prompt
•	d:\mongodb\bin>mongod –dbpath=D:/mongodb    (or)
•	d:\mongodb\bin>mongod.exe --config="D:\mongodb\mongo.config"

6.To run Commands on MongoDB
Open new commandline run mongo command
7.Create an User by running below commands on Mongo
db.createUser(
                {
                  user: "dashboarduser",
                  pwd: "dashboarduser123",
                  roles: [
                     {role: "readWrite", db: "dashboarddb"}
                          ]
                  })
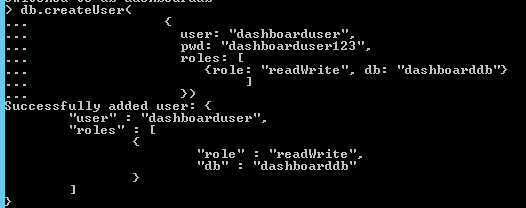
Now we are SuccessfullyConfigured MongoDB
2.5 Install Git
Download & Install Git Client , add Update PATH variable
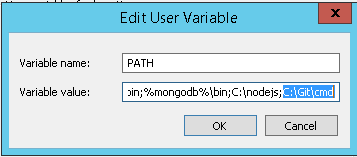
2.5 Install Node.Js
1.Download & Install Node.js from Nodejs Official website
2.Update Path variable with installed nodejs location
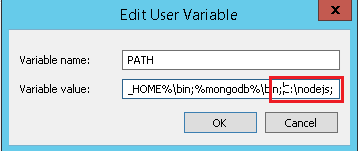
3.Open command Prompt run below commands one by one
npm install -g bower
npm install -g gulp
4.If you are under the Proxy, then configure proxy settings in below files
- Run “notepad .npmrc” and enter your proxy details
proxy = http://yourproxyservername:80/ https-proxy = http://yourproxyservername:80/ strict-ssl = false - Run “notepad .gitconfig”, and enter your proxy details
[http] proxy = http://yourproxyservername:80/ - Run “notepad .bowerrc” and enter your proxy details
{ "proxy":"http://yourproxyservername:80/", "https-proxy":"http:// http://yourproxyservername:80" } - If you are not foung npm folder in “C:\Users\YOUR_USER_Name\AppData\Roaming”, then we have to manually create “npm” folder under
for this error : ‘bower’ is not recognized as an internal or external command
Go to C:\Users\USER_NAME\AppData\Roaming\npm, Copy this location add to PATH variable
2.6 RoboMongo (or) Admin Mongo
2.6.1 RoboMongo
Robomongo is a shell-centric cross-platform MongoDB management tool. Unlike most other MongoDB admin UI tools, Robomongo embeds the actual mongo shell in a tabbed interface with access to a shell command line as well as GUI interaction.
We can Download the RoboMongo from here , you can install it as easy as normal windows software
2.6.2 Admin Mongo
adminMongo is a cross platform user interface (GUI) to handle all your MongoDB connections/databases needs. adminMongo is fully responsive and should work on a range of devices.You can download adminMongo from Github.
Installation
-
Navigate to folder & install adminMongo: git clone https://github.com/mrvautin/adminMongo.git && cd adminMongo
-
Install dependencies:npm install
-
Start application:npm startornode app
-
Visithttp://127.0.0.1:1234in your browser
3. Configure Hygieia Dashboard
Download Hygieia Source code from Github (Hygieia 2.0.4 release )
https://github.com/capitalone/Hygieia/releases/
3.1 Run Maven Build
1.Update Settings.xml file at C:\apache-maven-3.3.9\conf if you are under proxy
<proxies>
              <proxy>
               <id>your-proxy-id</id>
               <active>true</active>
               <protocol>http</protocol>
               <host>your.proxy.domain.name</host>
               <port>8080</port>
               <!-- For authenticated proxy, please set the following, as well -->
               <username>companyId999</username>
               <password>yourPassword</password>
               <nonProxyHosts>*.local</nonProxyHosts>
       </proxy>
</proxies>
2.Extract Hygieia-xxx.zip and Open. Make sure it contains following files
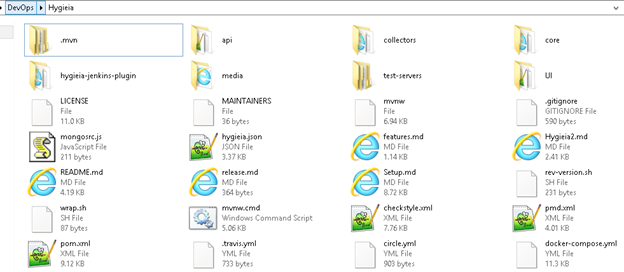
3.Open command prompt and go to Hygieia folder and run one of the below mvn cmds
mvn clean install package

(or)

mvn clean install package -Dmaven.test.skip=true

(or –for Skipping PDM Violations)

mvn clean install package -Dmaven.test.skip=true -Dpmd.failOnViolation=false
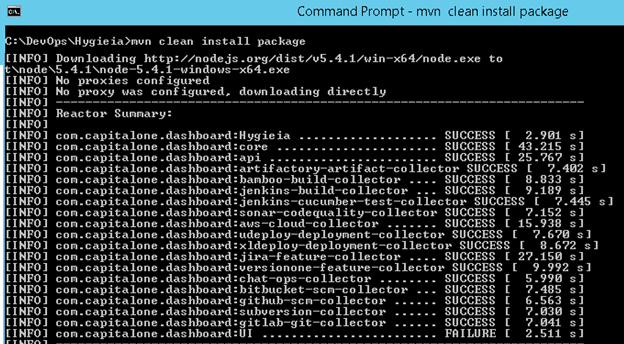
3.2 Install Bower & npm Packges on UI Folder
1.Open Hygieia\UI on command line
2.Issue the following commands via command line:
npm install -g bower
npm install -g gulp
3.Navigate to your project root via command line and use the following command:
npm install
Use Git Shell to install bower in the following manner; do so from your project’s root directory:
bower install
select option 2 when prompted for user input
4.Start the UI by running gulp serve on Hygieia\UI folder.

5.Open http://localhost:3000/ from browser, it will display the Dashboard
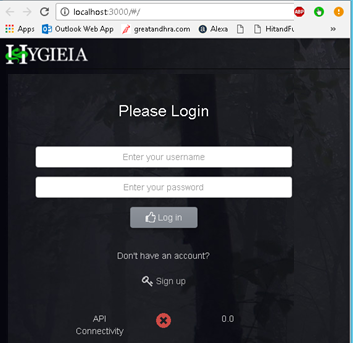
If we see above API is not connected. To connect with API we must run the api project. To do that we need to import the code to Eclipse. Follow below steps to do so.
3.3 Import code to Eclipse
1.Open Eclipse IDE
2.File → Import → Maven→ Existing Maven Projects, browse Downloaded Hygieia folder→ Finish
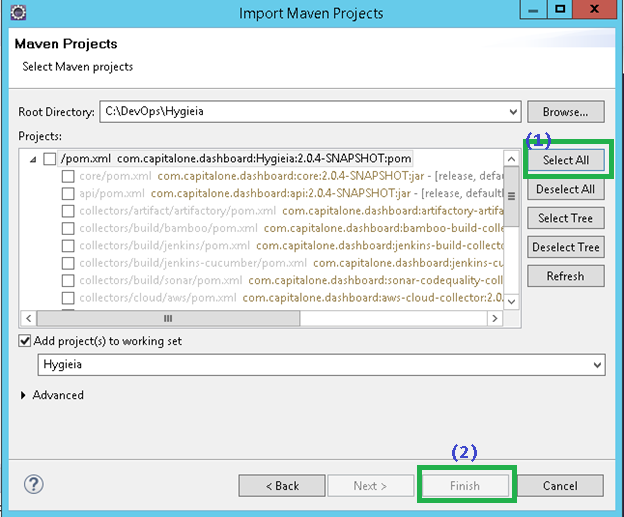
3.we will get Project structure as below like below
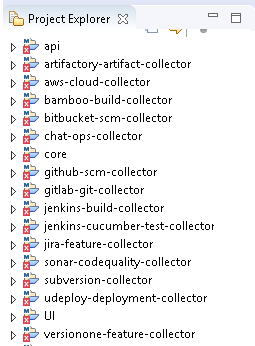
4.Update Maven Project by Selecting all → Right click → Maven Update → Ok
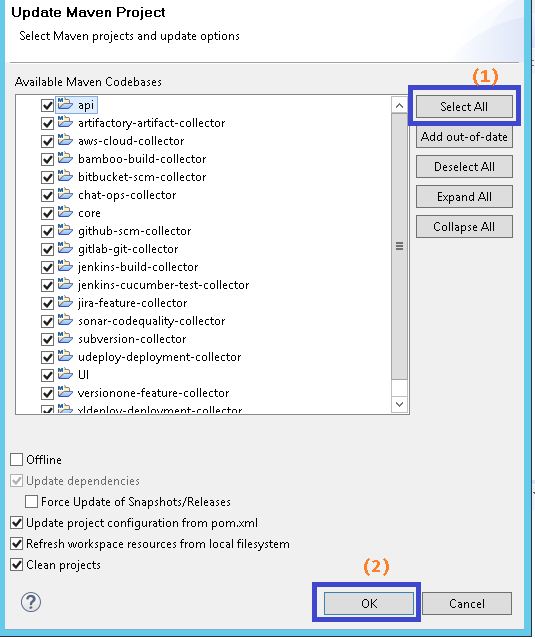
Now We are successfully Setup all the thing which are required for Running Hygieia Dashboard.So Let’s Move next step to Running Hygieia Dashboard
3.4 Steps to Running Hygieia Dashboard
3.4.1 Start MongoDB
First, we need to start MongoDB Database and Make sure it is Running
Check MongoDB is Started or not, by running mongo command on command-prompt
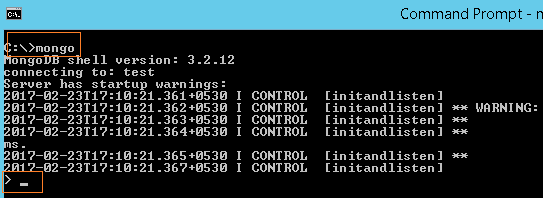
Blinking cursor means it is running.
3.4.2 Start -api”
Before we starting API we need add dashboard.properties file, change application.propeties file as per our requirement.
1.dashboard.properties(Path: Hygieia\api\dashboard.properties)
dbname=dashboarddb
#dbusername=[MogoDb Database Username, defaults to empty]
#dbpassword=[MongoDb Database Password, defaults to empty]
dbhost=localhost
dbport=27017
2.application.properties(Path: Hygieia\api\src\main\resources\application.properties)
# Default server configuration values
dbname=dashboard
#dbusername=dashboarduser
#dbpassword=1qazxSw2
dbhost=127.0.0.1
dbport=11500
server.contextPath=/api
server.port=8080
3.Configure api run configurations by going,
api project → Go to src → com.capitalone.dashboard.Application.java →Rightclick→Run Configuartions → Java Application → go to arguments → program args : add
--spring.config.location=dashboard.properties
4.Apply and Run the Application.
.   ____          _            __ _ _
 \\ / ___'_ __ _ _(_)_ __  __ _ \ \ \ \
( ( )\___ | '_ | '_| | '_ \/ _` | \ \ \ \
 \\/  ___)| |_)| | | | | || (_| |  ) ) ) )
  '  |____| .__|_| |_|_| |_\__, | / / / /
 =========|_|==============|___/=/_/_/_/
 :: Spring Boot ::        (v1.2.5.RELEASE)
2017-02-23 17:53:51,243 INFO  com.capitalone.dashboard.Application - Starting Application on Local with PID 5580 (C:\DevOps\Hygieia\api\target\classes started by smlcodes in C:\DevOps\Hygieia\api)
2017-02-23 17:53:51,468 INFO  o.s.b.c.e.AnnotationConfigEmbeddedWebApplicationContext -
2017-02-23 17:54:02,632 INFO  o.s.b.c.e.t.TomcatEmbeddedServletContainer - Tomcat initialized with port(s): 8080 (http)
2017-02-23 17:54:03,707 INFO  o.a.catalina.core.StandardService - Starting service Tomcat
2017-02-23 17:54:21,068 INFO  o.s.b.c.e.t.TomcatEmbeddedServletContainer - Tomcat started on port(s): 8080 (http)
2017-02-23 17:54:21,074 INFO  com.capitalone.dashboard.Application - Started Application in 30.837 seconds (JVM running for 35.29)
If we see the message -Tomcat started on port(s): 8080 (http)” means api is running successfully
3.4.3 Start -UI”
For Starting UI, Open nodejs command prompt, navigate to UI folder location & run gulp serve command
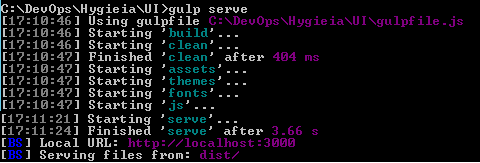
Hygieia people giving some sample Mock data to visualize dashboard. So for demo purpose i’m running gulp serve with mock data. For doing this we need run below command on UI folder
gulp serve –local true

Steps to See Hygieia Dashboard with Mock Data
1.Open http://localhost:3000/#/
2.Signup with username & password (minimum 6 characters); Ex: admin & 123456
3.Login with username & password
4.It will Display the dashboard homepage as below
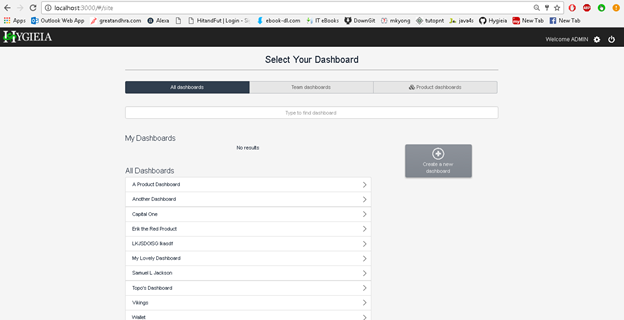
5.Select on any Dashboard, it will displays that Dashboard data
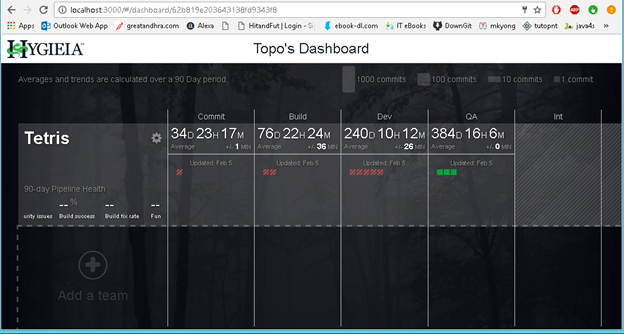
Now we just run the Hygieia Dashboard with some Demo Data. If you want to run the Dashboard with real data, we need configure & run our own Collectors. Next step will explain how to configure and run any collector in hygieia dashboard
3.5 Steps to Configuring Any Collector
We have many collectors in hygiea like Bamboo, Jenkins,Sonar etc.,.but don’t worry! We can easily configure any hygieia collector because all collectors follows same steps. We need do some minor changes in application.properties file. That’s it
1.Select a collector (for Ex: jenkins-build-collector)
2.Rightclick on Project →Create → new File → application.properties
3.Copy sample application.properties file data from Github file to local application.properties & change the details as per our requirement
#Database Name
dbname=dashboarddb

#Database HostName - default is localhost
#dbhost=localhost

#Database Port - default is 27017
#dbport=9999

#Database Username - default is blank
#dbusername=db

#Database Password - default is blank
#dbpassword=dbpass

jenkins.servers[0]=http://localhost:8181/jenkins/
#Collector schedule (required)
jenkins.cron=0 0/1 * * * *

#Jenkins server (required) - Can provide multiple

#If using username/token for api authentication (required for Cloudbees Jenkins Ops Center) see sample
#jenkins.servers[1]=http://username:token@jenkins.company.com

#Another option: If using same username/password Jenkins auth - set username/apiKey to use HTTP Basic Auth (blank=no auth)
#jenkins.username=
#jenkins.apiKey=

#Determines if build console log is collected - defaults to false
jenkins.saveLog=true
4.Right click on Project → Run As → Run configurations → Run Applciation.java
5.Open → Hygieia dashboard on webpage
6.Click on Configure Build Widget → select Jenkins/Hudson →save
7.It will display Jenkins data
References
https://github.com/capitalone/Hygieia
https://developer.capitalone.com/opensource-projects/hygieia