Express.js
Express.js is a web application framework for Node.js. It provides various features that make web application development fast and easy which otherwise takes more time using only Node.js.
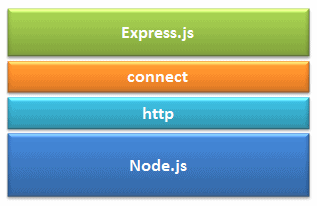
Express.js is based on the Node.js middleware module called connect which in turn uses http module. So, any middleware which is based on connect will also work with Express.js.
Advantages of Express.js
-
Makes Node.js web application development fast and easy.
-
Allows you to define routes of your application based on HTTP methods and URLs.
-
Includes various middleware modules which you can use to perform additional tasks on request and response.
-
Allows you to define an error handling middleware.
-
Easy to serve static files and resources of your application.
-
Allows you to create REST API server.
-
Easy to connect with databases such as MongoDB, Redis, MySQL
Installation
You can install express.js using npm. The following command will install latest version of express.js globally on your machine so that every Node.js application on your machine can use it.
npm install -g express
npm install express-generator -g (Optional – Recommended.)
Express.js vs Node.js
| Node.js | Express.js |
|---|---|
| It is used to build server-side, input-output, event-driven apps. | It is used to build Web Applications using approaches and principles of Node.js. |
| It is built on Google’s V8 engine. | It is built on the top of Node.js. |
| Written in C, C++, JavaScript | Written in JavaScript |
| It is a Run-time platform or environment designed for server-side execution of JavaScript. | It is a Framework, based on Node.js. |
| Controllers are not provided. We need to write manually | Controllers are provided. We just directly use them. |
| Routing is not provided. need to write manually | Routing is provided. |
| It requires more coding time. | It requires less coding time. |
Express.js Web Application
Express.js provides an easy way to create web server and render HTML pages for different HTTP requests by configuring routes for your application.
Express.js - Create Web Server
In Node.js we manually created server by writing code.
var http = require('http');

var server = http.createServer(function(req, res) {
  //Logic to handle requests
});

server.listen(5000);
But in Node.js we don’t need to write that much code, to create server & request processing. We need to just import express module & use the predefined methods.
Example to Create new server
var express = require('express');
var app = express();

// define routes here..

var server = app.listen(5000, function () {
    console.log('Node server is running..');
});
1.we imported Express.js module using require() function.
var express = require('express');
- Then our application contains express.js related features. Now we need to
create an express object, using express(); constructor.
var app = express();here the app object contains methods for routing HTTP requests, configuring middleware, rendering HTML views and registering a template engine.
-
The app.listen() function creates the Node.js web server at the specified host and port. It is identical to Node’s http.createServer.listen() method.
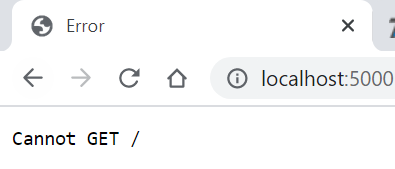
- Run the above example using node app.js command and point your browser to
http://localhost:5000. It will display Cannot GET /
because we have not configured any routes yet.
Express.js – Routing
Use app object to define different routes of your application.
The app object includes get(), post(), put() and delete() methods to
define routes for HTTP GET, POST, PUT and DELETE requests respectively.
var express = require('express');
var app = express();

app.get('/', function (req, res) {
  res.send('<html><body><h1>Hello World</h1></body></html>');
});

app.post('/post', function (req, res) {
  res.send('POST Request');
});

app.put('/put', function (req, res) {
  res.send('PUT Request');
});

app.delete('/delete', function (req, res) {
  res.send('DELETE Request');
});

var server = app.listen(5000, function () {
  console.log('Node server is running..');
});
-
The first parameter is a path(/) of a route which will start after base URL.
-
The callback function includes request and response object which will be executed on each request.
Run the above example using node server.js command and point your browser to
http://localhost:5000 and you will see the following result.

But for get(), post(), put() and delete() You still get Cannot GET /put because you are not handling those requests properly.
You need to send data to those request types. Next section will see how to send data using Forms.
Handle POST Request
you will learn how to handle HTTP POST request and get data from the submitted form.
To handle HTTP POST request in Express.js version 4 and above, you need to install middleware module called body-parser. This body-parser module parses the JSON, buffer, string and url encoded data submitted using HTTP POST request.
Install body-parser using NPM as shown below.
npm install body-parser --save
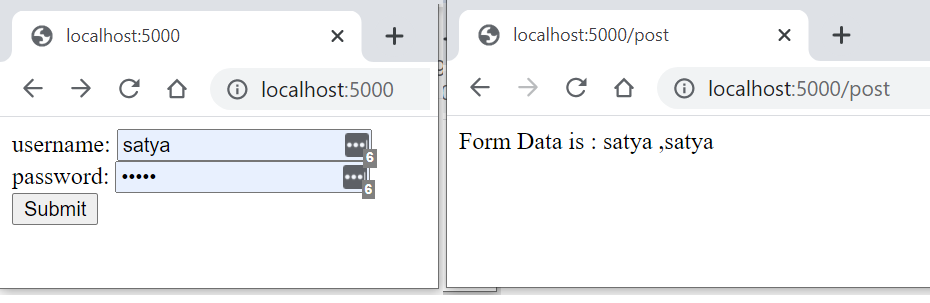
First, create index.html file in the root folder of your application and write the following code in it.
<form action="/post" method="post">
    username: <input name="username" type="text" /> <br />
    password: <input name="password" type="password" /> <br />
    <input type="submit" />
</form>
Create app.js file, import body-parser and get the POST request data as shown below.
var express = require('express');
var app = express();

//Import body parser
var bodyParser = require("body-parser");
app.use(bodyParser.urlencoded({ extended: false }));


//set Homepage - index.html
app.get('/', function (req, res) {
    res.sendFile(__dirname + '/index.html');
});


//process form data
app.post('/post', function (req, res) {
    var name = req.body.username + ' ,' + req.body.password;
    res.send('Form Data is : '+name);
});

var server = app.listen(5000, function () {
    console.log('Node server is running..');
});
In the above example, POST data can be accessed using req.body. The req.body is an object that includes properties for each submitted form.
Express.js - Serving Static Content
In this section, you will learn how to serve static resources like images, css, JavaScript or other static files.
Using express.static() method, you can server static resources directly by specifying the folder name where you have stored your static resources.
The following example serves static resources from the public folder under the root folder of your application
└───public
        index.html
        signin.html
	    logo.png
var express = require('express');
var app = express();

//setting middleware
app.use(express.static(__dirname + 'public')); //Serves resources from public folder

var server = app.listen(5000);
Express.js – Database Access
Node.js (Express.js on top of Node.js) supports all kinds of databases no matter if it is a relational database or NoSQL database.
To access the database from Node.js, you first need to install drivers for the database you want to use.
The following table lists important relational databases and respective drivers.
| Relational Databases | Driver | NPM Command |
|---|---|---|
| MS SQL Server | mssql | npm install mssql |
| Oracle | oracledb | npm install oracledb |
| MySQL | MySQL | npm install mysql |
| PostgreSQL | pg | npm install pg |
| SQLite | node-sqlite3 | npm install node-sqlite |
The following table lists important NoSQL databases and respective drives.
| NoSQL Databases | Driver | NPM Command |
|---|---|---|
| MongoDB | mongodb | npm install mongodb |
| Cassandra | cassandra-driver | npm install cassandra-driver |
| LevelDB | leveldb | npm install level levelup leveldown |
| RavenDB | ravendb | npm install ravendb |
| Neo4j | neo4j | npm install neo4j |
| Redis | redis | npm install redis |
| CouchDB | nano | npm install nano |
Express.js – MySQL Connection
Install MySQL driver
npm install mysql --save
Example
var express = require('express');
var mysql = require('mysql');
var app = express();

//Create MySQL DB Connection
var connection = mysql.createConnection({
    host: 'localhost',
    user: 'root',
    password: 'root',
    database: 'webapp'
});


app.get('/', function (req, res) {
    connection.connect(function (error) {
        if (!!error) {
            console.log(error);
        } else {
            connection.query('SELECT * FROM user ORDER BY id desc', function (err, rows) {
                if (err) {
                    console.log(err);
                } else {
                    res.send(rows);
                }
            });
        }
    });
});

var server = app.listen(5000, function () {
    console.log('Server is running..');
});
Express.js – MongoDB Connection
In order to access MongoDB database, we need to install MongoDB drivers
npm install mongodb --save
Connecting MongoDB
var MongoClient = require('mongodb').MongoClient;

// Connect to the db
MongoClient.connect("mongodb://localhost:27017/MyDb", function (err, db) {

     if(err) throw err;

     //Write databse Insert/Update/Query code here..
});
Insert Documents
var MongoClient = require('mongodb').MongoClient;

// Connect to the db
MongoClient.connect("mongodb://localhost:27017/MyDb", function (err, db) {

    db.collection('Persons', function (err, collection) {
        collection.insert({ id: 1, firstName: 'Steve', lastName: 'Jobs' });
        collection.insert({ id: 2, firstName: 'Bill', lastName: 'Gates' });
        collection.insert({ id: 3, firstName: 'James', lastName: 'Bond' });


        db.collection('Persons').count(function (err, count) {
            if (err) throw err;
            console.log('Total Rows: ' + count);
        });
    });

});
Select Query
var MongoClient = require('mongodb').MongoClient;

// Connect to the db
MongoClient.connect("mongodb://localhost:27017/MyDb", function (err, db) {

    db.collection('Persons', function (err, collection) {

         collection.find().toArray(function(err, items) {
            if(err) throw err;
            console.log(items);
        });
    });
});
Similarly we do Update/Delete as well.
Node.js - Template Engines
Template engine helps us to create an HTML template with minimal code. Also, it can inject data into HTML template at client side and produce the final HTML.
The following figure illustrates how template engine works in Node.js.
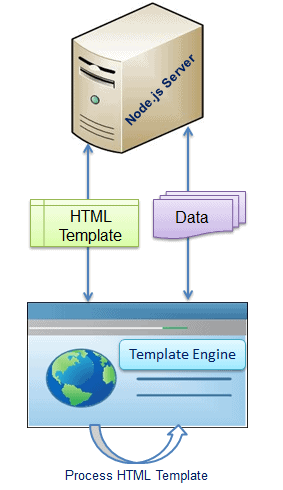
Template engine produces the final HTML using template and data in client’s browser.
The following is a list of important (but not limited) template engines for Node.js