Single Sign-on using IBM Stack
Single sign-on services provide a seamless experience for a user who accesses a number of applications in the enterprise.
You can enable single sign-on for both in the IBM® Security Identity Manager(ISIM) administrative console and IBM Security Access Manager(ISAM)
After you configure single sign-on,
-
a user logs on to IBM Security Access Manager(ISAM) web security one time.
-
The identity of the user is propagated to IBM Security Identity Manager(ISIM), which eliminates the need for another login
This function requires IBM Security Access Manager to enable single sign-on with IBM Security Identity Manager.
-
IBM Security Access Manager(Access for those ID’s) provides user authentication and coarse-grained authorization before it allows access to IBM Security Identity Manager.
-
IBM Security Identity Manager(Id-uname/pwd) then applies fine-grained access control with its own Access Control Item (ACI).
You can configure IBM Security Access Manager and IBM Security Identity Manager for single sign-on with either
-
WebSEAL
-
IBM Security Access Manager plug-in servers
Before you configure single sign-on with WebSEAL, you must install and configure IBM Security Access Manager and WebSEAL.
What is WebSEAL?
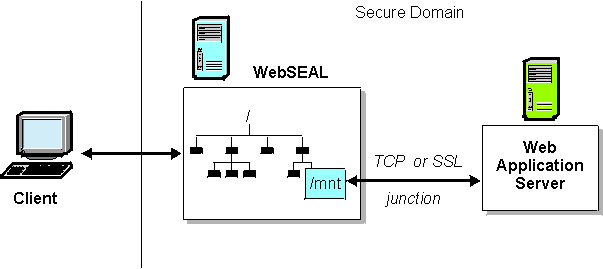
In a Web-based network, one or more front-end WebSEAL servers are integrate and protect Web resources and applications located on back-end Web servers.
The back-end server can be another WebSEAL server or, more commonly, a third-party Web application server.
The back-end server Web space is “connected” to the WebSEAL server at a specially designated junction (mount) point in the WebSEAL Web space.

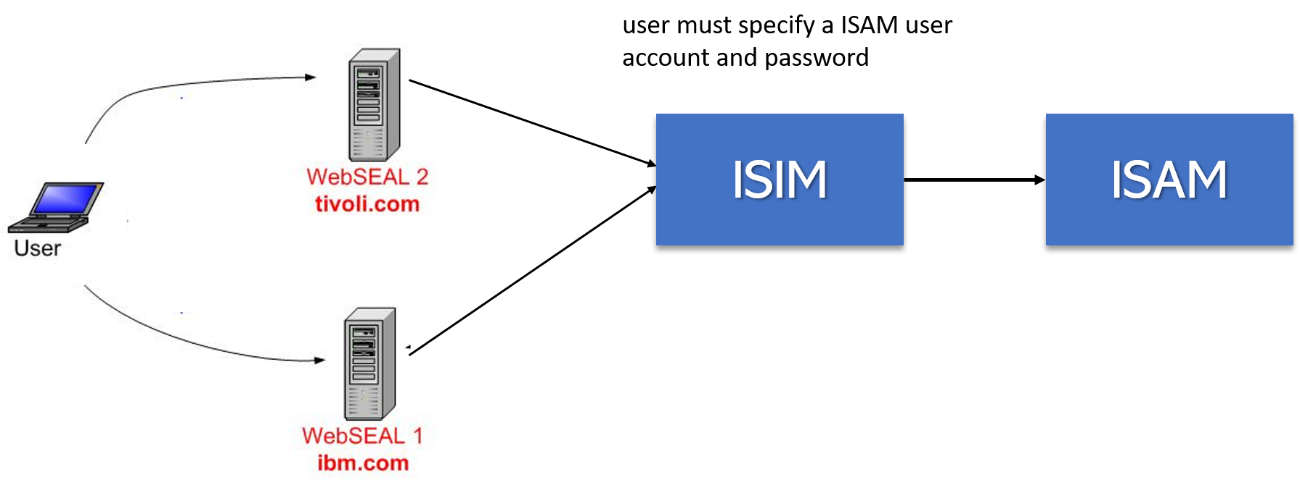
When a user accesses IBM Security Identity Manager with WebSEAL and single sign-on,
the user must specify a IBM Security Access Manager user account and password.
IBM Security Access Manager checks if the user is authorized to access IBM Security Identity Manager.

Typically, IBM Security Access Manager and IBM Security Identity Manager user accounts are identical.
If they are identical, the IBM Security Identity Manager user can log in to IBM Security Identity Manager.
Changing the logoff page
Open the IBM Security Identity Manager $ITIM_HOME/data/ui.properties file in a text editor.
To configure the Logoff page for SelfService UI, open the SelfServiceUI.properties file.
Configure Single Sign-on with WebSEAL
To configure single sign-on with Trust Association Interceptor and WebSEAL, complete the following steps:
-
Define how IBM Security Access Manager maps its accounts to IBM Security Identity Manager accounts during authentication.
ISAM –map accounts———> ISIM
-
Create a user in IBM Security Access Manager that WebSEAL can use to connect to the backend server - which contains Applications .
-
Create a junction that points to the IBM Security Identity Manager server.
-
Define two IBM Security Access Manager ACLs to control access to IBM Security Identity Manager.
-
Define one ACL for the IBM Security Identity Manager Administrator application.
-
Define another ACL for the IBM Security Identity Manager Self Service application.
-
-
Configure WebSphere® to point to IBM Security Access Manager.
-
Configure the Trust Association Interceptor.
-
Configure IBM Security Identity Manager to use single sign-on.
-
Configure WebSEAL.
Technology Stack
1.ISIM
- IBM Tivoli Identity Manager, also known as TIM, ITIM, or ISIM (IBM Security Identity Manager), is an Identity Management System product from IBM.
Solutions which fall under the category of identity management may include:
Management of identities
-
Provisioning/De-provisioning of accounts
-
Access control
-
Single sign-on (SSO)
-
Web single sign-on (Web SSO)
-
Role-based access control (RBAC)
-
Attribute based access control (ABAC)
Directory services
-
Identity repository (directory services for the administration of user account attributes)
-
Metadata replication/Synchronization
-
Directory virtualization (Virtual directory)
-
e-Business scale directory systems
-
Next-generation systems - Composite Adaptive Directory Services (CADS) and CADS SDP
Other categories
-
Federation of user access rights on web applications across otherwise untrusted networks
-
Directory-enabled networking and 802.1X EAP
Standards initiatives
-
Liberty Alliance — A consortium promoting federated identity management
-
Shibboleth (Internet2) — Identity standards targeted towards educational environments
-
Global Trust Center
1.provisioning software is software intended to help organizations more quickly, cheaply, reliably and securely manage information about users
on multiple systems and applications
Examples of systems and applications include:
-
LDAP directories.
-
Microsoft Active Directory and Novell eDirectory
Federation
A federated identity in information technology is the means of linking a person’s electronic identity and attributes,
stored across multiple distinct identity management systems.[
Federated identity is related to single sign-on (SSO), in which a user’s single authentication ticket, or token, is trusted across multiple IT systems or even organizations
federated identity management (FIdM) amounts to having a common set of policies, practices and protocols
to manage the identity and trust into IT users and devices across organizations.[6]
Single sign-on (SSO) systems allow a single user authentication process across multiple IT systems or even organizations.
SSO is a subset of federated identity management, as it relates only to authentication and technical interoperability.
Digital identity platforms that allow users to log onto third-party websites, applications, mobile devices and gaming systems with their existing identity,
i.e. enable social login, include:
-
Microsoft account – Formerly Windows Live ID
-
Google Account
-
Facebook - Login to public social venues.
SAML
Security Assertion Markup Language (SAML, pronounced SAM-el[1]) is an open standard for exchanging authentication and authorization data between parties, in particular, between an identity provider and a service provider.
A SAML assertion contains a packet of security information:
<saml:Assertion …>
..
</saml:Assertion>

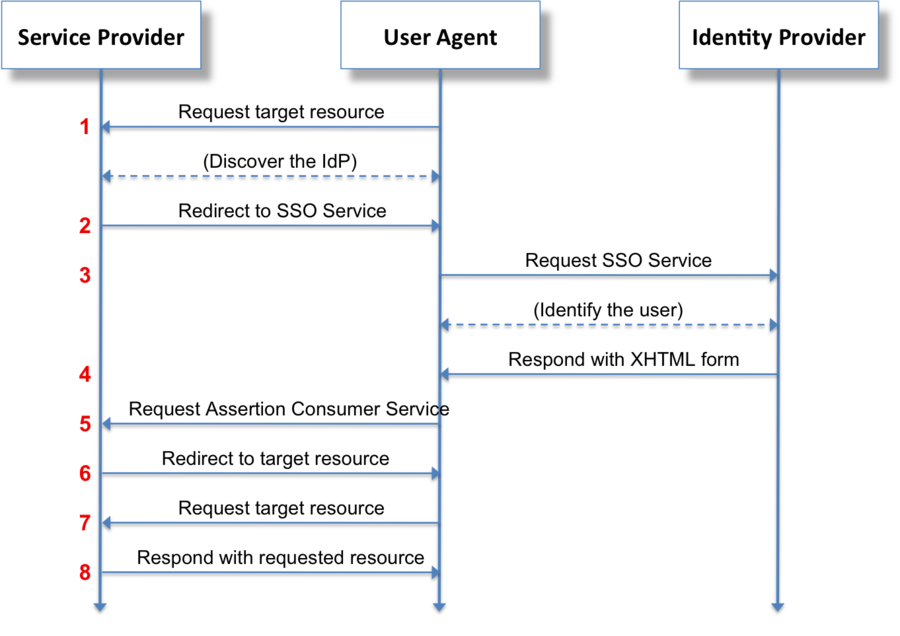
1. Request the target resource at the SP (SAML 2.0 only)
The principal (via an HTTP user agent) requests a target resource at the service provider:
https://sp.example.com/myresource
The service provider performs a security check on behalf of the target resource. If a valid security context at the service provider already exists, skip steps 2–7.
2. Redirect to the SSO Service at the IdP (SAML 2.0 only)
The service provider determines the user’s preferred identity provider (by unspecified means) and redirects the user agent to the SSO Service at the identity provider:
https://idp.example.org/SAML2/SSO/Redirect?SAMLRequest=request
The value of the SAMLRequest parameter (denoted by the placeholder request above) is the Base64 encoding of a deflated <samlp:AuthnRequest> element.
3. Request the SSO Service at the IdP (SAML 2.0 only)
The user agent issues a GET request to the SSO service at the URL from step 2. The SSO service processes the AuthnRequest (sent via the SAMLRequestURL query parameter) and performs a security check. If the user does not have a valid security context, the identity provider identifies the user (details omitted).
4. Respond with an XHTML form
The SSO service validates the request and responds with a document containing an XHTML form:
  <method="post" action="https://sp.example.com/SAML2/SSO/POST" ...>
    <type="hidden" name="SAMLResponse" value="response" />
    ...
    <type="submit" value="Submit" />
  </>
The value of the SAMLResponse element (denoted by the placeholder response above) is the base64 encoding of a <samlp:Response> element.
5. Request the Assertion Consumer Service at the SP
The user agent issues a POST request to the assertion consumer service at the service provider. The value of the SAMLResponse parameter is taken from the XHTML form at step 4.
T
6. Redirect to the target resource
The assertion consumer service processes the response, creates a security context at the service provider and redirects the user agent to the target resource.
7. Request the target resource at the SP again
The user agent requests the target resource at the service provider (again):
https://sp.example.com/myresource
8. Respond with requested resource
Since a security context exists, the service provider returns the resource to the user agent.
2.ISAM(Like LDAP Directory server)
ISAM is a method for creating, maintaining, and manipulating indexes of key-fields extracted from random data file records to achieve fast retrieval of required file records.
IBM developed ISAM for mainframe computer
ISAM contains user details in KEY= VALUE. So we are using LDAP to access it.
Creating a user in IBM Security Access Manager
-
typing pdadmin at a command prompt
-
For login, type login on cmd propt
pdadmin> login
Enter User ID: sec_master
Enter Password:
pdadmin>
- To create user
pdadmin sec_master> user create sso cn=sso,cn=Users,secAuthority=Default sso sso
- To Create Group
group create ITIM-Group cn=ITIM-Group,o=ibm,c=us ITIM-Group
-
Defining a junction(Mount Point) that points to IBM Security Identity Manager Server
-
To create WebSEAL Junction we need to know WebSEAL Server name
-
To determine the name of the WebSEAL server defined in IBM Security Access Manager, issue the server list command.
pdadmin sec_master> server list
        amwpm-tam60-server
        ivacld-tam60-server

pdadmin sec_master>
Issue the server task create command to create the junction. The command format is:
server task webseal_server_name create options /junction_name
server task default-webseald-tam60-server create -b supply -t tcp -s -j -e utf8_uri -c iv_user -p 9080 -h ITIMServer.ondemandinc.com /isimserver
-
Create an ACL requiring authenticated access to associate with the WebSEAL junction.
Use the acl create acl_name command, where acl_name is the name of the ACL being created.
For example, for administrative console access, type the following command:
-
Associate the ACL with the attach junction_name acl_name command. The command syntax is:
acl attach prefix/webseal_junction/url_path_prefix acl_name
acl attach /WebSEAL/tam60-server-default/itimserver/itim/console ITIM-ACL